

Auto Payments in MediaOS provide a streamlined and efficient way to handle recurring billing for both invoices and payment plans. By enabling Auto Payments, you can automatically charge the credit cards on file for your accounts, eliminating the need for manual intervention with each transaction. Whether you're managing subscriptions, scheduled payments, or regular invoicing, Auto Payments make it easy to maintain seamless financial operations within the MediaOS platform.
Configuring Auto Payments #
To set up Auto Payments, begin by navigating to the Sales section located in the left-hand menu. From there, locate the specific contract you wish to set up for auto-billing and click the View button associated with it. Once the contract details are displayed, select the Edit button to make changes.
Within the contract editing interface, navigate to the Billing tab. This tab contains the auto-billing section, where you can configure the automatic payment settings for the selected contract. In this section, use the Payment Account drop-down menu to select the appropriate account to be charged.
Note: If the selected account does not currently have a payment method on file, you can add one by clicking the button to the right of the drop-down field. This will open a window where you can input new payment account details.
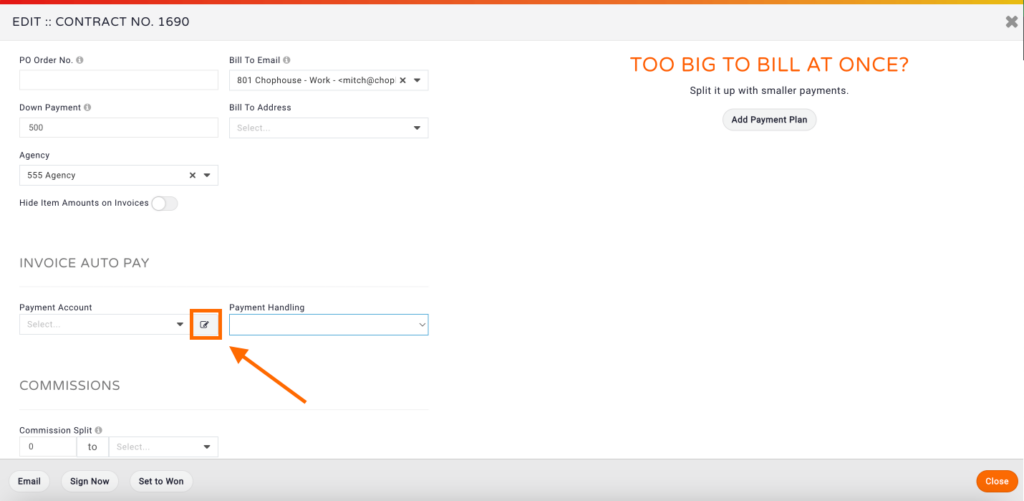
Use the Payment Handling drop-down menu to choose when to charge this account.
Charging Options #
Selecting Automatically Charge on Invoice Creation ensures that the total amount of the invoice is charged immediately upon its creation. This option is ideal for scenarios where prompt payment is required at the moment the invoice is issued.
Choosing Automatically Charge on Due Date will delay the charge until the invoice's designated due date. This provides a grace period between invoice issuance and payment, which may be useful for clients who require additional time to process payments.
Payment Plans #
It's important to understand how these options interact with payment plans. If a contract is associated with a payment plan, the system will disregard the invoice due date. Instead, charges will be processed automatically on each scheduled installment date defined by the payment plan.
Disabling Billing #
The Do Not Invoice option disables billing for the contract entirely. When selected, the contract will not be included in the Billable Line Items page, preventing invoices from being generated and excluding the contract from automatic billing processes.
Viewing Upcoming Auto Payments #
The Scheduled Auto Payments report in MediaOS provides a convenient way to view upcoming automatic payments that are set to process in the future. This report is especially useful for monitoring and managing expected cash flow and ensuring all scheduled charges are accounted for.
To access the report, begin by selecting Reports from the navigation menu. Within the Accounting section, click on Scheduled Auto Payments Report. By default, the report displays all scheduled auto payments set to occur within the next 30 days.
Tip: If you wish to view payments for a different time frame, you can adjust the parameters by clicking on the Date Range field, selecting your preferred start and end dates, and then clicking View to refresh the results.
You can also process payments ahead of schedule. To do this, simply select the checkbox next to any upcoming payment you wish to process early, then click the Charge Selected button. This allows for greater control over when payments are collected.
Scheduled Auto-Payments #
Sifting through invoices in search of overdue payments can be a time consuming process. The Scheduled Auto-Payments report feature inside MediaOS provides you with all of your upcoming payments and none of the hassle.
Managing Auto-Payments #
To view and manage upcoming auto-payments in MediaOS, begin by clicking Sales from the left-hand navigation menu. Scroll down to the Accounting section and select the Scheduled Auto-Payments report. This report provides a list of all payments scheduled to be collected over the next 30 days.
To review any payments that were not collected within a specific timeframe, use the Period filter to select the desired date range. From there, you can identify outstanding payments and take action as needed. Simply check the box next to any uncollected payment, then click Charge Selected to initiate the charge. This allows you to quickly and efficiently manage missed or pending payments directly from the report.

How to Use the Scheduled Auto-Payments Report # #
To access this report, begin by clicking Sales from the left-hand menu in MediaOS. Scroll down to the Accounting section, then select the Scheduled Auto-Payments report. This report gives you a complete list of all payments scheduled to be collected over the next 30 days, helping you stay ahead of revenue collection.
If you're looking for transactions that should have been collected earlier, use the Period selector to adjust the time frame. This allows you to identify any payments that were missed or not processed within a specific window. To take action on uncollected payments, click the checkbox next to each payment you want to charge. Once selected, click Charge Selected to process the transactions and bring those payments up to date.
Tip: Regularly reviewing this report helps reduce overdue balances and ensures a smoother cash flow process across your account base.


