Connecting your WordPress Website to Use the MediaOS Ad Server
NOTE: The MediaOS ad server will only work with a WordPress website.
- Choose Members from the left hand navigation menu.
- Click Websites from the options on the next screen.
- Click New Website in the top right corner.
- Click Download WordPress Plugin (pictured below) and install, following the steps listed on the screen.
- Once you download the plug-in, you’ll need to go to WordPress.
- Click the Plugins icon on the left toolbar.
- Click Add New on the drop down menu.
- Click Upload Plugin at the top of the page.
- On this page, you’ll be prompted to choose a .zip file. Download the file from MediaOS and upload it on this WordPress page.
- Once the file is uploaded, click the Installed Plugins icon on the left toolbar.
- Click the box next to MediaOS Services to activate the plugin.
- Next, navigate back to MediaOS.
- Click Proceed to Next Step.
- On the next screen, enter your website’s name and URL in the fields provided.
- Click the toggle WordPress Enabled to verify that your site is actually a WordPress-powered website.
- Then enter your WordPress site’s login and password credentials (Note: An admin’s login and password works best here.)
- This allows MediaOS to pull information from WordPress on your site’s pages, posts, categories, post types, etc.
- Click Connect.
- Next, click on the box labeled Assigned Products.
- From the dropdown menu, specify the products loaded into MediaOS you would like to be available on the website.
- For example: Time-based or CPM-based products. There is also a general run-of-the-site button.
- Note: Products can only be assigned to a single site. You can have multiple products, but they cannot be shared across multiple sites.
- Click Connect.
- The website section will update to show that your website is up-to-date. The up-to-date status is listed under Version.
Enabling Your Website to Support the Ad Server
You need to have your WordPress website connected before attempting to enable the ad server.
Note: The product has to support a start date and an end date at a minimum. It can be quantity based or a rotation.
- Choose Members from the left hand navigation menu.
- Click Websites from the options on the next screen.
- Click Edit on the website you want to work with.
- On the next page, under the Ad Server section, you can select which products you want to be supported on this website.
- Note: Products can only be assigned to a single site. You can have multiple products, but they cannot be shared across multiple sites.
- Under Change Ads Every X Seconds, choose how long you want the ads to show before automatically switching to another ad.
- The ad server will track impressions, clicks, and hovers for each ad.
Embedding Ads in Your WordPress Website
Once you have your website set up to support the ad server, you’ll want to check out our Embed Guide for embedding your ads into your website.
- Choose Members from the left hand navigation menu.
- Click Websites from the options on the next screen.
- Click Edit on the website you want to work with.
- At the top, click Embed Guide.
- Click Ad Unit from the left hand navigation, under Advertising.
- On the next screen, copy the HTML code at the top of the screen.
- Paste the HTML code into a HTML block anywhere inside your website that you want the ad to show up.
- NOTE: When you make changes to an ad, there is a 15 to 30 minute delay for any changes made to updated ads, assigned ads, targeting, etc.
- Any interactions with your ads will show up under your admin panel.
- The Embed Guide also has options for if you want to have Google Ads run in a spot that’s not yet been sold or if you want to drop default placeholders in that spot.
- You can also limit specific ad sizes, ad unit IDs, or product IDs.
- For example, if you want to run a homepage leaderboard ad, you can select one of these codes, drop it into the top of your WordPress site and specifically target what runs there.
Viewing Analytics on a Particular Ad
- Choose Delivery from the left hand navigation menu.
- Click the line item you want to view.
- On the right hand popup, click the drop down under Ad Server Analytics to see impressions, clicks, and CTRs by device.
- To set up custom targeting for the ad, scroll to the top of the right hand pop up and click Edit.
- On the next screen, scroll down to Match Page Type. Here, you can specify the categories, pages, authors, post types, and tags you want this ad to appear on.
- NOTE: These categories build off of each other. For example, if you only choose the Advice category, then the ad will show for all pages under that category. But if you choose the Advice category and then choose specific articles under Pages, it will only appear on those specific pages under the advice category.
- Under Reader Must Be, you can target by visitor type.
- NOTE: If you are not using our full MemberOS services, this option will not be available for you.
- The Handling option allows you to set custom pacing.
- NOTE: You can also set the Match Page Type, Reader Must Be, and Handling targeting options within the contract.
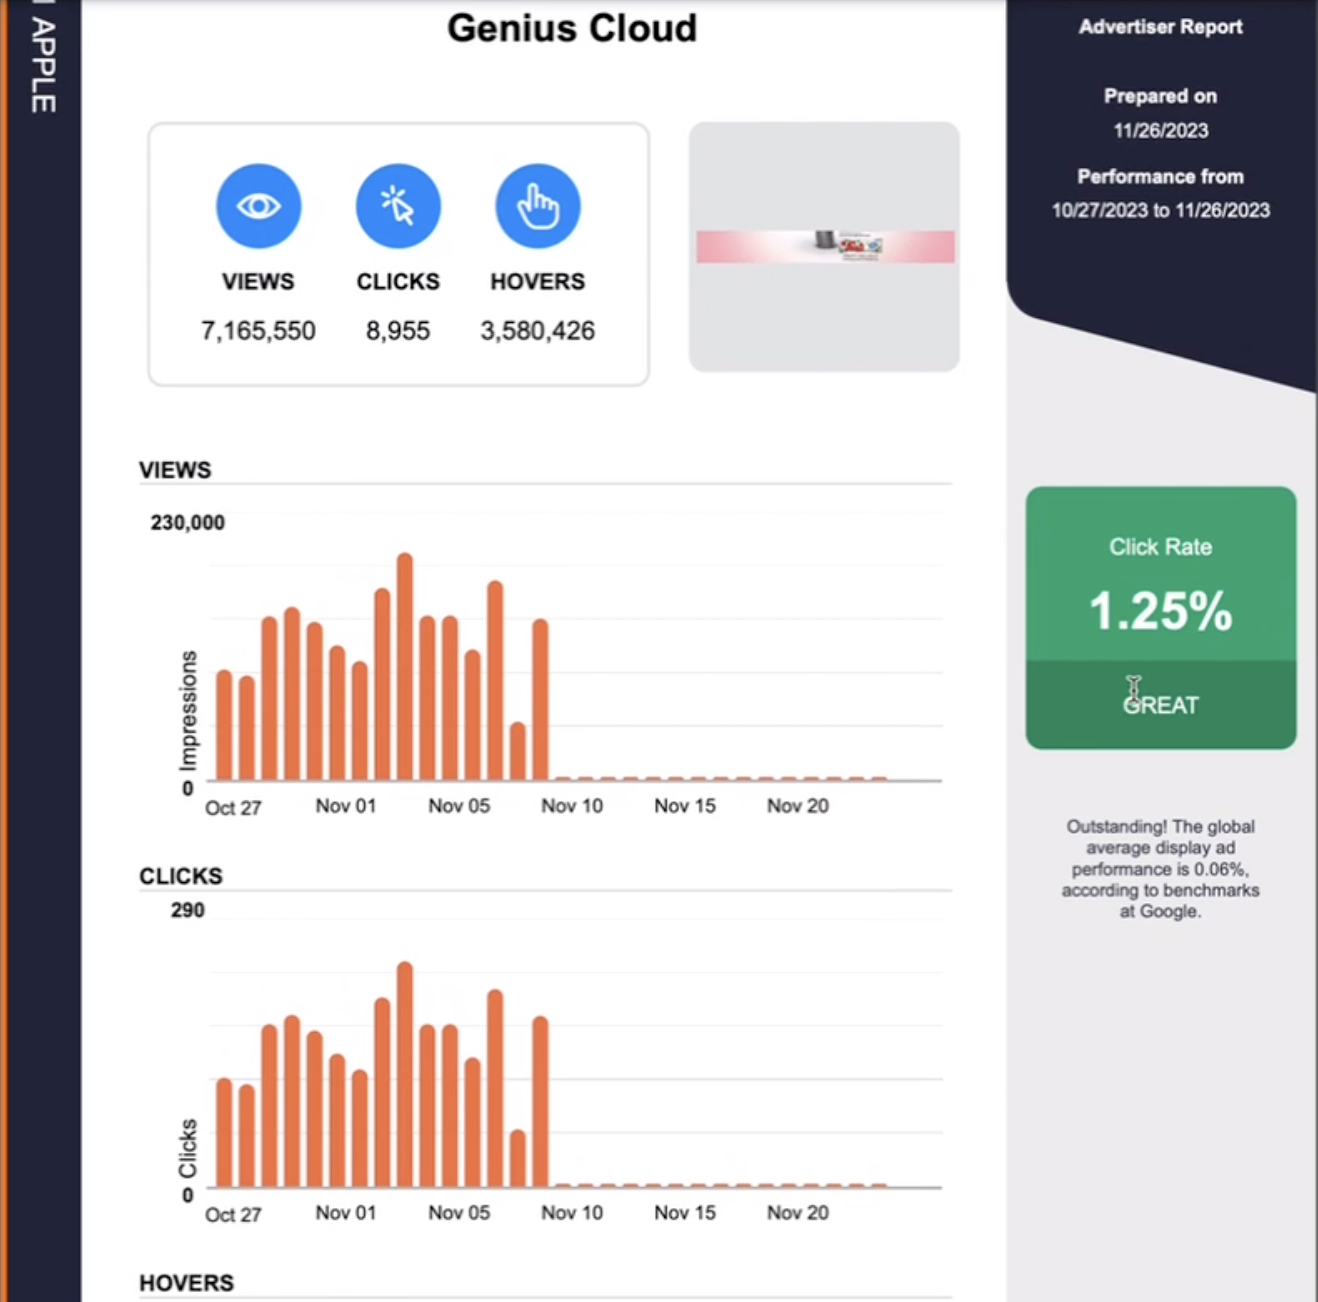
Including Ad Server Reports on Invoices
In MediaOS, you can choose to automatically include the ad server report on your invoices.
- Click on your profile picture at the bottom of the navigation menu.
- Choose System Settings.
- On the next screen, click General Settings at the top.
- On the next screen, type Ad Server into the search bar.
- Click the toggle next to Include Ad Server Report. Note: The invoice must include the specific line item you want the report generated for in order for it to show the report. (Example report shown below.)
- Note: The report on the invoice will only cover from the current date of generation to the prior 30 days. It will not cover more than the past 30 days.
- Exception: If the line item ended 10 days ago, the report that’s generated will span from 40 days ago to 10 days ago so that it’s automatically back-tracking to get that full 30 report.