Ads are a core part of campaign execution in MediaOS, giving you full control over how creatives are uploaded, organized, and assigned across line items. You can manage ad specs, set target URLs, track usage, and control the placement of each creative for both desktop and mobile delivery. For an in-depth guide on the MediaOS Ad Server, click here.
Ad Library #
The Ad Library will host all assets you upload into the system and allow you to reuse them as you see fit. You’ll have a trail of what ran, on what line item, and when. Instead of having to consistently reach out to people via email for something as simple as a pick-up ad, you’re going to be able to easily reassign the ad and reuse it directly inside the software.
Accessing and Utilizing the Ad Library #
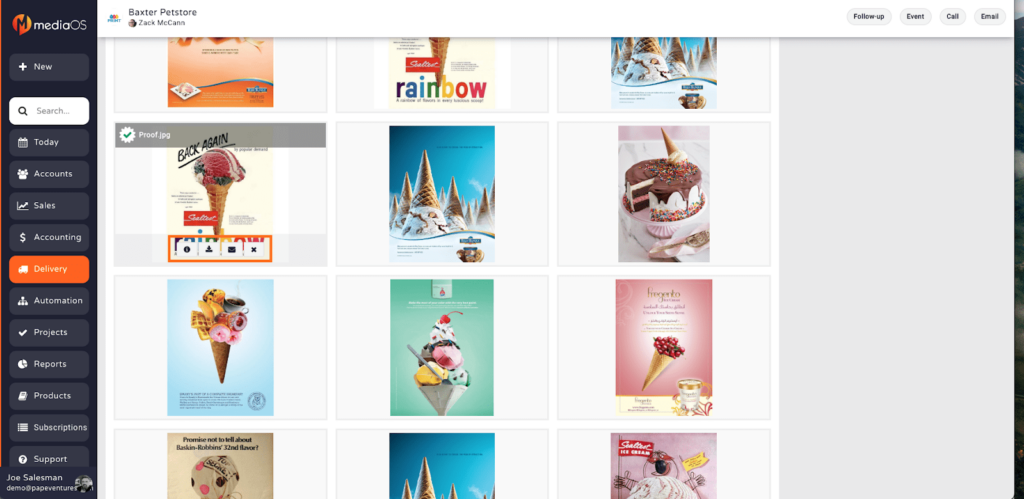
To access and manage ads in MediaOS, start by navigating to the Accounts tab in the left-hand menu. This will take you to a list of all client accounts associated with your organization. Once you select an account, you’ll be directed to that client’s main dashboard. Just below the client’s contact information, you’ll find a gray menu bar—click on the Ads tab to open the ad library for that account. This section displays all ad creatives associated with the client and includes interactive tools for managing them. When you hover over a specific ad, four action icons will appear. The X icon allows you to archive the ad, while the Mail icon lets you email the ad as an attachment. The Download icon enables you to save the ad to your computer, and the Information (i) icon provides additional details, including where and how the ad has been used across campaigns.

Uploading Ads into the System #
To upload new ad creatives in MediaOS, begin by clicking the + New button located at the top left-hand side of the Ads section. This initiates the upload process and allows you to add new files to the account’s ad library.
Next, select the file or files you wish to upload from your computer. Once selected, click the Upload button to begin transferring the files into the platform. After the upload is complete, you will be prompted to enter a Name for each ad. If the ad includes a digital link—such as a landing page or third-party tracking URL—you should include that information in the designated field.
Finally, click Save Ads to complete the process. The uploaded files will now appear in the ad library, fully saved and ready to be assigned to campaigns or line items.
Tip: You can sort and filter all file types by using the top, right-hand buttons, or search bar. Animated GIFS, audio ads, text ads, and video files are supported in MediaOS.
Assigning Creative to Ad Server #
Setting Up #
To use the Server effectively, several setup steps must be completed in advance. First, ensure that your subscription or service plan includes access to the MediaOS Ad Server. Without this feature enabled, ad serving capabilities will not be available within your account.
Next, your website must be properly connected within the Websites section of MediaOS. This connection establishes the link between your site and the platform, enabling ad delivery and tracking. For WordPress users, it is also essential to install the MediaOS Plugin on your website. This plugin facilitates seamless integration and communication between MediaOS and your WordPress environment.
Once your site is connected, navigate to the Ad Server settings for that website and assign a product. This ensures that the correct campaign structure and delivery rules are applied. For each ad unit you plan to serve, the corresponding HTML code must be placed in the desired location on your website. This code defines where the ad will appear.
Note: This step is not necessary if you are using a MediaOS-hosted site, as the system handles placement automatically.
After completing these setup steps, you can begin assigning creatives to your line items.
Assigning Products #
Once a line item has been booked as part of a won contract, go to the Delivery section and select Line Items. Find the specific line item you want to work with and click View to begin the process of assigning creatives.

Now click on the box underneath "Assigned Ad" to be taken to the Ad Library for this account.

Click on +New to upload a new Ad. After uploading your Ad you will see this screen:

When assigning creatives within MediaOS, it is important to pay close attention to the details of each ad file. Directly beneath the file name, you will see the pixel size of the image. This measurement is critical, as the MediaOS Ad Server uses it to determine whether a creative is eligible to appear in a specific ad placement. If the dimensions do not match the intended ad unit size, the ad will not be served.
In addition, any ad intended for digital delivery must include a valid Ad Target URL. This URL directs users to the appropriate landing page or destination when they click the ad. Without a target URL, the ad will not run, regardless of its visual content or placement.
Once the ad is configured correctly, click Save to store the ad in the system. You can then click on the saved ad to assign it to the appropriate line item. For optimal performance and maximum reach, it is recommended to upload both desktop and mobile versions of each ad creative. MediaOS Ad Server-enabled products support multiple creatives per line item, allowing for flexible delivery across devices.
To confirm that a creative has been successfully assigned, return to the ad library. Assigned ads will be visually marked with a green square border, providing a clear and immediate indication of their assignment status. This visual cue helps ensure proper setup before campaigns go live.

Assigning Ads to Line Items #
MediaOS makes it simple to manage and track ads across campaigns by helping you easily assign creatives to the correct line items. This ensures full visibility into which ads are running, when they’re scheduled, and across which placements.
To begin, navigate to the Delivery section from the main navigation bar. Locate the line item you wish to work with and click View next to it. Within the line item details, find the Ad Assigned column and click the white box in that section. A list of available ads will appear; simply click on the ad you want to assign. Once selected, the ad will be immediately linked to that line item. If the same creative will be used across multiple insertions, you can streamline your workflow by clicking Assign to Similar Future Items, ensuring consistent delivery across all relevant placements. If at any point you need to remove an ad from a line item, click Unassign Ad located at the top left of the page.
Alternatively, you can assign creatives through the Accounts section. Start by selecting the appropriate account from the Accounts page. From the gray menu beneath the client information, choose Line Items. Find the relevant line item and click View on the right-hand side, then click Edit to enter assignment mode. Locate the white box under the Ad column, click it, and select the ad you wish to assign. Again, use the Assign to Similar Future Items option if applicable. To unassign the creative, click Unassign Ad at the top left of the interface.
These flexible assignment methods allow for efficient management and ensure that your campaigns run smoothly with the correct creatives in place.
Tip: You can also assign ads to line items by selecting the Line Item tab in the account.