It can be difficult to keep track of everything going on with your clients. MediaOS’ Account Details allow you to easily keep track of everything you need to know about your customers.
To access an Account’s details:
- Go to the Accounts page
- Select View next to the account you’re working on
Or
- Select the Search bar in the Navigation Panel.
- Search for the name of the account you’re looking for.
- Click on the Account name.
The following information is found on the Account Details page:
Primary Account Information
- At the very top of the page you will find all of the basic information tied to the account. This includes the account name, owner, a description of the account, the accounts pipeline status, primary contact information, the accounts primary address, and the dates of the accounts last line item, signed contract, and activity
Tags
- Tags allow you to quickly classify your accounts for any reason you may need. To add a tag click on the tag field, enter the tag of your choice and hit enter. You may also remove tags from accounts by clicking on the X next to a tag.
- The button to the right of the Tags field allows you to see all tags in use and how many accounts each tag has been applied to
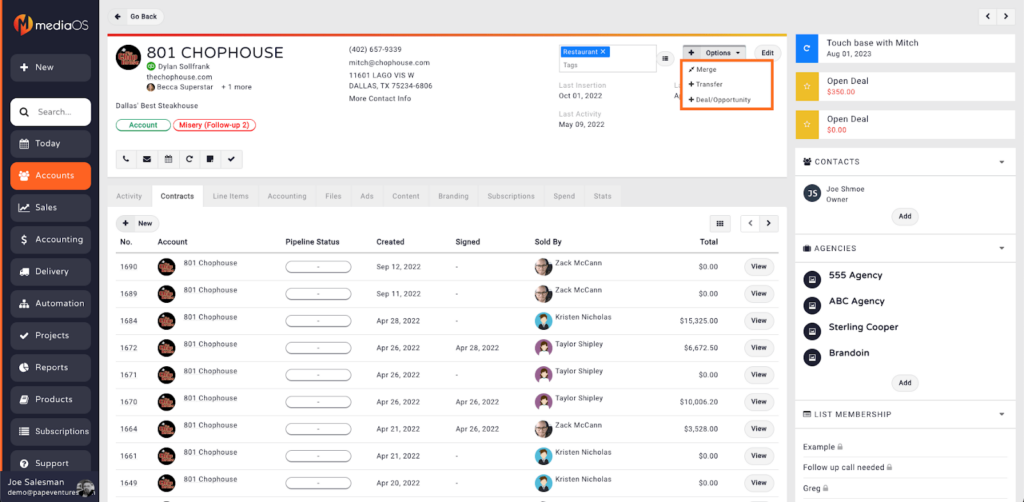
Options
- The options dropdown allows you to merge two accounts together, transfer ownership of the account to another user, and create a new deal for the account. Please see the Creating Deals/Opportunities subtitle below for more information on deals.
Edit
General
- The edit window allows you to edit the Account’s basic information, primary contact information, description, pipeline status, and parent account.
- You may activate or deactivate the account by toggle the Active button on or off. Deactivated accounts do not appear in the Accounts page results by default but are still accessible via the navigation search or through filtered searches on the Accounts page
- If you are using the integration with Quickbooks Online, you will be able to map the account to its corresponding account in Quickbooks at the bottom of this window.
Accounting
- Billing Email CC allows you to add contact emails that you would like to automatically be CC’d on invoicing campaigns
- Sales Lock allows you to turn off an accounts ability to be sold new contracts
- Credit Limit will prevent new sales for the account if the total of the contract exceeds the set credit limit on the account. The credit limit is calculated from the total balance of all unpaid invoices and the total of the new proposal
- GL Account Code allows you to set a specific GL code for the account and is only available to accounts using the integration with Quickbooks Online.
Delivery
- Email CC allows you to add contact emails that you would like to automatically be CC’d on all delivery communications
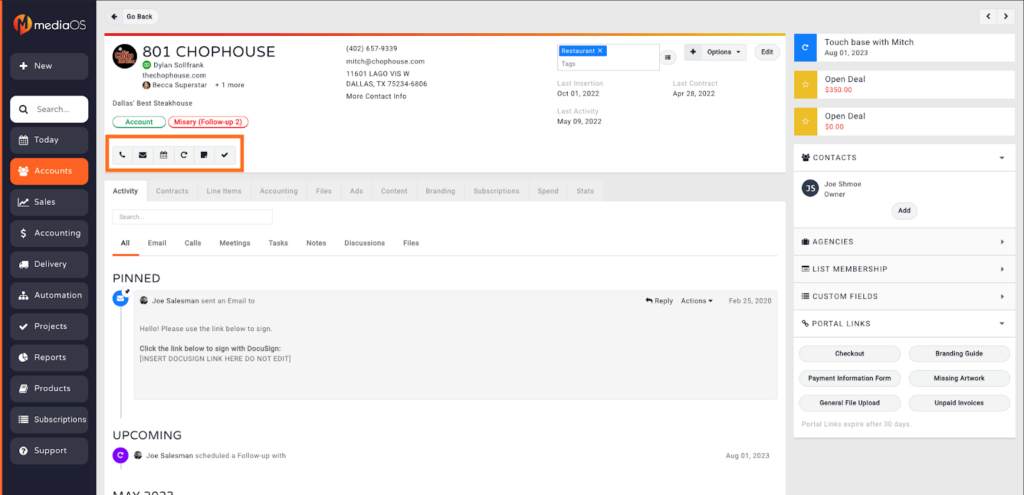
Contact Buttons
- The phone Icon allows you to log a call made to the account
- The email Icon allows you to send emails directly to contacts in the account.
- The calendar Icon allows you to schedule meetings with contacts in the account.
- The half-circle Icon allows you to schedule follow-up appointments with the account.
- The sticky note Icon allows you to log a note on the account.
- The checkmark Icon allows you to create and assign a task that needs to be completed for the account
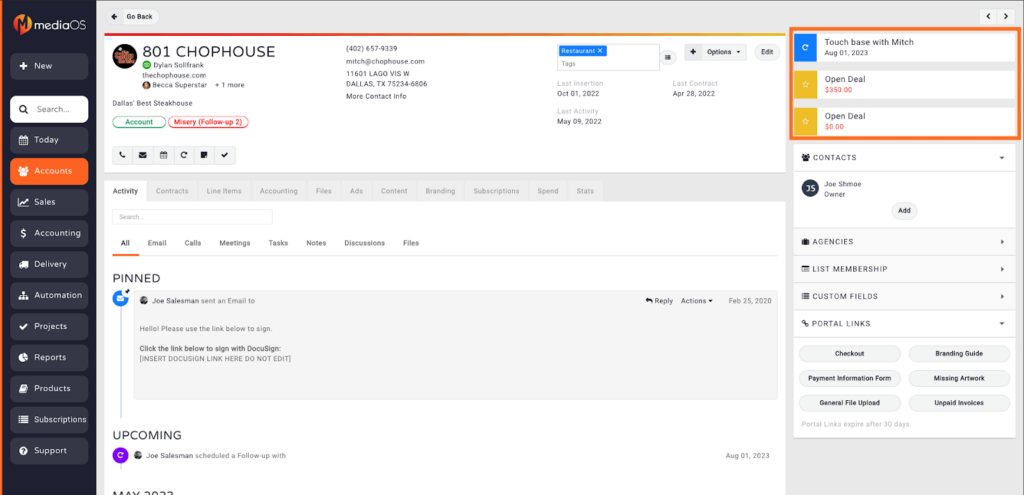
To-do Section
- The top-right hand corner of the Account Details page will display all to-do’s assigned to the account. This includes follow-ups, meetings, tasks, and open deals.
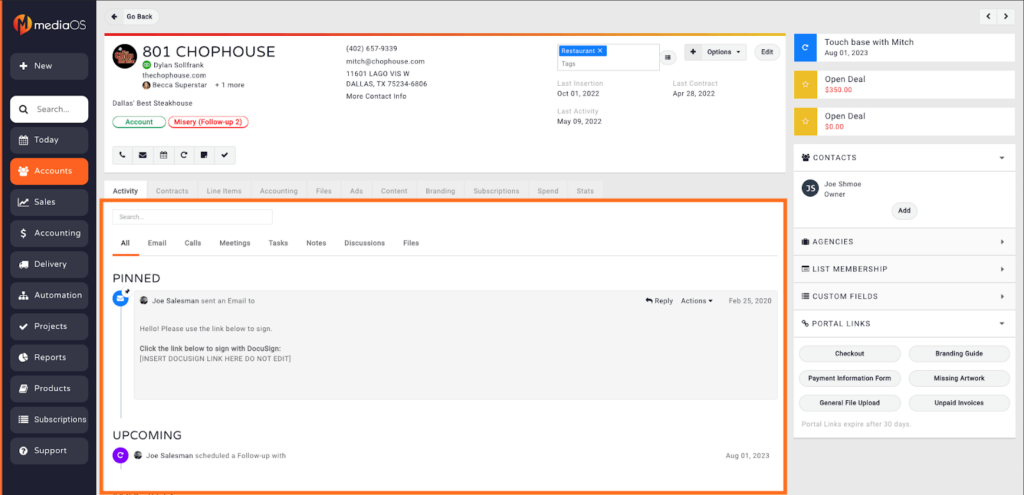
Activity Feed
- The activity feed shows all activity related to the account including calls, emails, notes, contracts signed, invoices, payments, etc.
- The activity feed shows activity within the past 365 days by default, however, you can extend this timeframe by clicking the search bar directly above the activity feed and adjusting the date ranges in the search criteria.
- The search bar allows you to filter for activity by users
- You can pin an activity to the top of the feed by overing over the item, and selecting Actions < Pin.
- Filter for specific types of activity by selecting any of the tabs below the search bar. You may filter for emails, calls, meetings, tasks, notes, discussion, and files
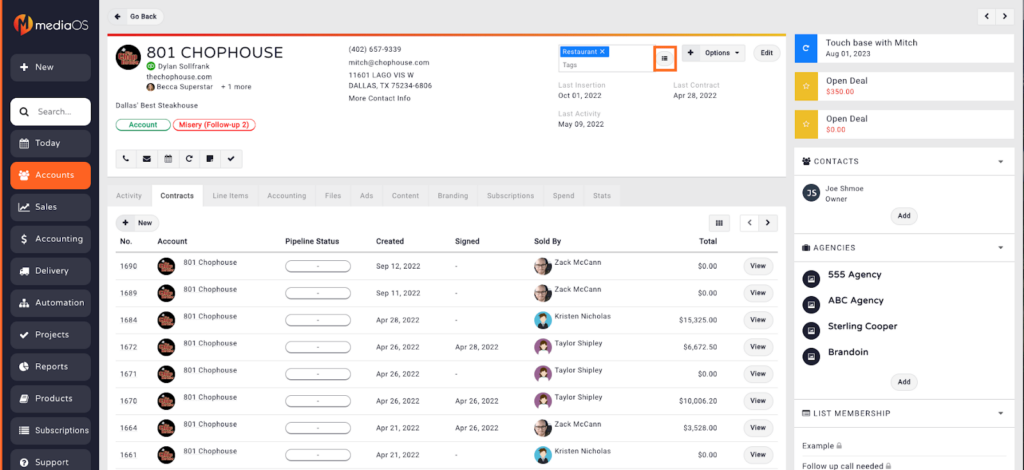
Contracts
- The contracts tab shows all open proposals and contracts created for the account.
- You can sort the data in this table by clicking on any of the column headers.
- You can customize the data shown on the table by selecting the Table button. You may include up to 10 columns at a time.

List Items
- The Line Items tab shows all line items that have been booked for the account.
- You can sort the data in this table by clicking on any of the column headers.
- You can customize the data shown on the table by selecting the Table button. You may include up to 10 columns at a time.
Accounting
- The Accounting tab shows all open invoices and payments created for the account.
- The Show Balance button displays the current outstanding balance for the account.
- The Manage Payment Accounts button allows you to add, edit, or remove payment information for the account. You can also select a default payment method for the account.
- The +New button allows you to create new payments, invoices, credit memos, statements, or alternative payment statements for the account.
- You can sort the data in this table by clicking on any of the column headers.
- You can customize the data shown on the table by selecting the Table button. You may include up to 10 columns at a time.
Files
- The Files tab allows you to upload files to your account. This is best used for general files pertaining to the account.
Ads
- The Ads tabs shows all ad artwork that has been assigned to the account’s line items.
- Select the +New button to upload new artwork.
- Clicking on an existing ad will show all line items the ad has been assigned to. You can edit, download, email, or delete ad files.
Content
- The Content tab shows all editorial content tickets assigned to the account.
- You may click on the title of any content ticket to view more details and edit or delete the ticket.
Branding
- The Branding tab displays the accounts branding guide. From primary colors to branding and strategy goals, the branding guide will provide you with all of the information you need when pitching creative to the account.
Subscriptions
- The Subscriptions tab provides the ability to keep track of complimentary subscriptions given to the account. You may create and edit subscriptions, however you cannot delete subscriptions. Should you no longer wish to provide comp subscriptions to the account, we recommend editing the subscription and setting the Issue Left amount to 0.
Spend
- The Spend tab provides a number of reporting options related to sales figures for the account.
Stats
- The Stats tab provides reporting options related to the performance of ads, whether it be impressions, clicks, calls, etc.
Contacts
- Found on the right-hand side of the Account Details page, this area will display all contacts associated with the account.
- Select the Add button to create a new contact
- Click on a contact’s name to see more details, edit, archive, or add the contact to a list
Agencies
- Agencies display all agencies that represent the account.
- Select the Add button to add an agency to the account.
- Click on an agency’s name, select the Represented Advertisers tab, and click the remove button to remove an agency from an account.
List Membership
- List Membership displays all lists the account belongs to.
- To remove an account from a list, hover your mouse over the list name and click the ‘X’ that appears to the right of the list’s name.
- Click the Add button to add the account to a list
Custom fields
- If you are using custom fields you will be able to see all account related custom fields and edit the fields assigned to the account.
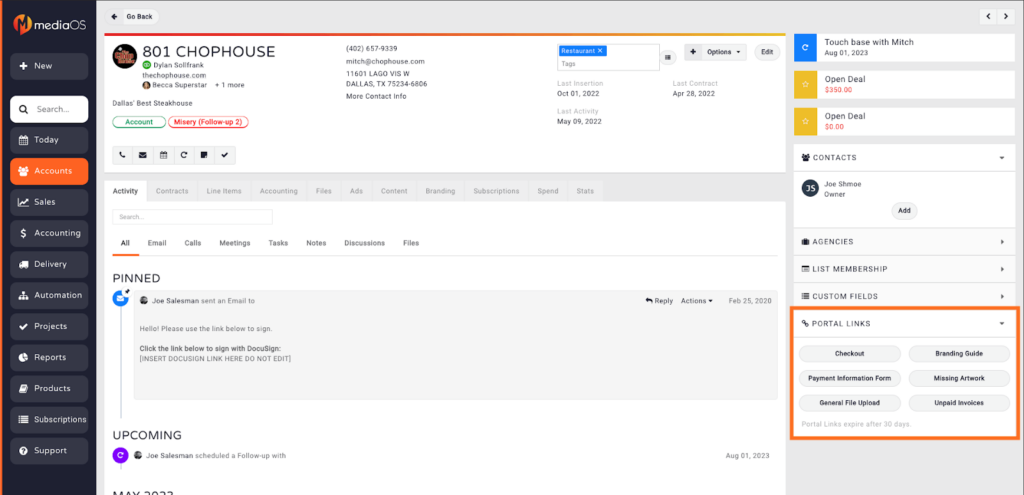
Portal Links
Portal links allow you to send your clients secure links to provide you with valuable information, purchase advertising, or pay their invoices. Simply click on any of the portal links and the secure link will automatically be copied to your clipboard. Each portal link is valid for 30 days, at which point it will cease to work.
- Checkout: Allows your clients to purchase advertising online, bypassing sales reps. Your administrator(s) will need to enable products for online checkout in order to use this feature.
- Branding Guide: Need to learn about your client’s branding specifications and goals? Send the branding guide and have your client provide you with all the branding information you need.
- Payment Information: Allows clients to provide and save their payment information for future payments. Note: MediaOS does not keep records of your clients payment information. All payment is saved in the payment processor you have integrated with.
- Missing Artwork: Running up on a deadline and need creative assets from your client? The Missing Artwork link allows clients to see any upcoming ads, within a specified window, they have purchased and provide finished artwork or working files to complete their ad.
- General File Upload: Allows your client to provide useful files that are not considered ads, whether that be logos, frequently used design elements, or any other noteworthy document.
- Unpaid Invoices: Time to get paid! The unpaid invoices link allows your clients to see all of their outstanding invoices and pay them online.