

Agencies are used to represent existing accounts in MediaOS. By creating an Agency in MediaOS, you are able to assign the Agency to Accounts as Represented Advertiser. This helps clarify relationships between advertisers and the agencies acting on their behalf, allowing for cleaner reporting and easier campaign tracking across accounts.
Using Agencies in MediaOS #
When an Agency is assigned to an account, the Agency will appear on the right hand rail of the Account Details page, as well as be selectable when creating Proposals and Contracts in MediaOS. When an Agency is assigned to a specific contract in MediaOS, all of the agency's contacts are available in a drop-down menu to be assigned as the Sold-To, Delivery and Billing contact on the corresponding contract.
Accessing Agencies #
To view the details of an agency in MediaOS, begin by selecting Accounts from the left-hand navigation menu. Once on the Accounts page, click the Agencies tab located at the top of the screen to access your list of configured agencies. From there, locate the agency you wish to review and click View next to its name. This will open the details panel, where you can see and manage information related to that specific agency.
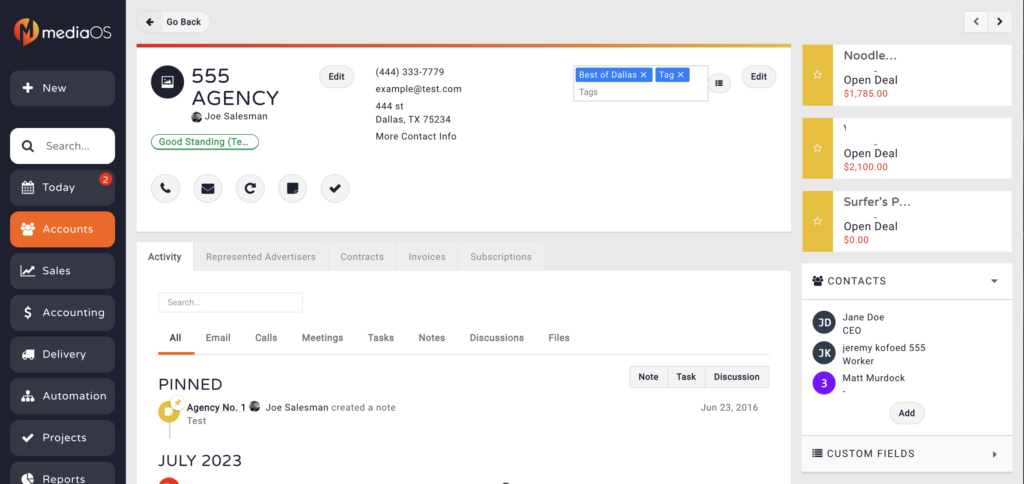
As you can see, the Agency Details Window is similar to the Accounts Window.
Navigating the Details Panel #
Within the agency details panel in MediaOS, the top pane allows you to view key information such as contact details, logged activity, and any tags associated with the agency. To make changes to the agency’s profile, click the Edit button. From there, you can update the agency name, contact information, active status, and set a default discount. The Default Discount field is especially useful—it will automatically apply the specified discount at the contract level for any proposals linked to that agency.
On the right-hand side of the screen, you’ll find any associated action items, contacts, and custom fields. Contacts can be added to an agency using the same process as adding contacts to regular accounts. For step-by-step instructions, refer to the knowledge base article on adding contacts to an agency.
The bottom pane provides access to the agency’s Activity Feed, Represented Advertisers, Contracts, Invoices, and Subscriptions (if your organization uses Subscription Genius). The Activity tab is particularly valuable for tracking all logged interactions, including notes, emails, calls, follow-ups, and other actions associated with the agency.
Adding a Represented Advertiser #
The Represented Advertisers tab displays a list of all accounts that are currently tied to the selected agency. To add a new represented advertiser, simply fill out the Accounts field and click the Add button. This links the account to the agency and establishes a formal relationship between them within MediaOS.
The Contracts tab provides a comprehensive view of all contracts in which the agency is involved, specifically those tied to their represented advertisers. This allows for easy tracking of ongoing and past business managed by the agency. Additionally, the Invoices tab displays all unpaid invoices associated with contracts where an agency contact is listed as the Bill To Contact, giving users a centralized location to manage outstanding financial obligations.
Contracts #
In order for a Contract to appear in the Contracts tab, one of the Agency's contacts must be assigned as one of or all of the following contacts on an Account's Contract: Sold To, Delivery or Bill To. Provided this has been selected, the contract will appear for viewing in both the Account's and Agency's Contracts tab.
Adding Agencies to Contracts #
To assign an agency to a contract in MediaOS, begin by creating or editing a contract following the standard process. Once you are within the contract editor, click on the Billing tab to access the available billing options. From there, use the Agency drop-down menu to designate the appropriate agency for the contract. Once selected, you will be able to populate the Sold To Email, Address, and Billing fields with the agency’s details, ensuring that all billing information is accurate and properly attributed.

Invoices #
Similar to Contracts, in order for an invoice to appear on the Invoices tab, an agency contact must be selected as the Bill To contact on an Account's Contract.
Note: Invoices will still be listed under the Represented Advertiser's name in the Accounting tab of MediaOS, but when being emailed, will be sent to the Agency Contact's email.
Attaching Agencies to Invoices #
In MediaOS, attaching agencies to invoices is a pretty straightforward process that makes sure billing responsibilities are properly tracked and attributed. First, either create a new contract or edit an existing one for an advertiser account that is already linked to a represented agency. Within the contract editor, navigate to the Billing tab to access the relevant billing fields. From there, use the Agency drop-down menu to assign the appropriate agency to the contract.
Once the agency is selected, it is essential to designate a Bill To Contact from within that agency. Again, this step is critical—only invoices where an agency contact is listed as the Bill To Contact will appear on the agency’s Invoices tab. Without this designation, the invoice will remain associated solely with the advertiser account and not the agency.
After completing the billing configuration, save the contract. MediaOS will automatically link any invoices generated from this contract to the assigned agency contact. You can verify this by navigating to the Agencies section under Accounts, selecting the agency, and reviewing the Invoices tab to confirm that the associated invoices appear as expected. This process provides clarity in financial tracking and accurate reporting across all agency-managed accounts.

