

The Proofing workflow in MediaOS gives your team a powerful, trackable system for managing creative reviews from start to finish. Whether you’re routing ads for internal feedback or client approval, every file, comment, and decision is captured in one place—making it easier to finalize high-quality ads, faster.
Uploading a Proof #
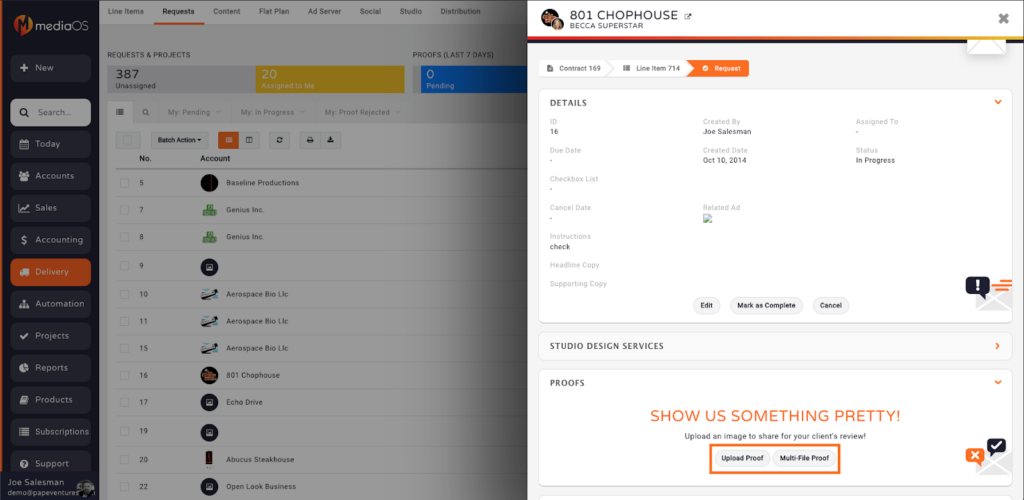
To upload a proof, start by selecting the Delivery tab from the main navigation menu. From there, click the Ad Requests tab at the top of the screen. Locate the ad request associated with the proof and click View next to it.
In the Ad Request panel, click either Upload Proof or Multi-File Proof, depending on your needs. Multi-File Proof is ideal for digital campaigns that require multiple ad sizes to be reviewed together. Once prompted, select the file you want to upload from your device and press Open. You’ll then be able to add a custom description in the Description field to provide context or specific instructions for reviewers.
After entering your description, click the Add Proof button (highlighted in orange) to complete the upload. A thumbnail preview of the proof will appear in the Proofs section of the ad request. You can now view, edit, download, email, or delete the proof from this section as needed.
Commenting and Reviewing #
To leave feedback or annotate the proof, click View on the thumbnail to open the proof in full screen. From here, click Add Comment to leave a note on specific areas of the design. Outside of view mode, any existing comments can still be reviewed beneath the proof thumbnail.
Clients who access the proof through the Customer Portal will see a Review Proof button. This opens the proof for them to review all submitted versions, read comments, and either approve or decline the design. If the proof is rejected, you can either update the current version or upload a revised version to continue the approval process.
Note: Premium MediaOS subscribers have access to additional proofing tools, including multiple version uploads and the ability to upload GIF files for frame-by-frame edits.
Finalizing the Ad #
Once the proof is approved, MediaOS will automatically assign the approved artwork to the corresponding line item, and the Ad Request will be marked as complete. From there, the asset is ready for production, fulfillment, or delivery based on your campaign timeline.
Let me know if you'd like to link this article to related topics like Creating Ad Requests, Proof Review Best Practices, or embed a short video walkthrough to guide users through the full upload and approval process.
Viewing All Open Ad Requests and Ad Proofs #
To access the dashboard, begin by clicking on the Delivery tab from the left-hand navigation menu. At the top of the screen, select Requests. This will take you to your master list of ad requests and proofs. For each request, you’ll see the current request status, proof status, and pipeline status, making it easy to understand where each ad is in the production process at a glance.
To further customize your view, click the magnifying glass icon labeled Proofs & Projects. This opens the filtering panel, where you can tailor the results based on specific needs. You might filter by Ad Request Status, Proof Status, Assigned Team Member, or even date created—whichever combination provides the clearest view of your workload.
Once you’ve set your desired filters, click the Filter button to apply them. Your dashboard will instantly update to reflect only the requests and proofs that match your criteria.
Tip: Save your filtered views as tabs so you can quickly return to a personalized workspace for tracking high-priority requests or team assignment.

