Creating and editing workflows in MediaOS allows your team to automate repetitive tasks and improve operational efficiency. Whether you're sending follow-up emails after a contract is marked as won or assigning internal tasks based on key milestones, workflows help streamline your processes.
Video Guide: Creating a Workflow #
Step-By-Step Guide: Creating a Workflow #
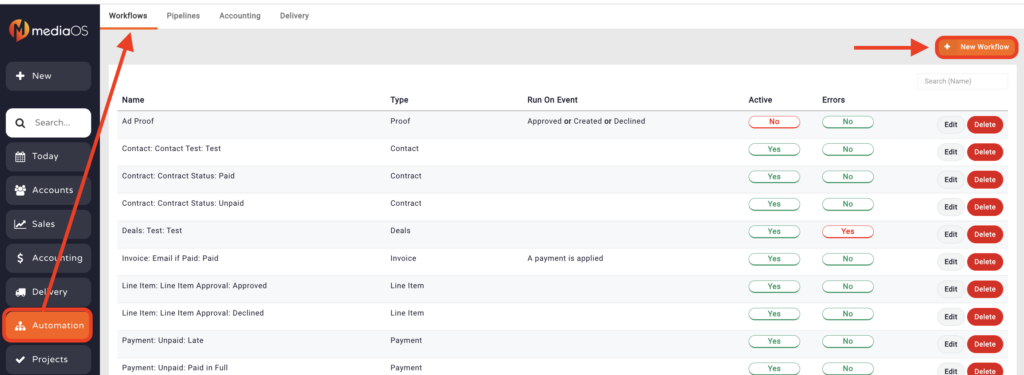
To get started, navigate to Automations in the left-hand menu. Once inside, click the Workflows tab at the top of your screen. This will take you to the main workflow dashboard where you can manage or create automations.
Click + New Workflow in the upper-right corner to begin building a new sequence. This will open the workflow setup screen, where you’ll define the trigger event—the condition that causes the workflow to start. Use the dropdown menu to select both the module (such as Contract or Task) and the event (such as Set to Won or Created).
After you’ve chosen the correct trigger, click Save to lock it in. This confirms the starting point for your workflow and allows you to begin adding follow-up steps.

Example: Sending an Email When a Contract Is Set to “Won” #
Imagine you want to automatically send a thank-you email to a client every time their contract is marked as won. From the + New Workflow screen, choose Contract as the workflow event type. A second dropdown menu will appear. In this menu, select Set to Won as the specific condition that should start the workflow. Then, click Save to move to the next step.
Now that your trigger is in place, define what happens next. Click the + sign located beneath the workflow trigger to add your first action. A panel titled Add a Step will appear on the right side of the screen. From this list of available actions, select Customer Email.
Once added, click on the Customer Email step to open its configuration. In the Description field, enter a label like Contract Won Email so you can easily identify the purpose of this step later. For the Send to Email field, choose Contact Sold To—this ensures the email is sent to the main contact associated with the contract.
In the Template field, select an existing email template from your library or create a new one. This message will be sent to the client each time the workflow is triggered. [If you're not sure how to build a template, check out the Email Templates article for more guidance.]
Once all fields are complete, click Save to confirm your action. To activate the workflow and make it live, click Activate in the top-right corner of the screen.
From this point on, every time a contract is marked as Won, MediaOS will automatically send your configured message—giving your client a seamless experience and saving your team valuable time.
Editing Your Workflow Settings #
Once a workflow is created, it can be refined or adjusted through the Settings tab inside the workflow editor. To access this area, return to the Workflows tab under Automations, locate the workflow you want to edit, and click Edit on the far right.
Inside the editor, click the Settings tab to reveal a set of options that allow you to configure how the workflow behaves. At the top of this panel, you’ll see a Name field. This lets you rename the workflow to better reflect its purpose, which becomes especially useful as your list of automations grows. Descriptive names like Membership Renewal Reminder or New Contract Welcome Sequence help keep things organized and easy to scan.
Directly below the name field is the Workflow Active toggle. Turning this on will allow the workflow to run automatically when its trigger conditions are met. If you need to pause the workflow—for example, while testing or editing logic—you can switch the toggle off. This pauses the automation without deleting your setup.
The Show in Activity Feeds toggle determines whether the workflow’s activity appears on an account’s timeline. When enabled, MediaOS will display real-time workflow updates in the account's history, showing the team which step is currently being executed. This improves transparency and makes troubleshooting much easier.
Note: Displaying workflow runs in activity feeds can be especially helpful for long or multi-step workflows where team visibility is essential.
In some cases, you may want to run a workflow manually instead of relying on an automated trigger. When this applies, the Who Can Manually Run This Workflow section allows you to specify which teams or roles have permission to initiate the workflow. You can grant access to groups like Accounting, Production, Sales, or Sales Managers, depending on the use case. Once enabled, authorized users can run the workflow directly by selecting Batch Action > Run Workflow from within MediaOS.
Tip: Manual workflows are ideal for tasks like reviewing data accuracy, identifying duplicates, or performing structured batch updates that need to be triggered at specific times


