

Planning your next issue just got easier! The MediaOS Flat Plan gives you a visual layout of every page in your publication—making it simple to organize ads, editorial content, and page order all in one place. Whether you're building from scratch or copying a previous layout, the Flat Plan helps you stay on track and in control. In addition to greater clarity for your internal team, your MediaOS Flat Plan can also automate tear sheets for invoices!
Accessing the Flat Plan Tool #
To begin building your layout, you'll need to open the Flat Plan tool from your dashboard. Start by navigating to Delivery from the main menu, then click on the Flat Plan tab at the top of the screen. Next, select the Product you want to work on, and use the dropdown menu to choose the specific issue you’re planning.
Building or Copying a Flat Plan #
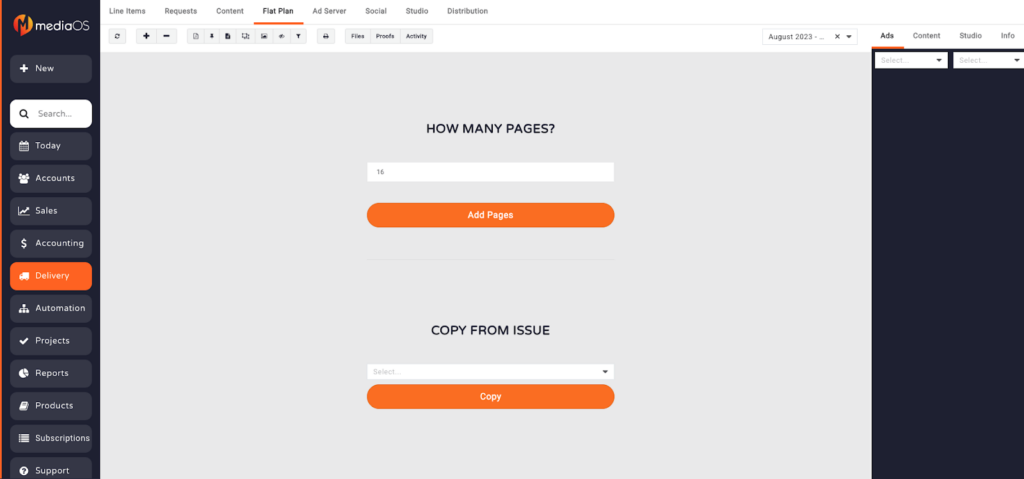
Depending on your workflow, you can either start with a blank layout or use a layout from a past issue. If you're building a flat plan for the first time, enter the total number of pages you’d like to create. If you’ve built flat plans before, you can copy a previous issue’s layout to speed up the process. Once your layout is in place, you're ready to begin placing ads and content throughout the issue.
When copying a Flat Plan - Repeated Editorial, Repeated Ads, Sections and Placeholders are carried over to the new Flat Plan & placed automatically
Functional Areas of the Flat Plan #
The Flat Plan interface is broken into three distinct sections to help you manage your layout efficiently.
Top Navigation #
The Top Navigation area includes tools for managing views, switching between issues, and exporting files. Use the + and – buttons to zoom in or out of the flat plan, and click View Options to adjust layout settings. To preview your layout, click the PDF button. You can also use the Pin icon to show or hide unassigned placeholders.
To customize your view, toggle between different display options such as Hide/Show Content, Hide/Show Line Items, Hide/Show Ad Images, or Make Line Items Transparent. When you're ready to generate a printer-ready PDF, click the Printer icon.
If you need to rearrange pages, hold Shift and click to select multiple pages, then click the Swap icon. To upload supporting files, use the Files button. Issue Files apply to a specific issue, while Publication Files are shared across all issues. Finally, use the Product and Issue Selector to jump between different flat plans.

Ads, Content, and Info Panel #
Located on the right-hand side, this panel gives you access to all ads, editorial content, and issue settings.
Ads Tab #
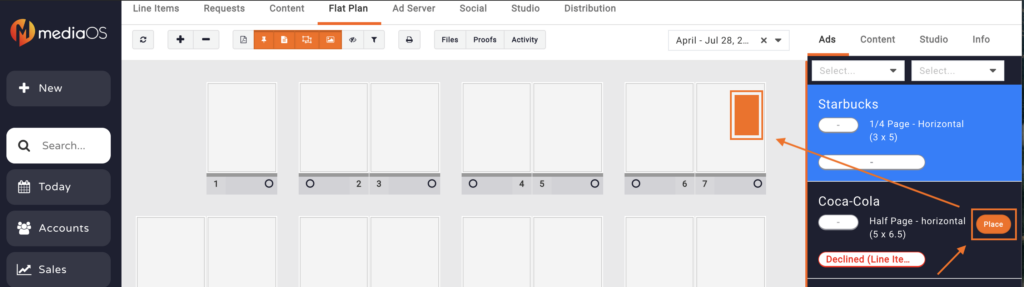
You can view all booked line items for the issue in one place. Use the available filters to narrow the list by Section or Unit/Size. Each ad displays its Account Name, Ad Size, and Pipeline Status for quick reference. Hover over any ad to open the Account Details Quickview, or click the ad itself to open the Ad Library and assign creative. To update the ad’s progress, click the Pipeline Status button. When you're ready to place the ad onto the flat plan, click the Place button.
Content Tab #
You can view all booked content for the issue in one place. To add a new editorial item, click + New Content. Each content block displays its Name, Word Count, and Page Count for easy reference. Use the Pipeline button to assign or update the content’s status as it moves through production.
Info Tab #
The Info tab lets you adjust the Page Number Offset if your cover isn’t counted as Page 1—for example, entering -1 will make Page 2 display as Page 1. This tab also provides a quick summary of your issue, including totals for ads, content, pages, placeholders, and more.
Using the Flat Plan Workspace #
The Flat Plan Workspace is where you visually design your publication by placing and organizing assets on each page. Click on any page to open its details panel, where you can update the Status Bar to reflect progress, rename the Page Number Name, and assign the page to a teammate using the Assigned To dropdown. You can also categorize the page using the Section dropdown, indicate special inserts with the Has Insert or Blow-in checkboxes, and add Page Notes for internal reference.

Assigned Assets Tab #
The Assigned Assets tab shows all assets—ads or content—that are currently assigned to the selected page. You can click the image to open the Ad Library, or click the content name to view its details. If you need to remove an item, click Unassign to send it back to the panel for re-placement.
Page Files Tab #
The Page Files tab allows you to upload or review files that are specific to the selected page. At the bottom of the page details panel, you'll find several action buttons. Click Close to exit the page view, Upload Finished Design to add your print-ready file, or Clear Finished Design to remove an uploaded file. You can also use Cut to move the page elsewhere in the layout, or select Delete Page to remove the page and all of its assigned assets.
Placing Ads and Content #
Once your layout is built, you can start placing assets.
Placing an Ad #
To place an ad, click the Place button from the right-hand Ads tab. Your cursor will change to reflect the selected ad’s dimensions. Then, click on a page to place the ad. You can also drag and reposition it to a different location or page as needed.
Placing Content #
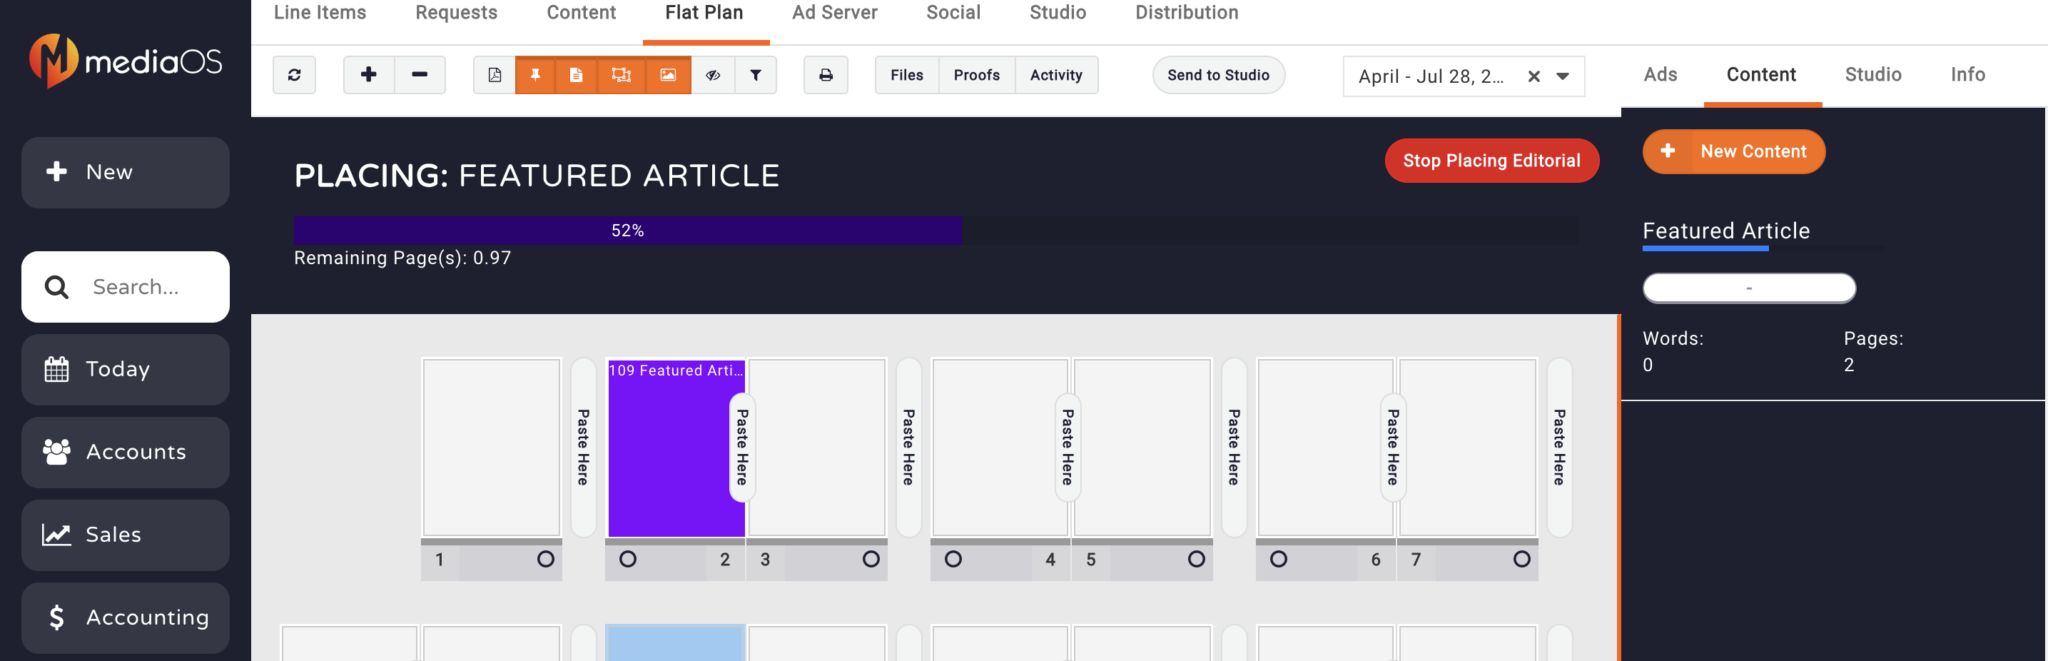
Placing content works much like placing ads, but it allows for multi-page layouts. Start by clicking on the Content tab, then select the Place button. Draw boxes across one or more pages to allocate space for the content. As you place it, a progress bar will indicate how much of the content has been assigned. If you need to pause, click Stop Placing Editorial—you can resume at any time without losing your progress.
Placing Placeholders #
By clicking and dragging on any Flat Plan page you can place a placeholder in any corresponding Ad Unit Size defined in the Product's Setup. These placeholders can be assigned with customizable text in order to make notes or additional context.
Advanced Navigation and Shortcuts #
The Advanced Navigation and Shortcuts features offer helpful tools to speed up your layout process. Use Shift + Click to multi-select and rearrange multiple pages at once. To add new pages, hover near the beginning or end of a page until the Add Pages button appears. You can also click and draw directly on a page to create custom placeholders for ads or content.
FAQ: I Placed an Ad but Can’t Find It #
It’s possible that your ad is still placed but hidden behind another ad on the same page. Here’s how to locate it.
Tip: Ads can be layered on top of one another, making it appear like one has disappeared.
To find and manage an ad, start by going to Delivery and clicking View next to the line item you're looking for. You can filter results by Product, Issue, or Account Name to narrow your search. In the line item details, scroll to the Delivery section to see which page the ad is placed on. After noting the page number, exit the line item panel and open the Flat Plan. Select the correct Product and Issue, then navigate to the page listed in the delivery details. Click the grey bar at the bottom of the page to view any stacked ads. From there, click the name of the line item to open its details, then click Remove from Page to unplace it. The ad will return to the Ads panel on the left, ready to be placed again.

