

Notifications help users stay on top of key activities happening across the system. Whether it's a rejected ad proof, a signed contract, an export completion, or any other important event, notifications ensure that nothing slips through the cracks.
Accessing Your Notifications #
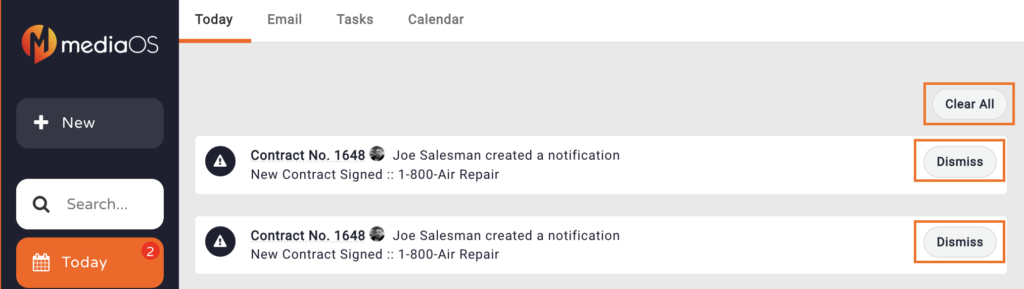
To view your notifications, navigate to the Today tab on the left-hand side of the navigation panel. When you open the Today tab, your notifications will appear by default at the top of the screen. Each notification gives you a snapshot of the activity or action that has occurred, helping you prioritize what needs attention.
If you want to remove individual notifications after reviewing them, simply click the Dismiss button located to the right of each notification. This clears them one at a time from your view. If you prefer to clear all notifications at once, click Clear All in the top-right corner of the notification panel. This instantly resets your notification feed, giving you a clean slate to work from.
Tip: Notifications are dynamic, so new alerts will continue to populate in real time throughout your day—making it easy to stay updated without disrupting your workflow.
Making Sure Notifications Reach Your Inbox #
Timely system notifications are essential to keeping your team informed and your workflows running smoothly. To avoid missing critical updates—like contract approvals, invoice alerts, or ad rejections—it’s important to whitelist MediaOS emails so they land directly in your inbox. With just a few quick steps, you can protect your team from missed communication and keep your business operations on track.
Whitelist MediaOS Email Addresses #
To prevent missing key communications, start by whitelisting the following addresses in your email system: no-reply@mediaos.com and any emails coming from the @mediaos.com domain. This wildcard setting ensures that all automated system emails from MediaOS will be delivered correctly to your inbox.
If you suspect you may have accidentally blocked MediaOS emails in the past, you can use the Check if emails are blocked link provided in your account settings. Simply enter your email address into the box, click Check, and any MediaOS addresses that have been mistakenly blocked will automatically be removed from your blocked list.
Tip: Running a quick block check every few months can help prevent delivery issues as new features or notifications are added to the platform.
Whitelisting Emails by Provider #
Depending on which email service you use, you’ll need to follow slightly different steps to whitelist MediaOS communications.
If you are using Gmail, log in to your account and click the gear icon in the top-right corner. Select See all settings, then open the Filters and Blocked Addresses tab. Click Create a new filter, and in the From field, enter both no-reply@mediaos.com and @mediaos.com. Afterward, click Create filter, check Never send it to Spam, and click Create filter again to finalize.
For users on Microsoft Outlook, log into your account and click the Settings gear icon. From the menu, choose Mail, then select Junk email. In the Junk email settings, add no-reply@mediaos.com and @mediaos.com to the safe senders list, then click Save to apply your changes.
If you are working with Yahoo! Mail, open your settings by clicking Settings in the right-hand corner of your inbox. Select More Settings, choose Filters from the left-hand menu, and click Add New Filters. Enter the MediaOS email addresses and save the new filter to ensure proper delivery going forward.
For Apple Mail users, open the Mail app and navigate to the Mailboxes view. Tap the Junk folder and locate any MediaOS emails. Swipe left on a message, tap the gray More button (three dots), and select Move to Inbox. This action helps Apple Mail recognize future MediaOS communications as safe and trustworthy.

