

MediaOS supports seamless integration with Google ReCAPTCHA and Google Maps API to enhance your website’s security and interactivity. ReCAPTCHA protects forms and portals from spam and bots, while Maps API powers dynamic, location-based features across your site. Together, these tools help safeguard user data, improve the customer experience, and bring interactive elements like directories, contact maps, and geolocation services to life—making your site more secure, engaging, and intelligent.
Google ReCAPTCHA: Protect Your Site from Bots #
Google ReCAPTCHA is a security feature that helps prevent spam and abuse on your website. It works by presenting small challenges that are easy for humans to solve but difficult for automated bots.
This helps maintain the integrity of your forms, comments, and user interactions — especially important for MediaOS-powered sites with member portals, signups, or donation forms.
How to Set Up Google ReCAPTCHA for Your MediaOS Site #
To set up Google ReCAPTCHA for your MediaOS site, start by going to the Google ReCAPTCHA Admin console. In the Label field, enter a name like “Universal ReCAPTCHA” to help you identify it later. For the ReCAPTCHA Type, select Challenge and choose the “I am not a robot” checkbox option. Under Domains, enter your website’s domain—additional domains can be added later if needed.
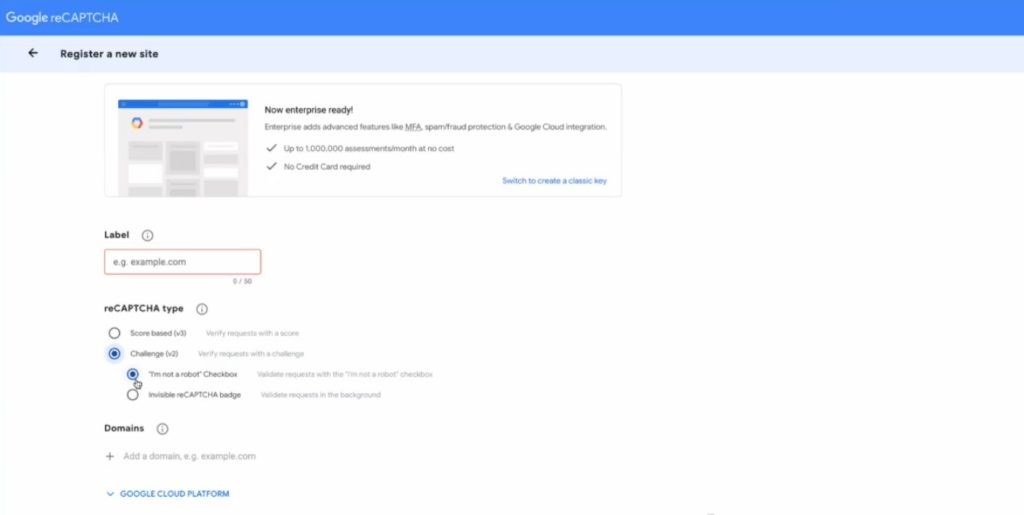
Click Submit, then send the Site Key and Secret Key to your MediaOS Account Representative.
Tip: Keep these keys safe. You’ll only need to generate them once unless you change domains or want to add additional protections.
Google Maps API: Power Your Site with Interactive Maps #
Google Maps API gives your website powerful location capabilities. Whether you're embedding a map on your contact page or powering a business directory with live geographic data, the Maps API allows you to deliver interactive, customized location features directly within your MediaOS platform.
How to Set Up Google Maps API #
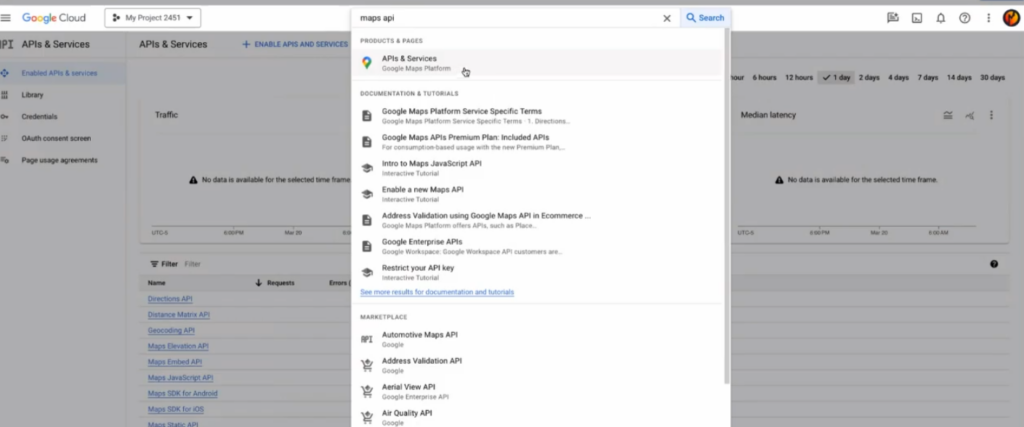
To enable and configure the API for your MediaOS site, go to the Google Cloud Console, search for Maps API, and select API. Click Continue, then—if you’ve used Google Maps before—choose your existing company account and select Activate.
Note: You only pay for what you use, and if Maps has already been enabled for your account, there’s no additional charge.
If you're new to Google Maps API, start by selecting My Project, give it a name, and continue with the setup. Next, protect your API key by choosing Restriction Type: Website under the Protect Your API Key section. For the referrer, enter: *.site.com/*.
Note: Replace “site” with your actual website domain
Click Restrict Key, then proceed to activate the specific services required.
To continue setup, go back to the search bar and select APIs and Services > Maps. Scroll down and enable the Maps JavaScript API. Then, use Control+F to locate the Geocoding API, click on it, and enable it as well. To finalize your setup with website restrictions, click Keys and Credentials from the left-hand menu. Find your key, click the three dots next to it, and select Edit. Scroll to the Website Restrictions section and add the following entries: site.mediaos.com/* and *.site.com/*.
Note: Be sure to replace “site” with your actual domain name.
Scroll down and click Save to apply your settings. Once saved, click the three dots again next to Show Key and select Edit to double-check your restriction settings, confirming that your key is properly scoped to the correct site. Then, copy the API Key from the right-hand panel and send it to your MediaOS Account Representative.

Tip: Setting these restrictions helps prevent unauthorized use of your Maps API key, protecting you from unexpected charges.

