The Account Details page is your go-to hub for understanding everything related to a specific account. Whether you're managing relationships, tracking activity, or updating ownership, this page gives you full visibility and control—all in one place. By centralizing critical data and ownership tools, this page reduces time spent digging through systems and increases your ability to take action quickly.
Accessing Account Details #
There are two ways you can access the Account Details page.
Option 1:
You can access the Account Details page in MediaOS through two simple methods. The first option is to navigate to the Accounts page using the left-hand navigation menu. Once the list of accounts loads, locate the account you’re working on and click View next to its name to open the full details.
Option 2:
Alternatively, you can use the Search bar located in the navigation panel. Type in the name of the account you're looking for, and once it appears in the results, click directly on the account name to open its detail page. Both methods provide quick access to the same information, so you can choose whichever fits best into your workflow.
Basic Information #
Primary Account Information #
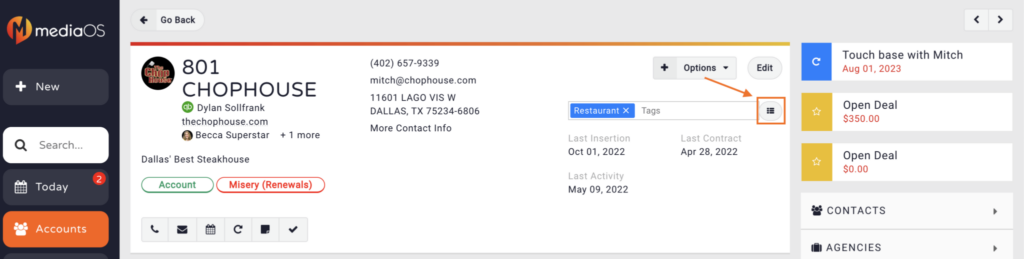
At the very top of the Account Details page, you’ll find all the essential information associated with the account. This section includes the account name, the assigned account owner, and a brief description of the account. You’ll also see the account’s current pipeline status, along with its primary contact information and primary address.
In addition to these core details, the account summary displays important timestamps, such as the date of the last line item, the last signed contract, and the most recent activity. This overview gives you a quick snapshot of the account’s current status and recent engagement history.
Tagging Account #
Tags in MediaOS offer a quick and flexible way to organize your accounts and build targeted lists in just a few clicks. By tagging accounts with custom keywords or categories—such as geographic region, industry vertical, campaign type, or account tier—you can tailor your database to match your team's unique workflow and goals.
To add a tag, simply type your desired keyword into the tags field and press Return or Tab on your keyboard to create it. As you begin typing, MediaOS will suggest existing tags in a dropdown menu; selecting one of these will immediately apply the tag to the account. If you need to remove a tag, it must be deleted from all associated accounts in the system.
To manage your tags, click the List button next to the tags field to view a list of all tags currently in use, along with the number of accounts assigned to each. You can also search for tagged accounts by using the Has Tag filter in the Accounts Page search menu, allowing for easy segmentation and outreach.
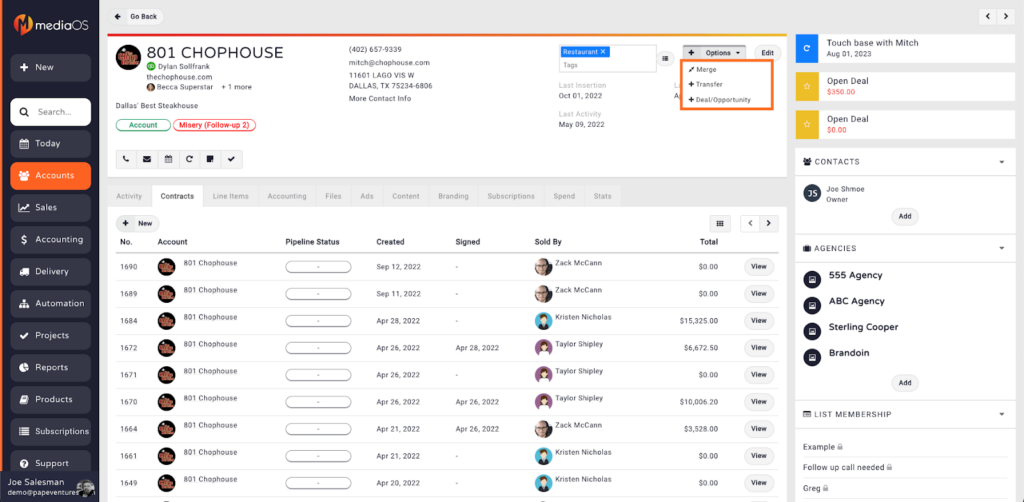
Options #
The options dropdown allows you to merge two accounts together, transfer ownership of the account to another user, and create a new deal for the account. Please see the Creating Deals/Opportunities subtitle below for more information on deals.
Editing an Account #
General #
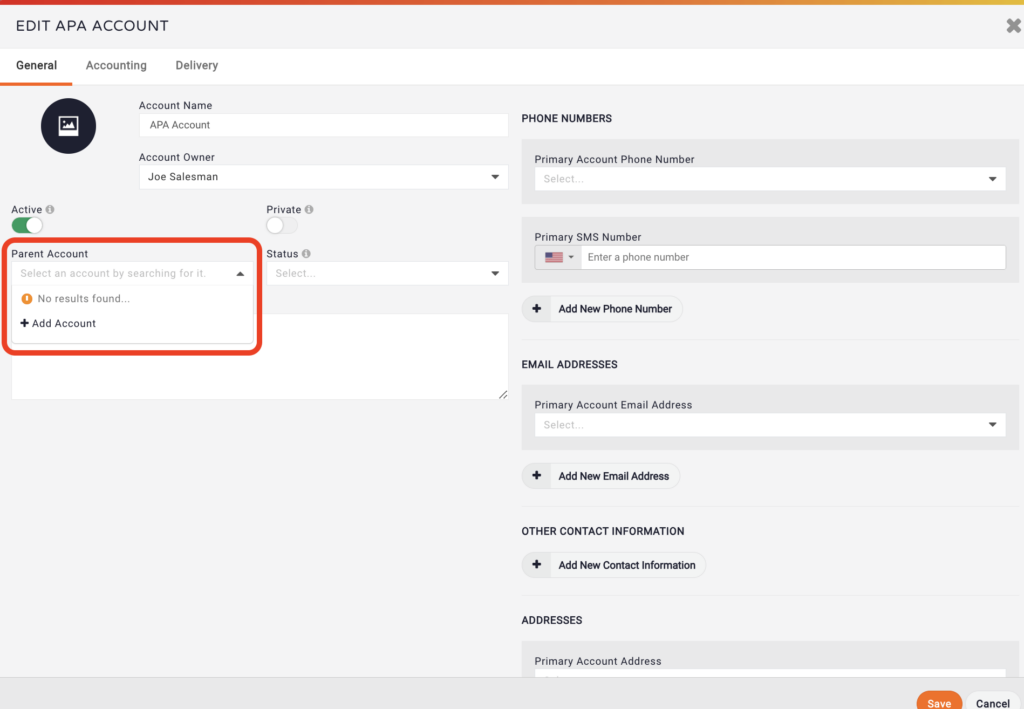
The Edit Window allows you to edit the account’s basic information, primary contact information, description, pipeline status, and parent account.
You may activate or deactivate the account by toggle the Active button on or off. Deactivated accounts do not appear in the Accounts page results by default but are still accessible via the navigation search, or through filtered searches on the Accounts page.
Transferring Account Ownership #
To transfer ownership of an account in MediaOS, begin by selecting the Account Owner dropdown menu on the account’s detail page. From there, choose the new owner you'd like to assign. Once selected, click the Save button to confirm the change. MediaOS will automatically log the transfer, preserving a record of ownership history for accountability and transparency. If you’re looking to reassign ownership for multiple accounts at once, there’s also a bulk transfer option available—click here for details on that process.
Parent Accounts #
Setting a Parent Account in MediaOS allows you to link two separate accounts, giving you shared access to contacts while keeping billing and account data distinct. This is especially useful when managing franchises or organizations with multiple branches. When building a proposal or contract, you’ll be able to assign contacts—such as Billing, Sold To, or Production—from both the Parent Account and the Sub Account, streamlining collaboration across related entities.
To set up a Parent Account, first navigate to the Accounts section from the left-hand menu. Begin by creating an account for the parent franchise. Then, create individual accounts for each franchise or agent that will fall under that parent. Once those are set, click into one of the sub-accounts and select Edit in the top right corner. In the edit panel, locate the Parent Account dropdown and begin typing the name of the parent account. Select it from the results, then click Save in the bottom-right corner. Once linked, MediaOS will recognize the relationship, allowing you to pull in contacts from the parent account when needed—without merging billing or account data.
Accounting #
In MediaOS, the Accounting section of an account includes several configurable fields that help you manage financial policies and controls tied to that account.
The Sales Lock feature allows you to prevent new contracts from being created for a specific account. This is useful when an account is on hold or under review. The Credit Limit field sets a threshold for how much the account can owe at any given time. When creating new proposals, MediaOS will calculate the combined total of all unpaid invoices and the proposed contract. If that sum exceeds the credit limit, the system will block the sale from proceeding. Lastly, the GL Account Code lets you assign a specific general ledger code to the account. This helps ensure consistent financial tracking and simplifies syncing with external accounting systems. These fields can be edited from the account’s Accounting tab and are essential for maintaining internal controls over client billing and sales activity.
Note: GL Account Code is only available to accounts using the integration with Quickbooks Online.
Setting up Automatic Accounting and Delivery CC Contacts #
If your clients require multiple people to be looped in on billing or ad approvals, MediaOS makes it easy to set up automatic CC emails for accounting and delivery contacts. This ensures that the right stakeholders receive invoices, ad proofs, or other time-sensitive communications—without any manual forwarding.
To begin, go to Accounts from the left-hand dashboard and open the account you’d like to update. Click Edit in the top-right corner of the account details panel. You’ll see three tabs across the top: General, Accounting, and Delivery.
From the General tab, click + Add New Email Address to add a primary contact. These contacts are considered the main points of communication for the account and will receive general updates and correspondence. After entering the email, click Save.
Next, switch to the Accounting tab. In the section labeled Add Emails, enter any additional addresses that should receive financial communications. These contacts will be automatically CC’d on invoices, payment reminders, and billing-related emails. Be sure to click Save after making changes.
Finally, head over to the Delivery tab and type in any additional emails in the same Add Emails section. These contacts will be included on all communications related to delivery logistics, such as ad proofs or production updates. Once added, click Save to finalize your updates.
This feature helps streamline communication and keeps everyone in the loop—whether it's for billing approvals, ad design feedback, or anything in between.
How to Add Automatic Email CC's to An Account Record
Advantages of Adding Multiple Accounting and Delivery Contacts #
Adding multiple accounting and delivery contacts to an account record can be crucial for several reasons. First, it ensures transparency and keeps all relevant parties in the loop regarding communications. By automatically CC'ing specific emails related to an account, stakeholders or team members can stay updated on important discussions or correspondence without manual intervention. This practice enhances collaboration and ensures that everyone involved has visibility into ongoing conversations or developments.
Also, having automated CC contacts helps maintain a documented trail of communication. It assists in record-keeping, which can be invaluable for reference, dispute resolution, or auditing purposes. Having a comprehensive history of emails and communications tied to an account aids in maintaining clarity, accountability, and a complete overview of interactions related to that account. So let's get into it!
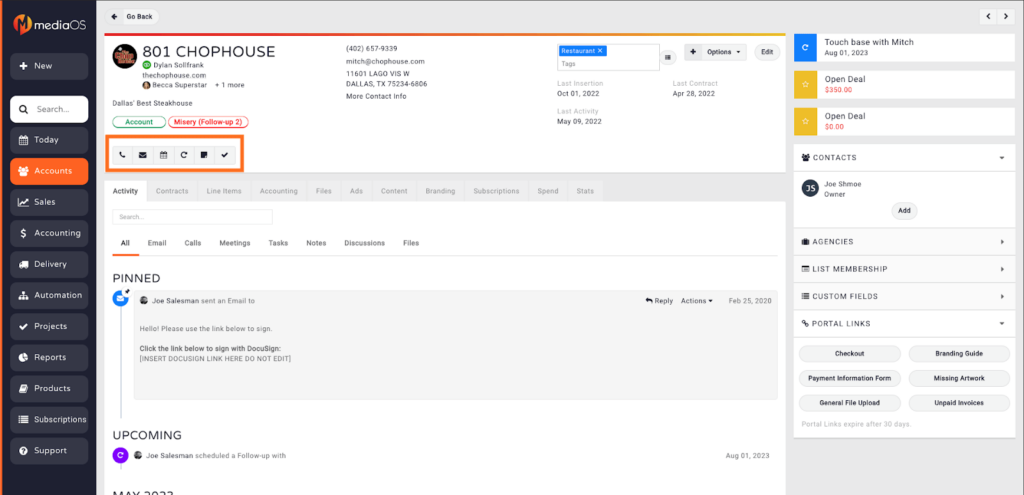
Activity Buttons #
MediaOS includes a series of Activity Buttons designed to help you stay organized and track every interaction with your accounts. These icons appear throughout the platform and allow for quick access to communication and task management tools.
The Phone icon lets you log a call directly on the account, making it easy to document outreach and follow-up activity. The Email icon enables you to draft and send emails to any contact associated with the account without leaving the platform. The Calendar icon allows you to schedule meetings and appointments, while the Half-Circle icon is used to set up follow-up actions—ensuring that no opportunity slips through the cracks.
If you want to document an internal observation or client update, click the Sticky Note icon to log a note. And finally, the Checkmark icon is used to create and assign tasks, helping your team stay accountable and aligned on next steps. Each of these tools contributes to a streamlined, well-documented sales and service process.
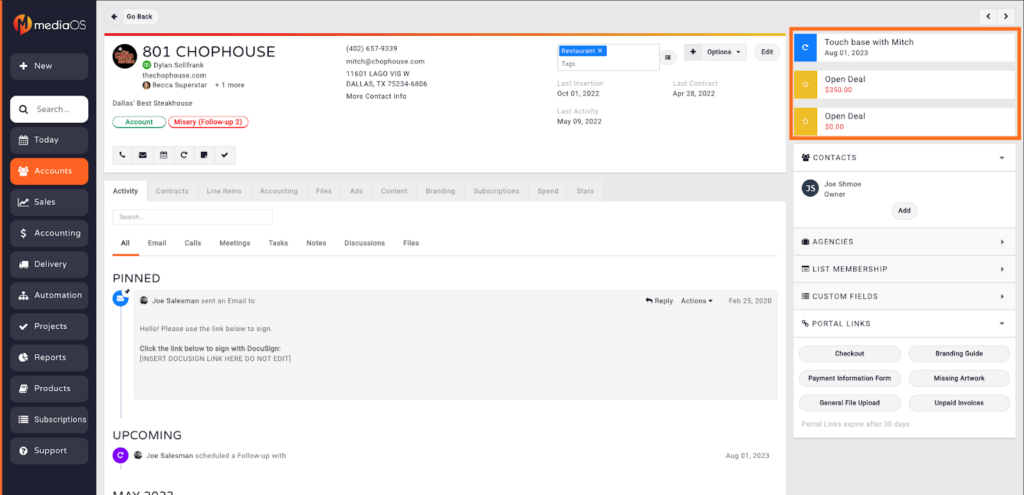
To-Do Section #
The top-right hand corner of the Account Details page will display all to-do’s assigned to the account. This includes follow-ups, meetings, tasks, and open deals.
Activity Feed #
Our Activity Feed feature acts as a real-time list of all user actions displayed conveniently throughout MediaOS. It enables streamlined communication and user efficiency company wide. You can quickly record all types of activities, as seen in the tabs: Emails, Calls, Meetings, Tasks, Notes, Discussions and Files. You can log activities at the account level and wherever you see the activity icons throughout the software. Utilize the Clickable Links feature for easier navigation and more information.
Note: The Activity Feed displays all account activity for the last 365 days by default. Click the Search button and adjust the date range to see older activity.
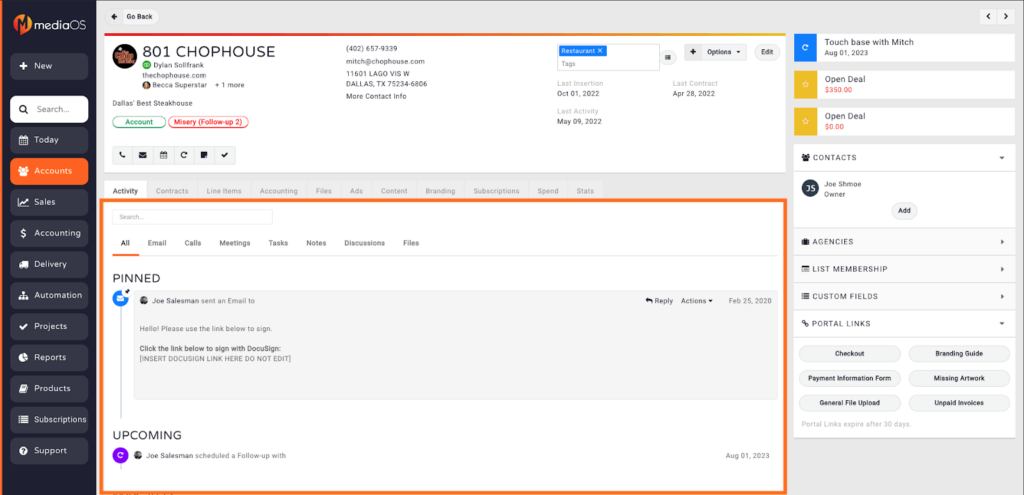
The Activity Feed in MediaOS is organized into several tabs that help you easily filter and manage your interactions with an account. At the top of the feed, you’ll find the option to pin important activity. To do this, click on any activity item, open the Action dropdown, and select Pin. This keeps critical updates or correspondence visible at the top of the activity list for quick reference.
The All tab displays a full chronological history of every logged interaction with the account, offering a comprehensive overview of calls, emails, meetings, notes, and tasks. The Email tab narrows the view to show only email communications exchanged with contacts assigned to the account. This is especially helpful when reviewing previous conversations or preparing for follow-ups.
In the Calls tab, you can log call notes and tag other users by typing @ followed by their name. These tagged users will receive a notification under the Today tab. The Meetings tab works in conjunction with your connected calendar and automatically logs scheduled meetings with account contacts. From this view, you can also add comments and use @ to tag users or # to tag Slack channels, streamlining collaboration across your team.
Contracts #
The Contracts tab shows all open proposals and contracts created for the account. You can sort the data in this table by clicking on any of the column headers. You can customize the data shown on the table by selecting the Table button. You may include up to 10 columns at a time.

Line Items #
The Line Items tab shows all line items that have been booked for the account. You can sort the data in this table by clicking on any of the column headers. You can customize the data shown on the table by selecting the Table button. You may include up to 10 columns at a time.
Accounting #
The Accounting tab provides a complete view of all open invoices, payments, and financial activity associated with the account. At the top of this section, the Show Balance button allows you to quickly view the account’s current outstanding balance, giving you instant insight into what is still owed.
To manage stored payment methods, click the Manage Payment Accounts button. From here, you can add, edit, or remove credit card or ACH information and assign a default payment method for future transactions. If you need to initiate a transaction, the +New button allows you to create new payments, invoices, credit memos, statements, or alternative payment statements directly from the account.
The transaction table itself is highly interactive. You can sort the data by clicking any column header, making it easy to view payments or invoices by date, amount, or type. If you want to customize the information displayed, use the Table button to adjust the visible columns. MediaOS allows up to 10 columns to be shown at a time, so you can tailor your view to highlight the most relevant financial data for your workflow.
Files #
The Files tab allows you to upload files to your account. This is best used for general files pertaining to the account.
Ads #
The Ads tab provides a centralized view of all ad artwork that has been assigned to the account’s line items. This is where you can manage creative assets tied to campaigns, ensuring that the right artwork is linked to the correct placements.
To upload a new file, click the +New button and follow the prompts to add your artwork. Once uploaded, ads will appear in a list format, allowing you to easily browse existing files. Clicking on any ad will open a detailed view that shows which line items the ad has been assigned to. From this screen, you can edit, download, email, or delete the file—giving you full control over creative management at the account level.
Content #
The Content tab shows all editorial content tickets assigned to the account. You may click on the title of any content ticket to view more details and edit or delete the ticket.
Branding #
The Branding tab displays the accounts branding guide. From primary colors to branding and strategy goals, the Branding Guide will provide you with all of the information you need when pitching creative to the account. Scroll down for more information about the Branding Guide.
Subscriptions #
The Subscriptions tab provides the ability to keep track of complimentary subscriptions given to the account. You may create and edit subscriptions, however you cannot delete subscriptions.
Note: Should you no longer wish to provide complimentary subscriptions to the account, we recommend editing the subscription and setting the Issue Left amount to 0.
Spend #
The Spend tab provides a number of reporting options related to sales figures for the account.
Stats #
The Stats tab provides reporting options related to the performance of ads, whether it be impressions, clicks, calls, etc.
Contacts #
Located on the right-hand side of the Account Details page, the Contacts section displays all individuals associated with the account. This panel gives you quick access to each contact’s details and allows you to manage communication effortlessly.
To add a new contact, simply click the Add button and enter the required information. If you need to make changes to an existing contact, click on the contact’s name to open their profile. From there, you can view additional details, make edits, archive the contact, or assign them to a contact list for targeted outreach or segmentation.
Agencies #
The Agencies section displays all agencies currently representing the account. This view helps you understand third-party relationships and manage agency-advertiser connections more effectively.
To add an agency, click the Add button and select the agency you'd like to associate with the account. If you need to remove an agency, click on the agency’s name to open its profile, then navigate to the Represented Advertisers tab. From there, you can click the Remove button to unlink the agency from the account. This setup ensures clear visibility and easy management of agency partnerships.
List Memberships #
The List Memberships section shows all the lists an account is currently part of, allowing you to track segmentation and organize your outreach efforts. To add the account to a new list, simply click the Add button and select from your available options. If you need to remove the account from a list, hover your mouse over the list name and click the X that appears to the right. This makes it easy to manage which campaigns, newsletters, or custom segments the account is included in.
Custom Fields #
If you are using custom fields you will be able to see all account related custom fields and edit the fields assigned to the account.
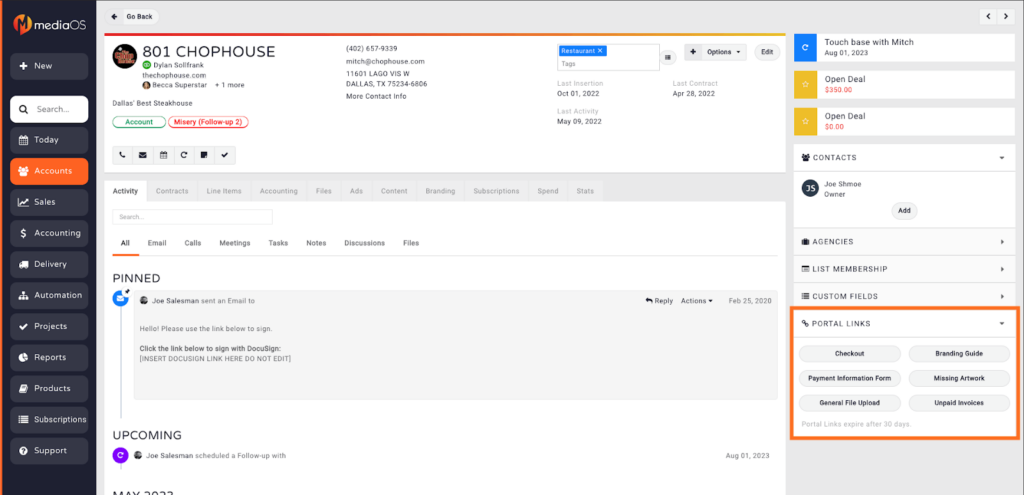
Portal Links #
All accounts in MediaOS have customized portal links in the bottom right of each account. You can send clients custom portal links for unpaid invoices, branding guides, missing artwork and more. Send your clients portal links by simply clicking on the link, then copy/pasting from each account.
Note: Portal links expire every 30 days, so if a client has difficulties accessing the portal, you may need to re-send the link.
Checkout #
The MediaOS Checkout feature allows your clients to purchase advertising online without a sales rep.
Note: Your administrator(s) will need to enable products for online checkout in order to use this feature.
Branding Guide #
Your accounts can access an online portal where they can configure their branding materials. The link for your account's Branding Guide Portal can be found on the lower right-hand corner of the Account Details page. Simply copy and paste this link to send directly to your accounts.
Using the Branding Guide Portal #
The Branding Guide Portal in MediaOS allows clients to configure their branding preferences directly, ensuring that their visual identity and messaging are clearly captured from the start. When a customer accesses the portal, they’ll be guided through a step-by-step process to complete their branding setup.
The first step prompts the client to upload their logo by clicking the Upload Logo button. Once uploaded, the system will analyze the logo and suggest brand colors. These can be edited or removed by clicking on individual color swatches. The client will then enter their website URL and provide a brand description, including the public-facing name of the business and any brand attributes.
Further down, the Goals section gives the client space to describe their branding expectations, while the Value Proposition section allows them to define their mission statement, customer benefits, target audience, and competitors. In the Important Brand Guide Assets section, clients can upload critical design files, such as logos, graphics, or templates, using the Upload Asset button.
Once all fields are complete, clicking the Save button finalizes the branding setup. The completed branding guide can then be accessed and edited at any time from the Branding tab on the Account Details page. This ensures that your team always has easy access to each client’s most up-to-date brand information.
Add Payment Account Form #
The Add Payment Account Form allows clients to provide and save their payment information for future payments.
Note: MediaOS does not keep records of your clients payment information. All payment is saved in the payment processor you have integrated with.
Missing Artwork #
Running up on a deadline and need creative assets from your client? The Missing Artwork portal link allows clients to see any upcoming ads, within a specified window, they have purchased and provide finished artwork or working files to complete their ad.
General File Upload #
The General File Upload allows your client to upload useful files that are not ads. These can be logos, frequently used design elements, or any other noteworthy document.
Unpaid Invoices #
The Unpaid Invoices portal link allows your clients to see all of their outstanding invoices and pay them online.