

Before launching any MediaOS feature—whether it's an ad campaign, membership signup, or directory listing—your website setup must be solid. Connecting your WordPress site, configuring essential templates, and enabling key tools like Google reCAPTCHA, maps, and analytics ensures your platform is secure, scalable, and ready for growth. A properly set-up website unlocks the full power of MediaOS, helping you deliver better user experiences, automate key processes, and drive revenue with confidence.
Start with Settings #
To begin, click the Websites tab from the left-hand sidebar, then select the orange Manage Settings button at the top of the screen. This opens your foundational settings for branding, forms, email templates, and backend connections. These settings are separate from the main tabs you’ll see under Websites and should be configured before launching any public-facing features.
Website #
Start by entering your website name and URL. If your site is built on WordPress, toggle WordPress Enabled to “on” and add your administrator credentials to allow MediaOS to connect. If WordPress is disabled, features like plugin-based ad serving will not function. Always double-check for typos before saving, especially in login fields.
Email #
The Email tab is where you build email templates. For your Core Template, which is used for automated emails like member registration confirmations, click Change Template, then Edit Template. Use the drag-and-drop builder to insert dynamic content such as ads, website content, or featured events. After saving the template layout, enter your sending details like sender name, reply-to email address, and logo.
To set up the Checkout Receipt Template, select a pre-made design, make any necessary edits, and save it to be used in all checkout confirmations sent through your site.

Ad Server #
To enable ad server functionality, you must define which products will be eligible. Eligible products must be time-based, include a scheduler, and contain inventory. You can also configure how often ads rotate by adjusting the Change Ads Every X Seconds setting.
Analytics #
In the Analytics tab, enable or disable ad tracking features such as click counts or hover rates. To improve data quality, use the Ignore Visitors Less Than X Seconds field to exclude bounces from your reporting metrics.
Registration #
This tab allows you to decide which fields to collect during user registration. You can prompt users for details such as name, company, or email address by toggling each prompt on or off.
Branding #
Update your brand’s color scheme, logo, and icon URL under the Branding tab. These settings will apply across your MediaOS templates. If you already have templates built, you’ll need to update them manually to reflect your new branding.
Pages #
The Pages tab allows you to define the URLs for your core site pages—like checkout, login, and registration. Each page must be created first in WordPress. Once live, paste the correct URL into the corresponding field to activate it within MediaOS.
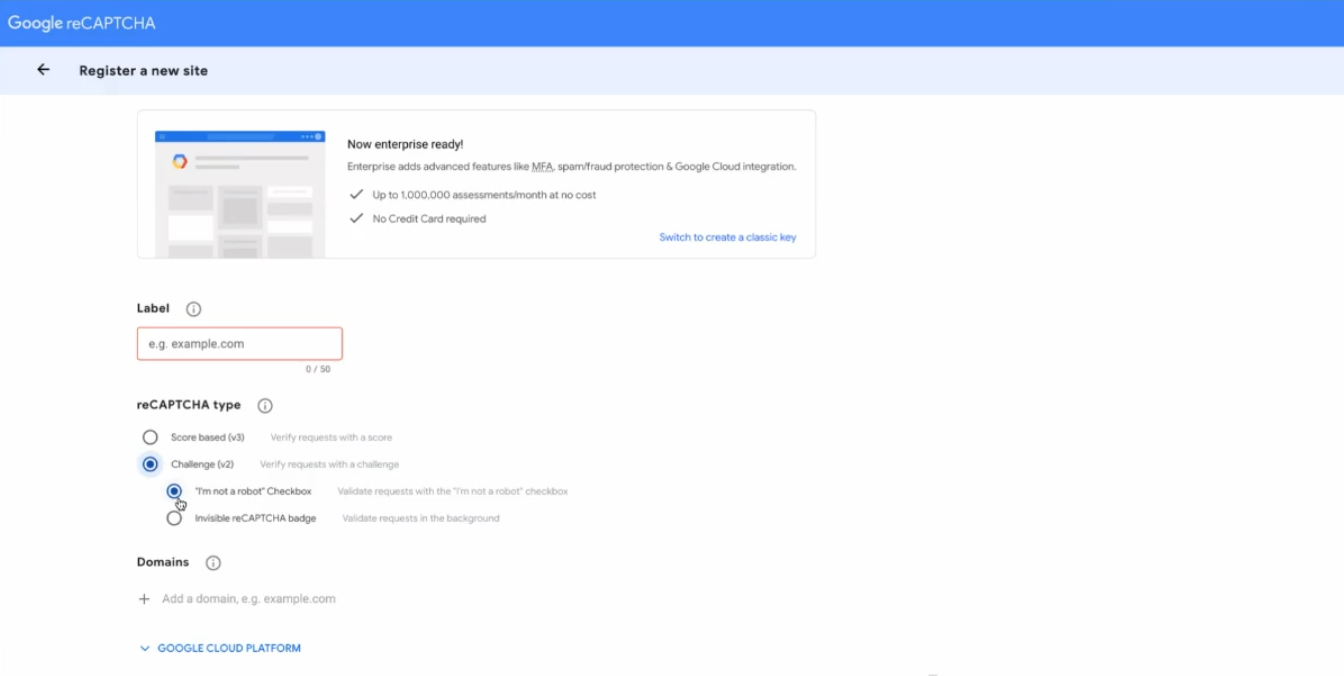
Google #
To enable Google reCAPTCHA, visit the reCAPTCHA Admin Console, select v2 Challenge, and register your domain. Copy your Site Key and Secret Key, then paste them into the designated fields in MediaOS. These keys should always be kept secure.
For Google Maps, open the Google Cloud Console, enable the Maps APIs, and generate a new API key. Set the restriction type to “Website” and add your domain. Paste the API key into MediaOS to activate location-based tools.
Forms #
Customize your form appearance by selecting border styles, font colors, and label sizes. These design settings only apply to newly created forms; any existing templates will need to be manually updated.
Once all your settings tabs are configured, you’re ready to move on to your main website features.
Main Website Tabs #
When you click into the Websites section, you’ll see nine feature tabs: Websites, Store, Ad Server, Lists, Pop-Ups, Directory, Events, Voting, and Analytics. These features form the public and operational front end of your site.
Connecting Your Website #
To connect your WordPress site, start by clicking Websites, then New Website. After entering your site name and domain, click the link to download the MediaOS WordPress plugin. Once downloaded, log into your WordPress admin area, go to Plugins, select Add New, and upload the plugin zip file. Activate the plugin from the Installed Plugins page. Back in MediaOS, click Proceed to Next Step, toggle WordPress Enabled, and enter your admin credentials to finalize the connection. Once successful, your site will appear as connected and up-to-date.
Setting Up Your Ad Server #
To activate ad serving, navigate to the Ad Server tab inside the Websites section. Use the Assigned Products field to define which ad products will run on your website. Each product can only be assigned to one website, and eligible types include CPM-based ads, shared voice placements, and other time-based ad products.
Embedding the Ad Server #
Once your website is connected and your products are assigned, go to the Products tab, select your website, and click Ad Server to open the embed options. Copy the full EMBED CODE and paste it into your website’s HTML or WordPress page where you want ads to appear. If you want ads to rotate dynamically, make sure to include only the base embed code without limiting it to a single ad unit.
Selling Targeted Ads #
From the Sales tab, create a contract proposal that includes targeting preferences. You can target by page, section, tag, author, device type, or user status (known vs. unknown). To preview projected impressions, click Get Audience Count. If your account includes the audience segmentation platform, use the Reader Must Be field to refine your audience even further. This will automatically generate a forecast report of projected reach and inventory.
Assigning Ads #
Before an ad can run live, it needs a valid End URL. Go to the Ad Library, select an ad, click Edit, and add the destination link in the appropriate field. You can assign multiple ad sizes to the same unit, and the system will automatically select the most appropriate version based on the visitor’s device size.
Ad Reporting #
To include ad performance metrics in your client invoices, go to Account > System Settings > General Settings, search “invoice,” and toggle Include Ad Server Report on. This will append a 90-day performance summary for each ad unit to the invoice preview, providing transparency and value to your advertisers.

