

Invoices serves as a central hub for managing all aspects of your organization's billing process. You can view, edit, and apply payments to invoices, as well as sync them with QuickBooks. Tools like the Invoice Activity Feed help track all changes, making it easy to stay on top of your financial records.
Creating Invoices #
To create invoices in MediaOS, start by navigating to Accounting using the left-hand navigation menu. Then, click on the Billable Line Items tab to view a list of all items that are ready to be invoiced. From this window, you can select the contracts you wish to invoice and set custom dates using the Created Date and Due Date fields. The Created Date specifies when you want the selected invoices to be generated, while the Due Date indicates when the invoices should be paid.
Note: If no due date is entered, the system will automatically generate one based on the created date.
Once you’ve made your selections, click the Invoice Selected button to generate the invoices and open the Email Invoices window. You can review the invoices you’ve created by returning to the Accounting section in the left-hand menu
Accessing Invoices #
To view and manage the details of an invoice in MediaOS, begin by clicking Accounting from the left-hand navigation menu. Locate the invoice you want to review and click the View button next to it to open the invoice. This will display the Invoice Details Panel, where you can access and configure various aspects of the invoice, including line items, payments, commissions, and more.
Invoice Details Page #
The Invoice details page in MediaOS allows you to view, edit, delete, and write-off invoices. You can apply payments, access the insertion order, and sync the invoice to QuickBooks.
For a more in-depth look at this page, click here.

Editing Invoices #
If you notice a typo or need to make changes to an unpaid invoice, MediaOS makes it easy to edit line items as needed. Start by clicking on Accounting in the far left-hand menu and locating the invoice you want to update. Click View on that invoice line to open a side panel, then select Edit. From here, click on the specific line item you want to change.
Using the Invoice Edit Window #
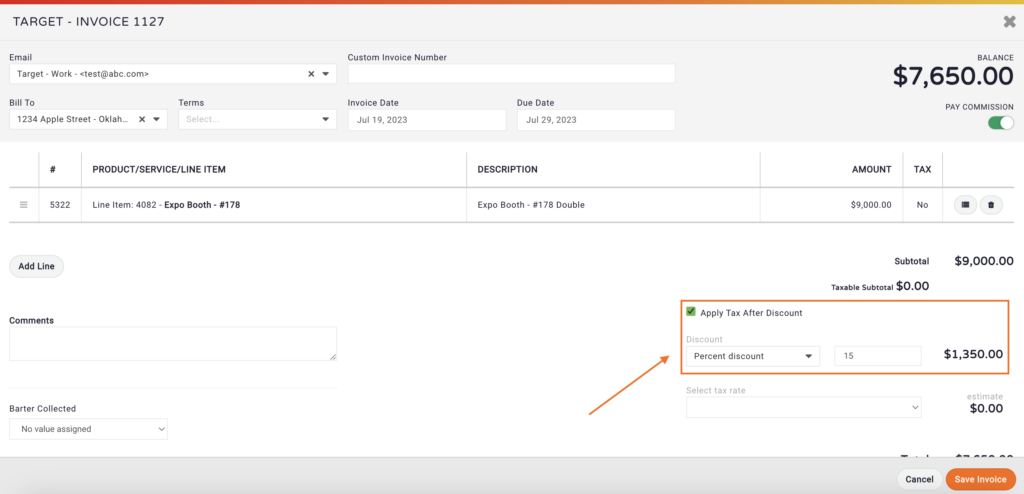
The Invoice Edit window provides a clear overview of key invoice information at a glance. At the top of the page, you’ll find details such as the client’s name, invoice number, invoice balance, billing contacts, payment terms, and both the invoiced and due dates. You can enable the Pay Commissions toggle to activate commission payouts for the invoice. In the line items section, you’ll see the invoice number, associated products or services, descriptions, and amounts. Custom fields are also visible here, and you have the option to remove specific line items if needed. You can also can rearrange line items by using the drag-and-drop feature in the first column to organize them in your preferred order.

Adjusting Fees and Discounts #
To add a discount or fee, click Add Line to create a new entry. In the first dropdown, select Invoice Item, and in the second dropdown, choose the appropriate item type, such as a Processing Fee. Enter the amount, then click Save Invoice in the bottom right corner to apply your changes.
Editing Line Items #
The # column in the Invoice Edit window displays the line item number, helping you keep track of the order and organization of each item. To edit a specific line item, simply click on it to reveal additional options.
Note: The invoice must be in an unpaid status to edit. Click the Edit button to display the Invoice Edit window.
Use the Product/Service/Line Item drop-down menu to select the appropriate product for the insertion. If your account is integrated with QuickBooks, icons next to the product name will indicate the item’s sync status—an alert icon means there is a mapping issue that needs to be resolved in QuickBooks.
The Description field allows you to add details for the line item, while the Amount field is where you input the dollar value. If the item is taxable, check the Tax box to apply tax. Additional customization is available through buttons that let you display custom fields or remove the line item entirely. To add more entries, click the Add Line button. If you’d like to apply a discount, choose between a fixed amount or a percentage using the Discount fields, and enter the value in the provided text box. Any necessary comments can be added in the Comments field. Once all adjustments are complete, click Save Invoice to finalize your changes.
Adding a Discount Line Item #
As mentioned above, you can add line items to any invoice that has not yet been paid, including discount line items. To do this, start by clicking Accounting in the left-hand navigation menu, then select View next to the unpaid invoice you want to edit. This will open the Invoice Details panel—click Edit to access the Invoice Edit window. From here, click the Add Line button to insert a new line item. In the Product/Service/Line Item select box, choose the appropriate discount item from the list. These options are configured in the Custom Line Item Types window. Next, fill in the Description field with details about the discount, and enter the discount amount in the Amount field.
Step-by-Step Discounting Guide: #
To apply a discount to an invoice, begin by accessing the Invoice Edit window. In this view, use the Discount fields to select whether you want to apply a fixed amount or a percentage-based discount. Then, enter your discount value into the provided text field. If the invoice is taxable, you can choose whether to apply tax before or after the discount is calculated. Once all your selections are in place, click Save Invoice to finalize your changes.
Tip: When applying discounts to an invoice in MediaOS, you can either choose to apply the discount as a line item or as a rate off of the total amount. If your customer would like to see an itemized discount, it is recommended that you utilize the line item discount. If they would just like to see the total amount reduced without a line item, you can choose to apply the discount at the invoice level.

Emailing Invoices #
After creating your invoices in MediaOS, the Billable Line Items summary window will appear, allowing you to take further action. While you can send invoices as part of an email campaign, you also have the option to send them individually. To do this, navigate to Accounting from the main menu, then click View next to the invoice you want to send. From there, select the Email button, compose your message, and click Send. A PDF of the invoice will automatically be attached to the email.
Changing the Recipient Email Billing Address #
Statements consolidate all of an account's unpaid invoices onto one PDF that can then email out as an attachment. However, a recipient email may be different from the one you wish to send the statement to.
Note: The email address that appears on the statement page is pulled from the billing address assigned to the account's most recent invoice.
To change or update the billing email address for an invoice in MediaOS, begin by navigating to the relevant account. Select the Accounting tab, then click the View button next to the most recently created invoice. In the Invoice Details panel, click the Edit button to make changes. Locate the Bill to Email field and update it with the correct email address. After making the change, click Save to apply your edits. Once saved, the updated recipient email will be reflected on the statements page.
Deleting Invoices #
To delete an invoice in MediaOS, simply use the Delete button. It will appear on the Invoice Detail panel. Select the Delete button, then select it again to remove the invoice from your system.
Deleting Invoices with Applied Payments #
To delete an invoice with applied payments, begin by navigating to the invoice you want to remove and click View to open the invoice details panel. Scroll down to the Applied Payments section and click View next to any payments that have been applied to the invoice. In the pop-up window, select Unapply Payment to disconnect the payment from the invoice. Once the payment has been unapplied, refresh your screen to ensure the changes are reflected. Then delete the invoice using the Delete button.
Note: To prevent QuickBooks from overriding changes made to invoices in MediaOS, it's important to first unapply any payments and ensure the invoice is completely disconnected from QuickBooks. This helps avoid syncing conflicts or re-imports that could cause duplicate or outdated records. Once the invoice is no longer linked, you can safely proceed with deletion without affecting your accounting data in QuickBooks.
Mass Deleting Invoices via Batch Action #
The Batch Action feature in MediaOS allows you to quickly and efficiently delete multiple invoices at once, saving time when managing large volumes of billing records. To use this feature, navigate to Accounting in the left-hand menu and select the checkboxes next to the invoices you wish to delete. Then, click the Batch Action button and choose Delete from the dropdown menu. Remember, if any of the selected invoices have payments applied, the batch delete action will fail. In such cases, you’ll need to unapply those payments first, as outlined in the previous section.
Invoice Printing Services #
If your clients prefer receiving physical invoices, MediaOS makes it easy to accommodate them. For just $1.49 per invoice, MediaOS will print and mail your invoice directly to the billing address listed on the document. This hands-off solution eliminates the need for in-house printing, envelopes, or trips to the post office—freeing you up to focus on selling and servicing accounts.
How to Print and Mail an Invoice #
To use the invoice printing service, begin by clicking Accounting from the left-hand navigation menu. Locate the invoice you want to send, then click View to open it.
Inside the invoice view, click the Print button. This will instantly send the invoice to MediaOS’s printing service. The invoice will be printed and mailed to the billing address on file.
Note: This action is immediate and cannot be undone. Make sure your invoice is final and ready to send before clicking the Print button.

