

In MediaOS, Ad Units and Rates help you manage your advertising inventory efficiently. By defining ad units, you can set specific sizes and formats for your ads, ensuring consistency across your offerings. Assigning rates to each unit allows for clear pricing structures, making it easy to generate accurate proposals and invoices. The system also helps prevent overselling by tracking inventory limits, ensuring a smooth and organized ad sales process.
What Are Ad Units? #
Units define how a product is sold. This could be by time, quantity, or performance. Units are essential because they determine what and how you can sell items under a product. The features available to an Ad Unit are directly related to the product type assigned to a product.
What Are Rates? #
Rates represent the cost associated with a product's ad unit. They tell the system (and your sales reps) how much to charge based on the unit of sale. Rates can be fixed, tiered, or quantity based—depending on your sales model.
Example: A newsletter ad might have a flat $500 rate per send, while a display banner might cost $15 CPM (cost per thousand impressions).
Setting Up Ad Units and Rates for Issue Based Products #
Issue-based products allow you to sell advertising placements on a per-issue basis, which is commonly used for print magazines or other publication cycles. Common ad units for these types of products include Full Page, Half Page, and Two-Page Spread. Check out this article to learn more about issue-based products.
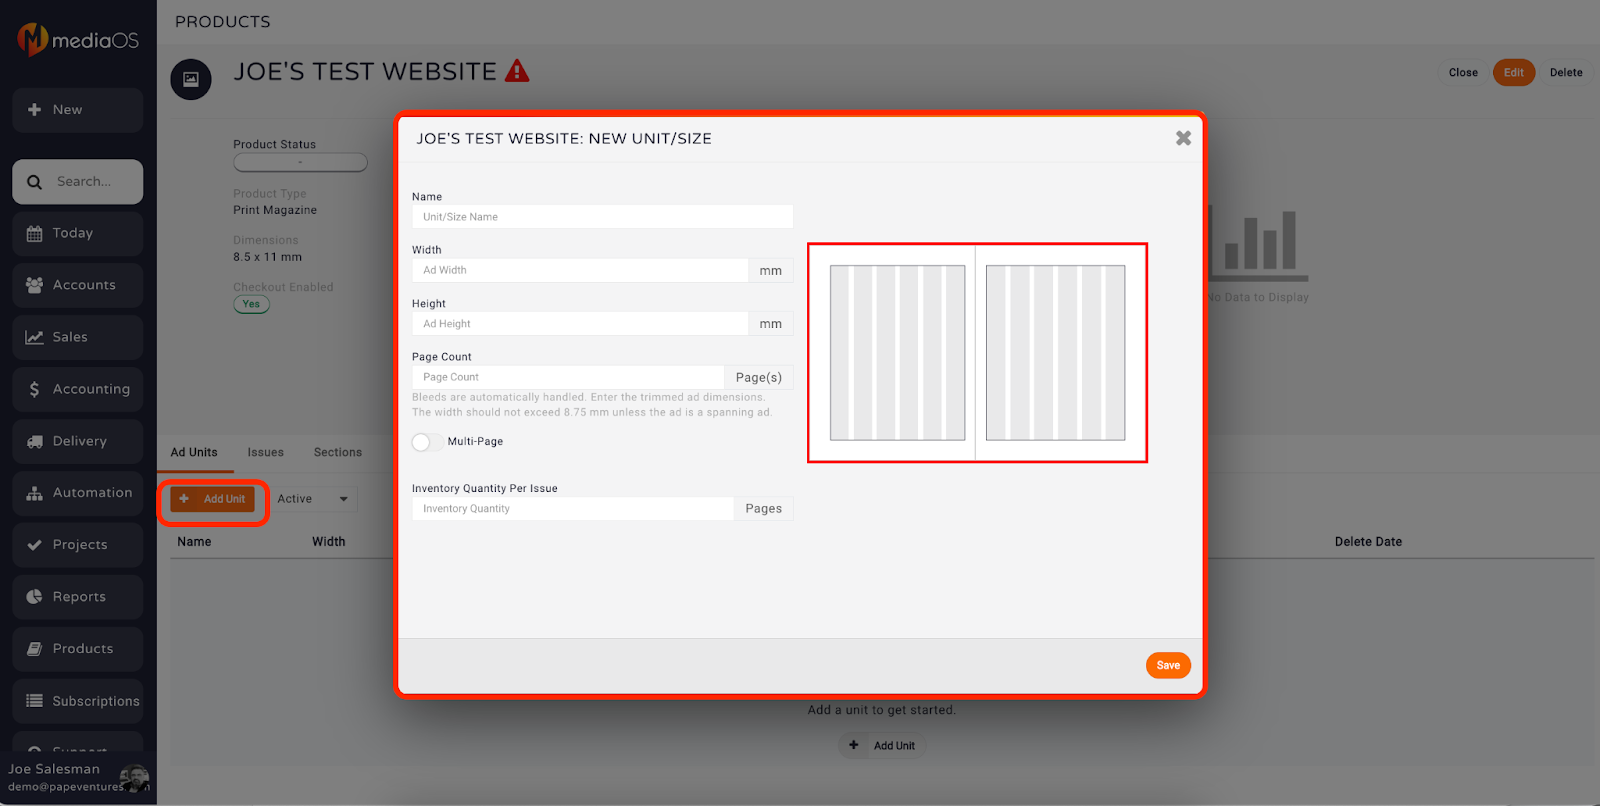
To set up ad units, begin by navigating to your Products page and opening the product associated with the issue-based item. From the product view, click the Ad Units section. An orange + Add Unit tab will appear—click this to begin creating a new ad placement.
Enter a name for the ad unit, typically reflecting the size or position, and then follow the prompts to input the exact dimensions. Once your sizing details are added, click Save. A rate entry dialog will appear immediately afterward, prompting you to assign a label and enter pricing. You can either save each rate individually or use the Add By Grid option to enter up to six rates at once.
When you’ve finished entering your rates, exit the dialog box. To create additional ad units, repeat the process by clicking + Add Unit again. This lets you define as many unique sizes and rate structures as needed for each issue-based product.
Note: Always include trim size. Bleeds are automatically handled. Set limits in the box labeled Inventory Quantity Per Issue, just below the dimension entries. Type the number of specific ads per issue you’re able to sell, and the software will automatically prevent you from overselling once the limit has been reached.
Setting Up Time-Based Ad Units #
Time-based ad units are most commonly used for digital and newsletter products, where availability is determined by specific intervals such as days, weeks, months, or years. To learn more about time-based products, check out this article.
Choosing the Right Unit of Time #
Begin by defining the unit of time your product will be sold in. The unit you choose determines how availability and pricing will be structured. If the product is only available on specific days—such as Mondays or Fridays—select Days as the unit. This is common for date-specific placements or events.
For broader timeframes, such as recurring placements or ongoing listings, choose Weeks, Months, or Years. These units are better suited for long-term products like sponsored directories, recurring ad placements, or annual subscription-based offerings.
Tip: If you're selling a weekly newsletter that only goes out on Wednesdays, select Days and then choose Wednesday under “Days Sold.”
Note: If you're using Weeks, Months, or Years, you do not need to select individual days of the week.
Selecting a Key Date #
The Key Date defines when your product's availability begins on the calendar and serves as the anchor for its recurring schedule. For products sold on a monthly basis, such as banner ads billed by the month, the recommended key date is the 1st of the month. This ensures consistent monthly tracking and availability.
For products sold on a weekly or daily basis, like newsletters that go out every Wednesday, the key date should match the specific weekday the product starts on. This allows the system to align your sales windows and scheduling logic with the actual delivery or activation pattern.
Warning: Your ad unit’s availability will begin from this key date. Plan carefully to avoid unexpected scheduling.
Setting Concurrent Ad Limits #
The Concurrent Ad Limit defines how many ads can be sold for the same unit of time. This acts as your inventory control. For example, if you set a concurrent ad limit of 3 for a monthly banner ad, you can sell up to 3 ads for each month.
Using the Time Interval Setting #
The Time Interval setting controls how often an ad unit becomes available within your chosen timeframe. For example, if your newsletter is sent out every other week, setting the interval to 2 will skip every second week in the availability schedule. This ensures that ad units align with your actual publishing cadence. If your product is sold continuously—such as every week or every month without interruption—you can leave the time interval set to its default and disregard this option.
Tip: The Time Interval setting is key when your product isn’t offered weekly or daily on a standard cadence.
Setting Up Rates for Time-Based Ad Units #
Once your unit is configured, it’s time to define your rates.
Naming and Configuring a Rate #
To begin setting up a rate, click Add Rate. Start by assigning a descriptive name that clearly identifies the purpose or duration of the rate, such as “One-Month Banner” or “Quarterly Promo Package.” Next, enter the Rate Amount—for example, $1,500—based on how much the client will pay for that placement. Then, define the Unit of Time to indicate how long the ad will run when this rate is selected. If you're setting up a banner ad that runs monthly, for instance, enter 1 in the Months field. This means that when this rate is booked, the ad will be scheduled to run for exactly one month.
If you’d like to offer a bundled rate over a longer period, you can use the same process to create a multi-month option. For example, to create a 3-month rate, add a new rate called “3-Month Package,” enter 3 in the Months field, and set a bulk rate such as $3,900. This lets you offer a discount for longer-term bookings while keeping the rate structure clear and flexible.
Creating Ad Units for Event-Based Products #
Event-based ad units are designed for selling physical advertising space at expos, conferences, trade shows, and other scheduled events. To create a new ad unit, start by clicking the orange + Add Unit tab that appears beneath the ad unit section. Enter a name that clearly identifies the space or size, such as a booth size or signage placement.
Next, follow the on-screen prompts to define the ad unit's dimensions. Once you’ve filled in the size details, click Save. This will open a dialog box where you can begin setting rates for the unit. Assign a clear label for each rate and enter the appropriate pricing. After each rate is entered, click Save, or use the Add By Grid option if you want to input up to six different rates at once.
When you’re done inputting rates, exit the dialog box. You can continue adding more ad units by clicking + Add Unit again to define additional spaces with different sizes and pricing tiers as needed.
Using the Floor Plan Editor #
To begin laying out your event space, navigate to the product’s Floor Plan tab. On the left side of the editor, you’ll see a list of available Unit Sizes, such as 10x10 Booth or Corner Booth. Select the unit size you want to place, then drag and drop it onto the grid on the right. This interactive grid allows you to visually build your event layout by positioning each unit where it will appear on the physical floor plan.
Grouping Units #
To create a grouped unit within your floor plan, begin by clicking on any individual unit that has already been placed on the grid. Once selected, use the plus icons that appear around the unit to expand in the desired direction. As you click these icons, additional spaces will be linked together to form a single, larger grouped unit—ideal for sponsors or vendors reserving multiple adjacent spaces.
Creating Ad Units for Delivery-Based Products #
Delivery-based products are typically one-off offerings that do not rely on recurring schedules or calendar-based availability. Common examples include custom print jobs, sponsored social posts, and white-label content delivery. These products are sold as single, project-based deliverables rather than time-based placements.
To create an ad unit for a delivery-based product, click the + Add Unit button under the product’s Ad Units section. Enter a clear and descriptive name for the unit that reflects the nature of the deliverable. Proceed by defining any relevant specifications, such as format, audience, or output details. Once you've saved the unit, a prompt will appear to enter your pricing. Assign a label and rate for the service, then click Save. If you're offering variations—such as different tiers of service or add-ons—you can repeat the process to create multiple ad units within the same product. To learn more about booking delivery products, check out this article.
Quick Setup for Delivery Units #
To quickly create a delivery unit, start by opening your Delivery-Based Product. Click the + Add Unit button to begin setting up the offering. Enter a name that clearly describes the deliverable, such as “Custom Print Ad – Full Page,” then click Save to confirm the new unit. Once the unit is created, click Add Rate, input the pricing for the service, and click Save again to complete the setup. This streamlined process allows you to define and price single-delivery ad products in just a few steps.
Note: Since delivery products don’t rely on inventory control or scheduling, no date or time configuration is required.

