

The MediaOS Ad Server allows you to manage, target, and track digital advertisements directly through your site — all within one unified system. With tight integration between your website, CRM, and reporting tools, the ad server helps you streamline ad operations, optimize revenue, and deliver highly targeted experiences to your audience. For an overview of Ads (Finding, Uploading, and Assigning) click here.
Getting Started with the Ad Server #
Before you begin using the MediaOS Ad Server, make sure a few key requirements are in place. Your MediaOS plan must include Ad Server functionality, and your website should be connected to MediaOS through the Websites section. If your site isn’t hosted by MediaOS, be sure the MediaOS Plugin is installed on your WordPress site. Confirm that your products are assigned to the correct site under the Ad Server tab, and ensure the appropriate HTML embed code for each ad unit has been placed in the intended location on your website.
Note: This step is not required for MediaOS-hosted websites.
Creating a Product for the Ad Server #
To run ads through the Ad Server, you’ll need to make sure your product is properly set up in MediaOS. This involves creating a product that uses a Time Range with a defined Start and End Date, ensuring the ad can be scheduled and delivered during the intended campaign window.

When setting up your ad product, select the toggle for Multiple Ad Units and set the Ad Unit Measurement to pixels. You can also choose whether to schedule a calendar for ad delivery. Once the product is created, click Manage next to the product, then click Edit and check the box for Allow assigning of multiple ads per sold item. Recommended ad sizes include 300x250 for a rectangle, 728x90 for a leaderboard, and 100x100 for a square box.
Connecting Your Product to a Website #
To connect your product to a website, go to the Websites tab and click Add New Website, then fill in the required fields. If your site is hosted by MediaOS, select MediaOS Hosted. If you’re using WordPress, choose WordPress Enabled, which will prompt you to enter your credentials for integration. After setting up the website, assign your product to the Ad Server to complete the connection and begin serving ads.
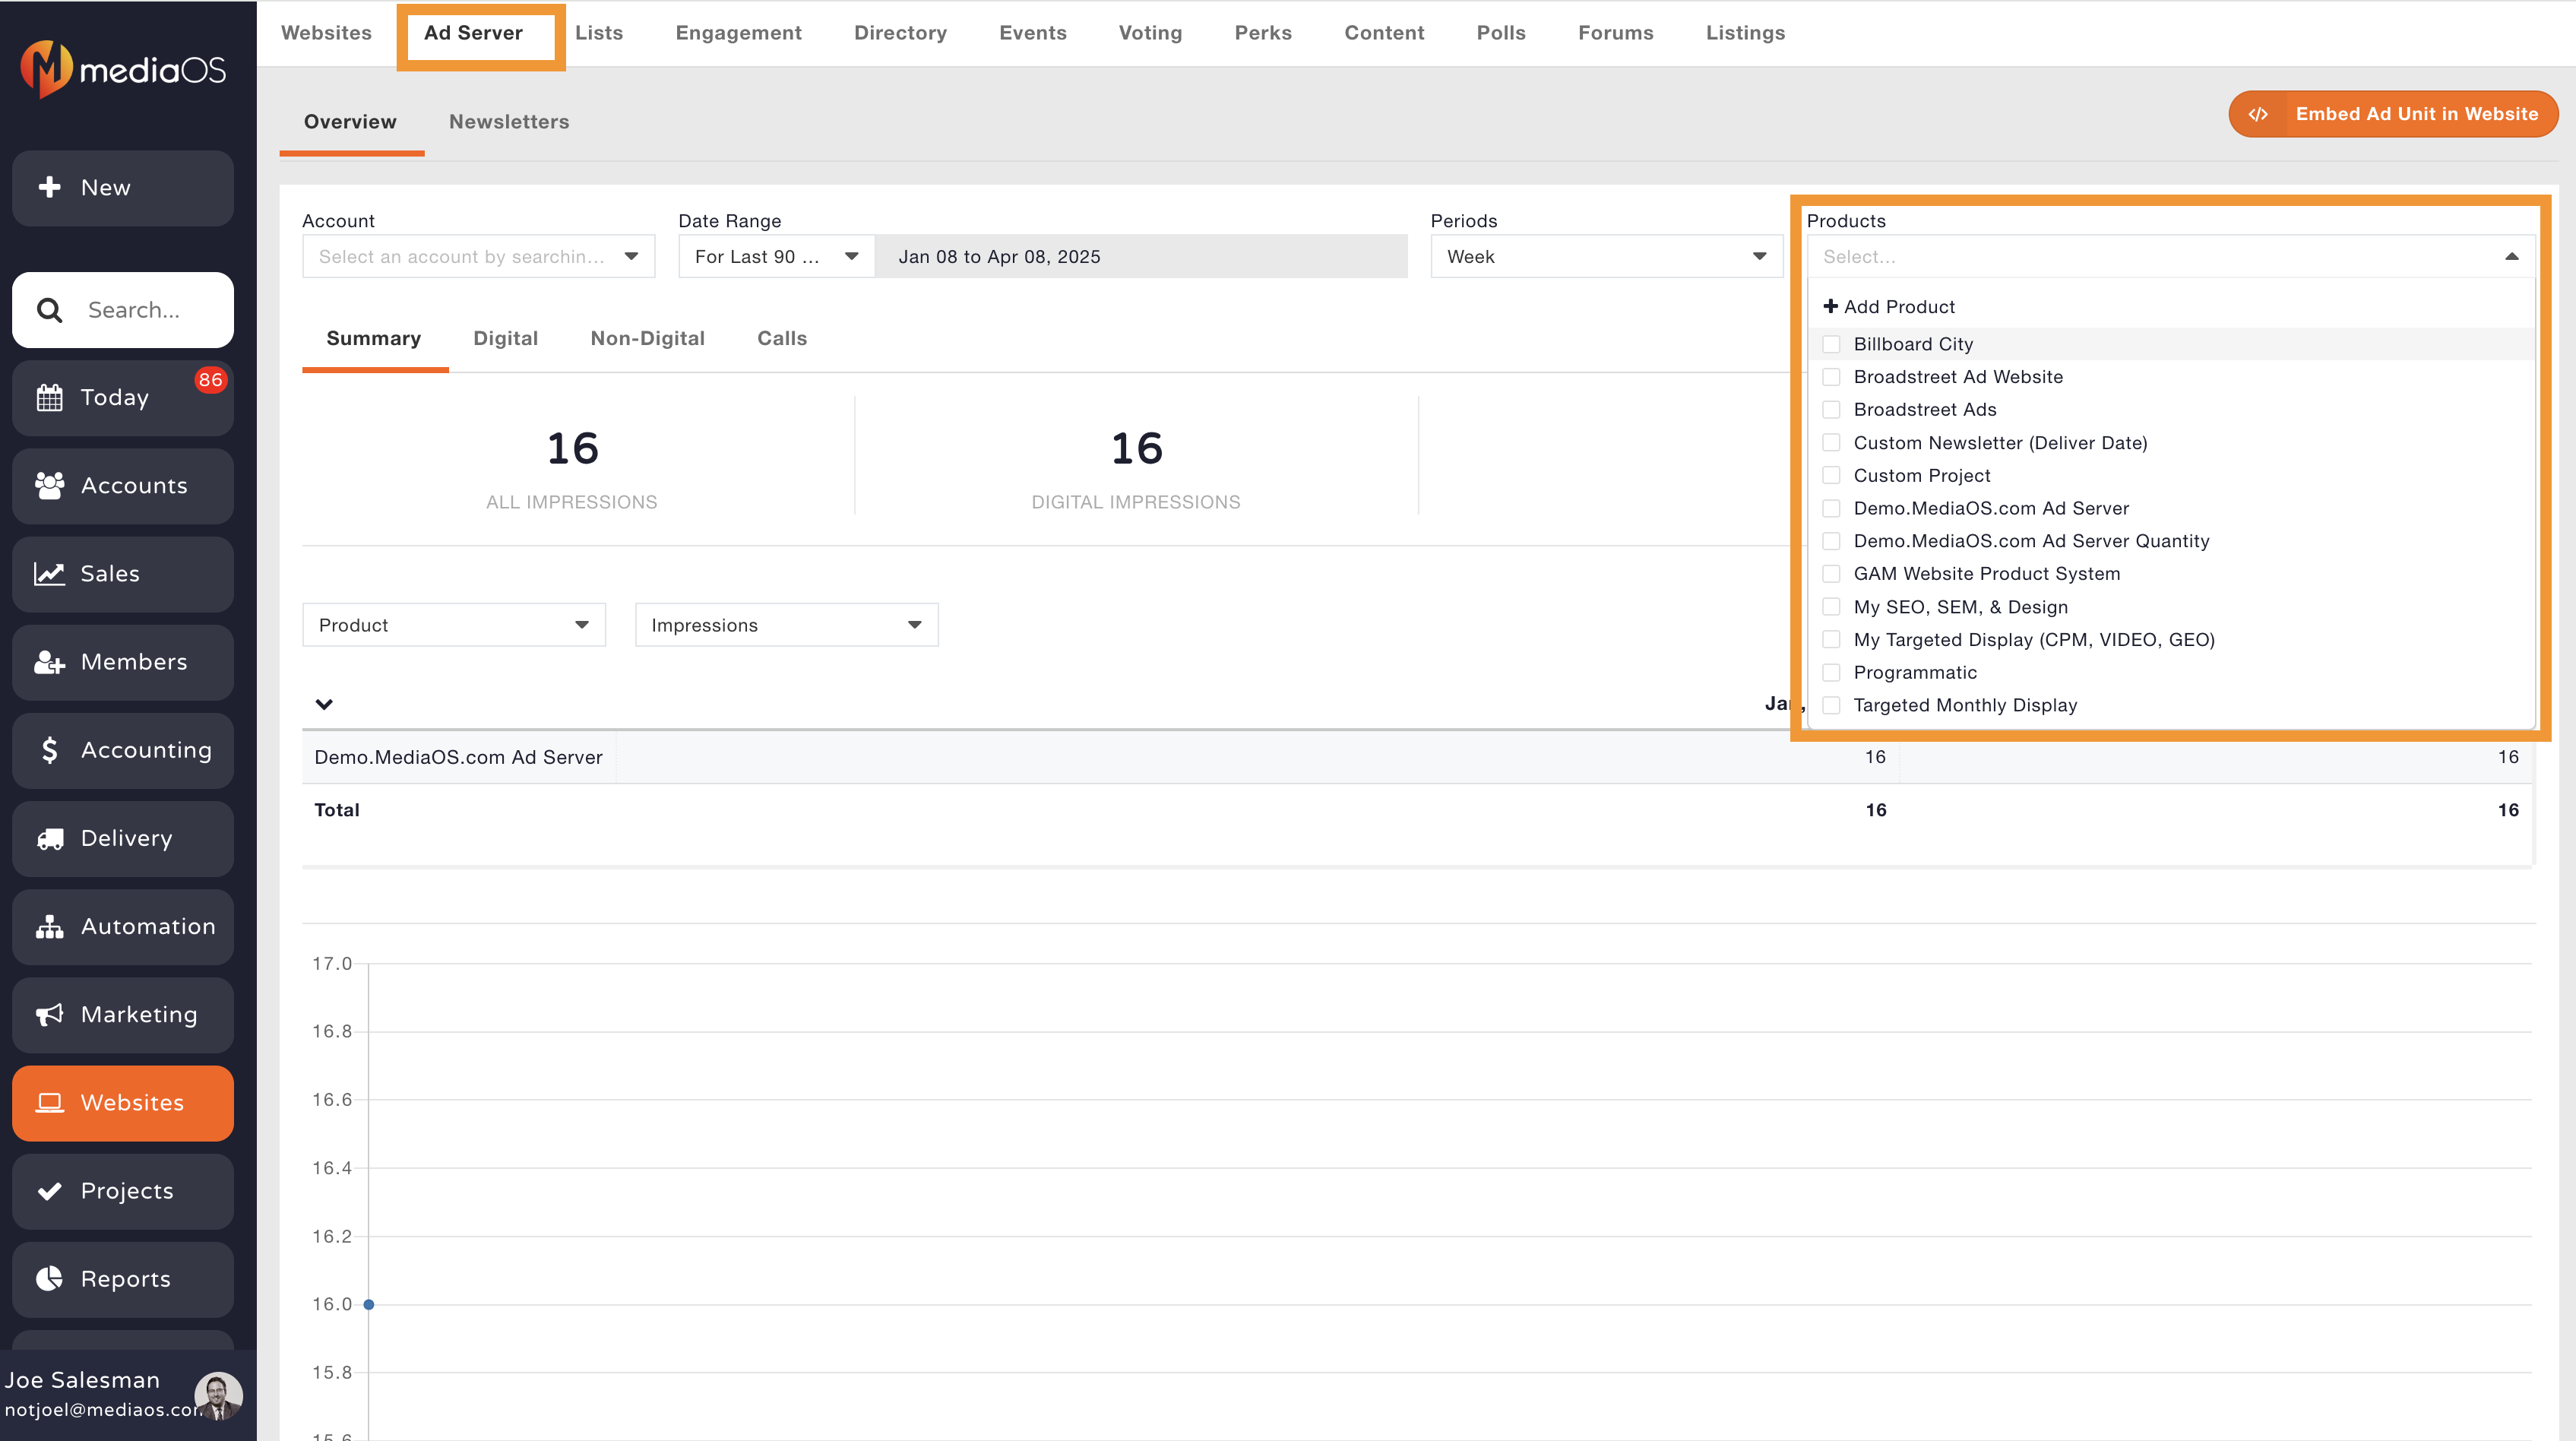
Next, select the Ad Server tab at the top of the website settings. Under Assigned Products, check the boxes for the products you want to run on the site. If needed, set the Change Ads Every X Seconds option to control how frequently ads rotate. You can also toggle Display one ad per placement if you want only one ad to appear in each designated ad space.
Line Items #
Line Items are the building blocks of any media campaign within MediaOS. Whether you're planning, trafficking, or optimizing, a solid grasp of how line items work is essential for accurate execution and reporting. More info on line items can be found here.
Assigning Assets to a Line Item #
Once a contract is marked as won, go to Delivery > Line Items and locate the appropriate line item. Click View, then click the box under Assigned Ad to open the Ad Library. To upload a new ad, click + New. Make sure your ads are in a web-friendly format like JPEG or PNG, as PDFs are not supported.
Warning: Each ad must include a Target URL, or it will not display.
After uploading, confirm that the ad size matches the unit size, and upload both desktop and mobile versions to ensure full coverage. Assigned ads will appear with a green border in the Ad Library.
Using the Ad Server in WordPress #
WordPress Site with MediaOS Theme #
If you're using a WordPress site with a MediaOS theme, log in to WordPress and click Customize from the top bar. Then, select the Advertisement Option to manage your ad placements. To preview how Article Ads will appear, navigate to an individual article page within your site.
WordPress Site without MediaOS Theme #
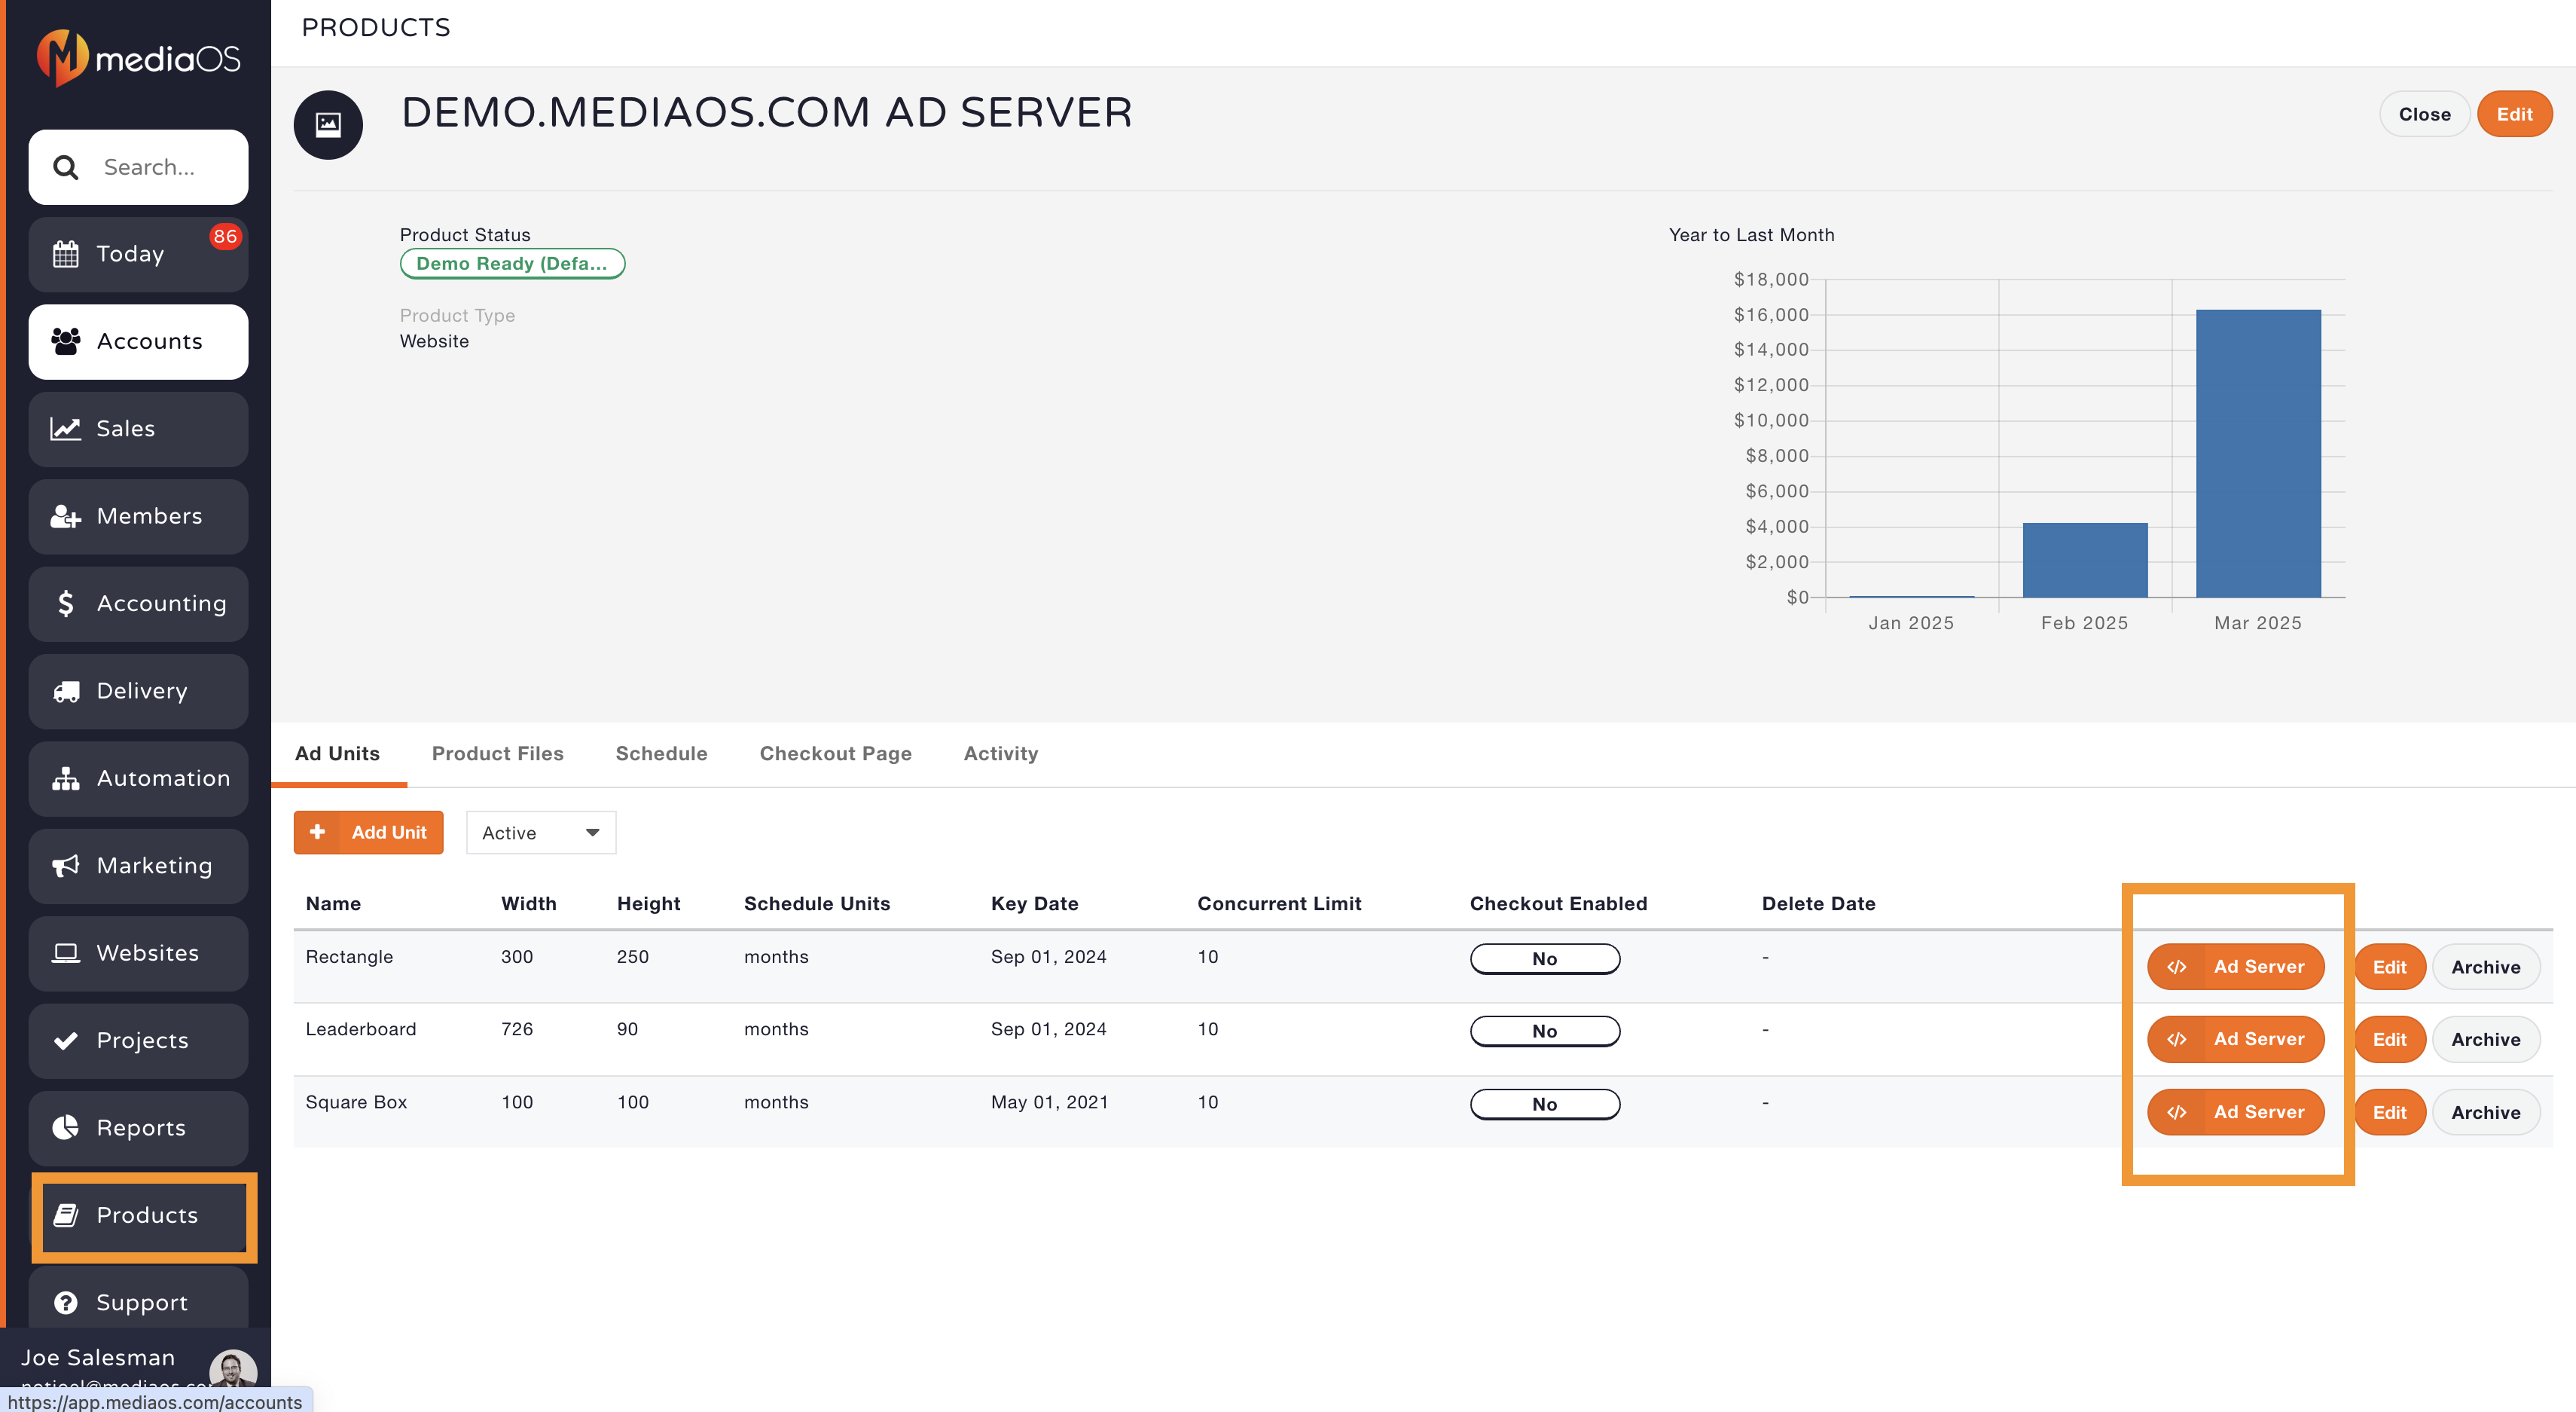
If you're using a WordPress site without a MediaOS theme, you can still display ads by using the HTML widget. Drag the widget to your desired location on the page and paste in the ad embed code. To find the embed code in MediaOS, navigate to your selected product, and under Ad Units, you’ll see an Ad Server embed button for each available ad size.
Elementor & MediaOS Ad Blocks #
To use MediaOS Ad Blocks with Elementor, start by selecting Edit with Elementor from the top menu. In the widget panel, search for MediaOS Ad Block, then choose your ad type—image, Google ad, or script. Paste your embed code into the block and place it where you want the ad to appear on the page.
Audience Targeting with the Ad Server #
Audience targeting in the MediaOS Ad Server allows you to deliver more relevant ads, boost engagement, and command premium pricing by giving advertisers access to the exact readers they want to reach. MediaOS supports detailed ad targeting through its audience segmentation tools. To get started, navigate to Members > Audiences to create audience groups and segment readers based on their behavior, tags, or the content they consume. For example, you could place readers into a Left-Leaning audience if they regularly engage with political articles. These audiences can then be used to serve different ads to known vs. unknown readers, target by author, category, or page type, or even combine groups for focused campaigns—such as targeting only Left-Leaning but Not Right-Leaning readers.
Click here to learn more about Audiences in MediaOS.
Selling Targeted Ads #
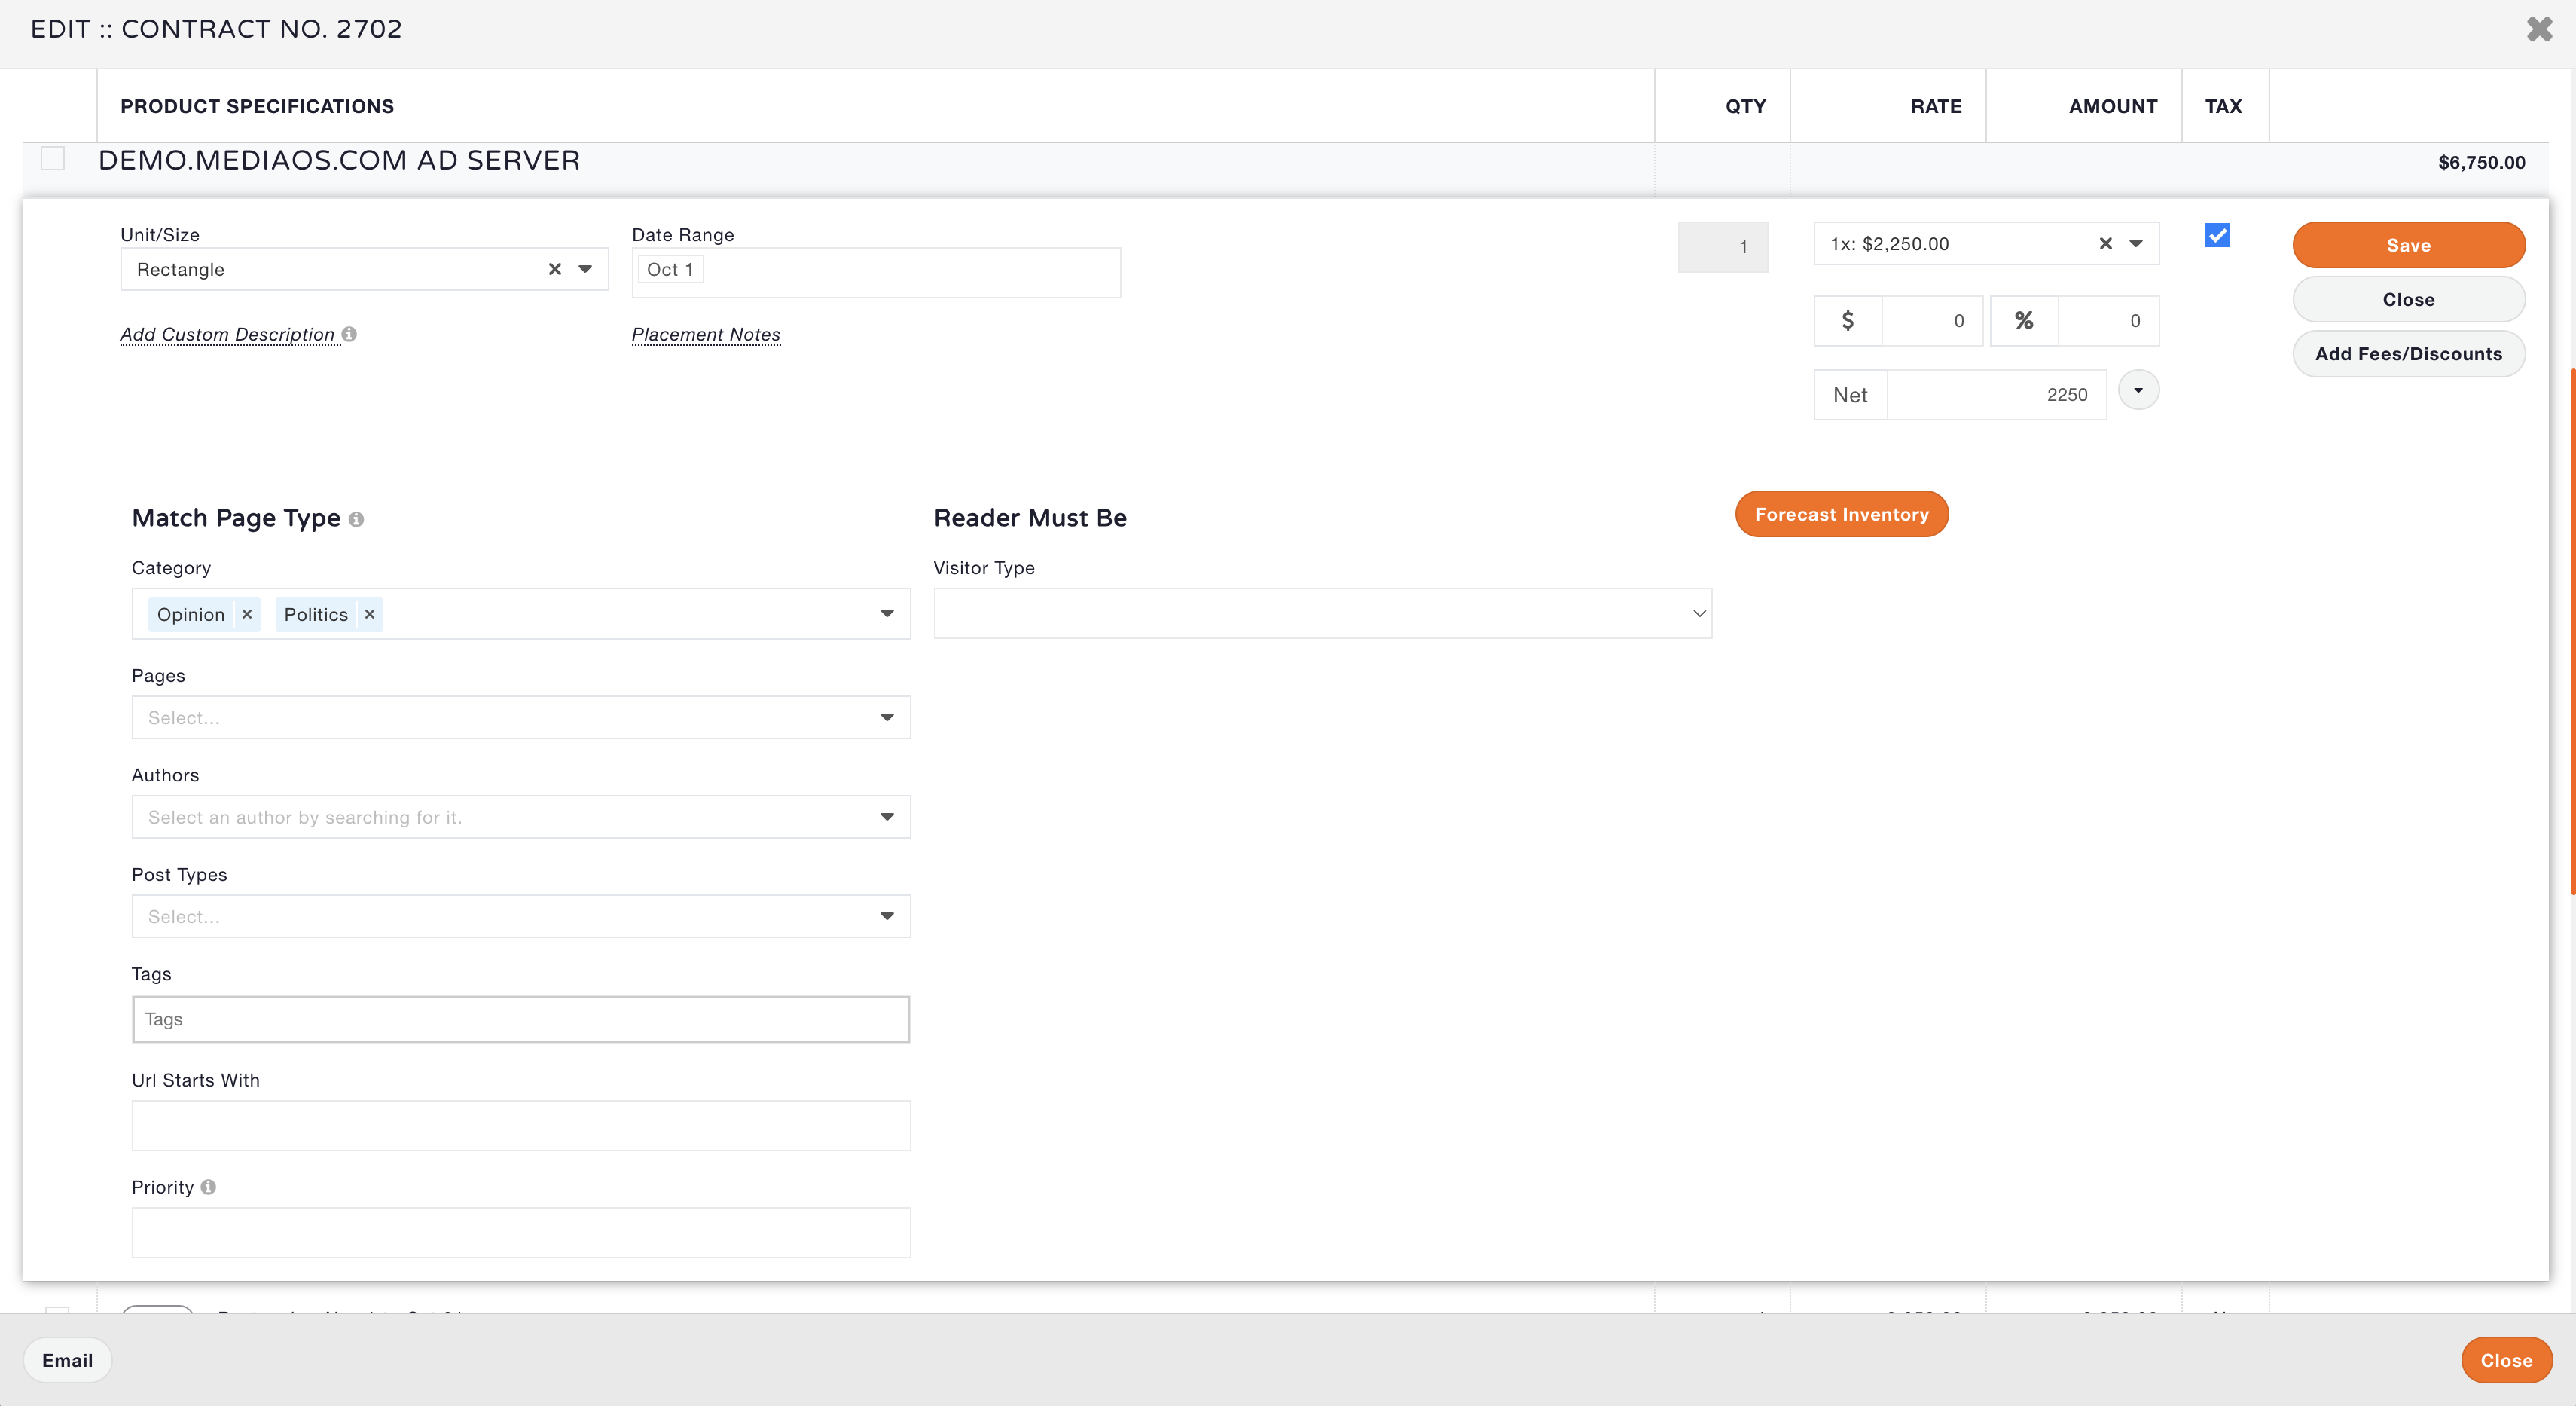
Selling targeted ads with MediaOS gives you a competitive advantage by offering advertisers precise audience targeting, transparent forecasting, and smarter ad placements that command higher rates and deliver stronger performance. To get started, go to the Sales tab and create a new contract proposal. Specify the unit size, quantity, dates, and any targeting rules. Use the Get Audience Count feature to estimate available inventory based on your targeting. Ads can be directed to individual pages, specific tags or categories, or reader attributes for maximum relevance.
Note: To use Reader Must Be, you must be using MediaOS’s full audience platform. This enables advanced segmentation and targeting logic.
The Forecast Inventory tool provides a detailed breakdown of your available ad impressions, helping you plan and price more effectively. It segments inventory by device type, reader status (known or unknown), and various page types and categories, giving you a clear view of where and how your ads can be served.
Managing Ad Requests & Proofs #
Managing Ad Requests & Proofs in MediaOS streamlines your workflow, making it easier to impress clients, speed up approvals, and close deals with fewer delays. To access this feature, navigate to Delivery > Requests, where you can view all active ad requests and proofs. The dashboard displays key details like request status, proof status, and pipeline activity. Click the magnifying glass icon to filter requests by assignee, status, or creation date. This centralized view helps your team stay organized, collaborate more effectively, and ensure that no request slips through the cracks.
Viewing Ad Server Analytics #
Viewing Ad Server analytics in MediaOS gives both your team and your advertisers the insights needed to demonstrate ROI, optimize campaigns, and confidently scale investment in targeted, high-performing placements. MediaOS offers two primary ways to view ad performance, giving you the flexibility to analyze results based on your goals and reporting needs.
Option 1: Reports Tab #
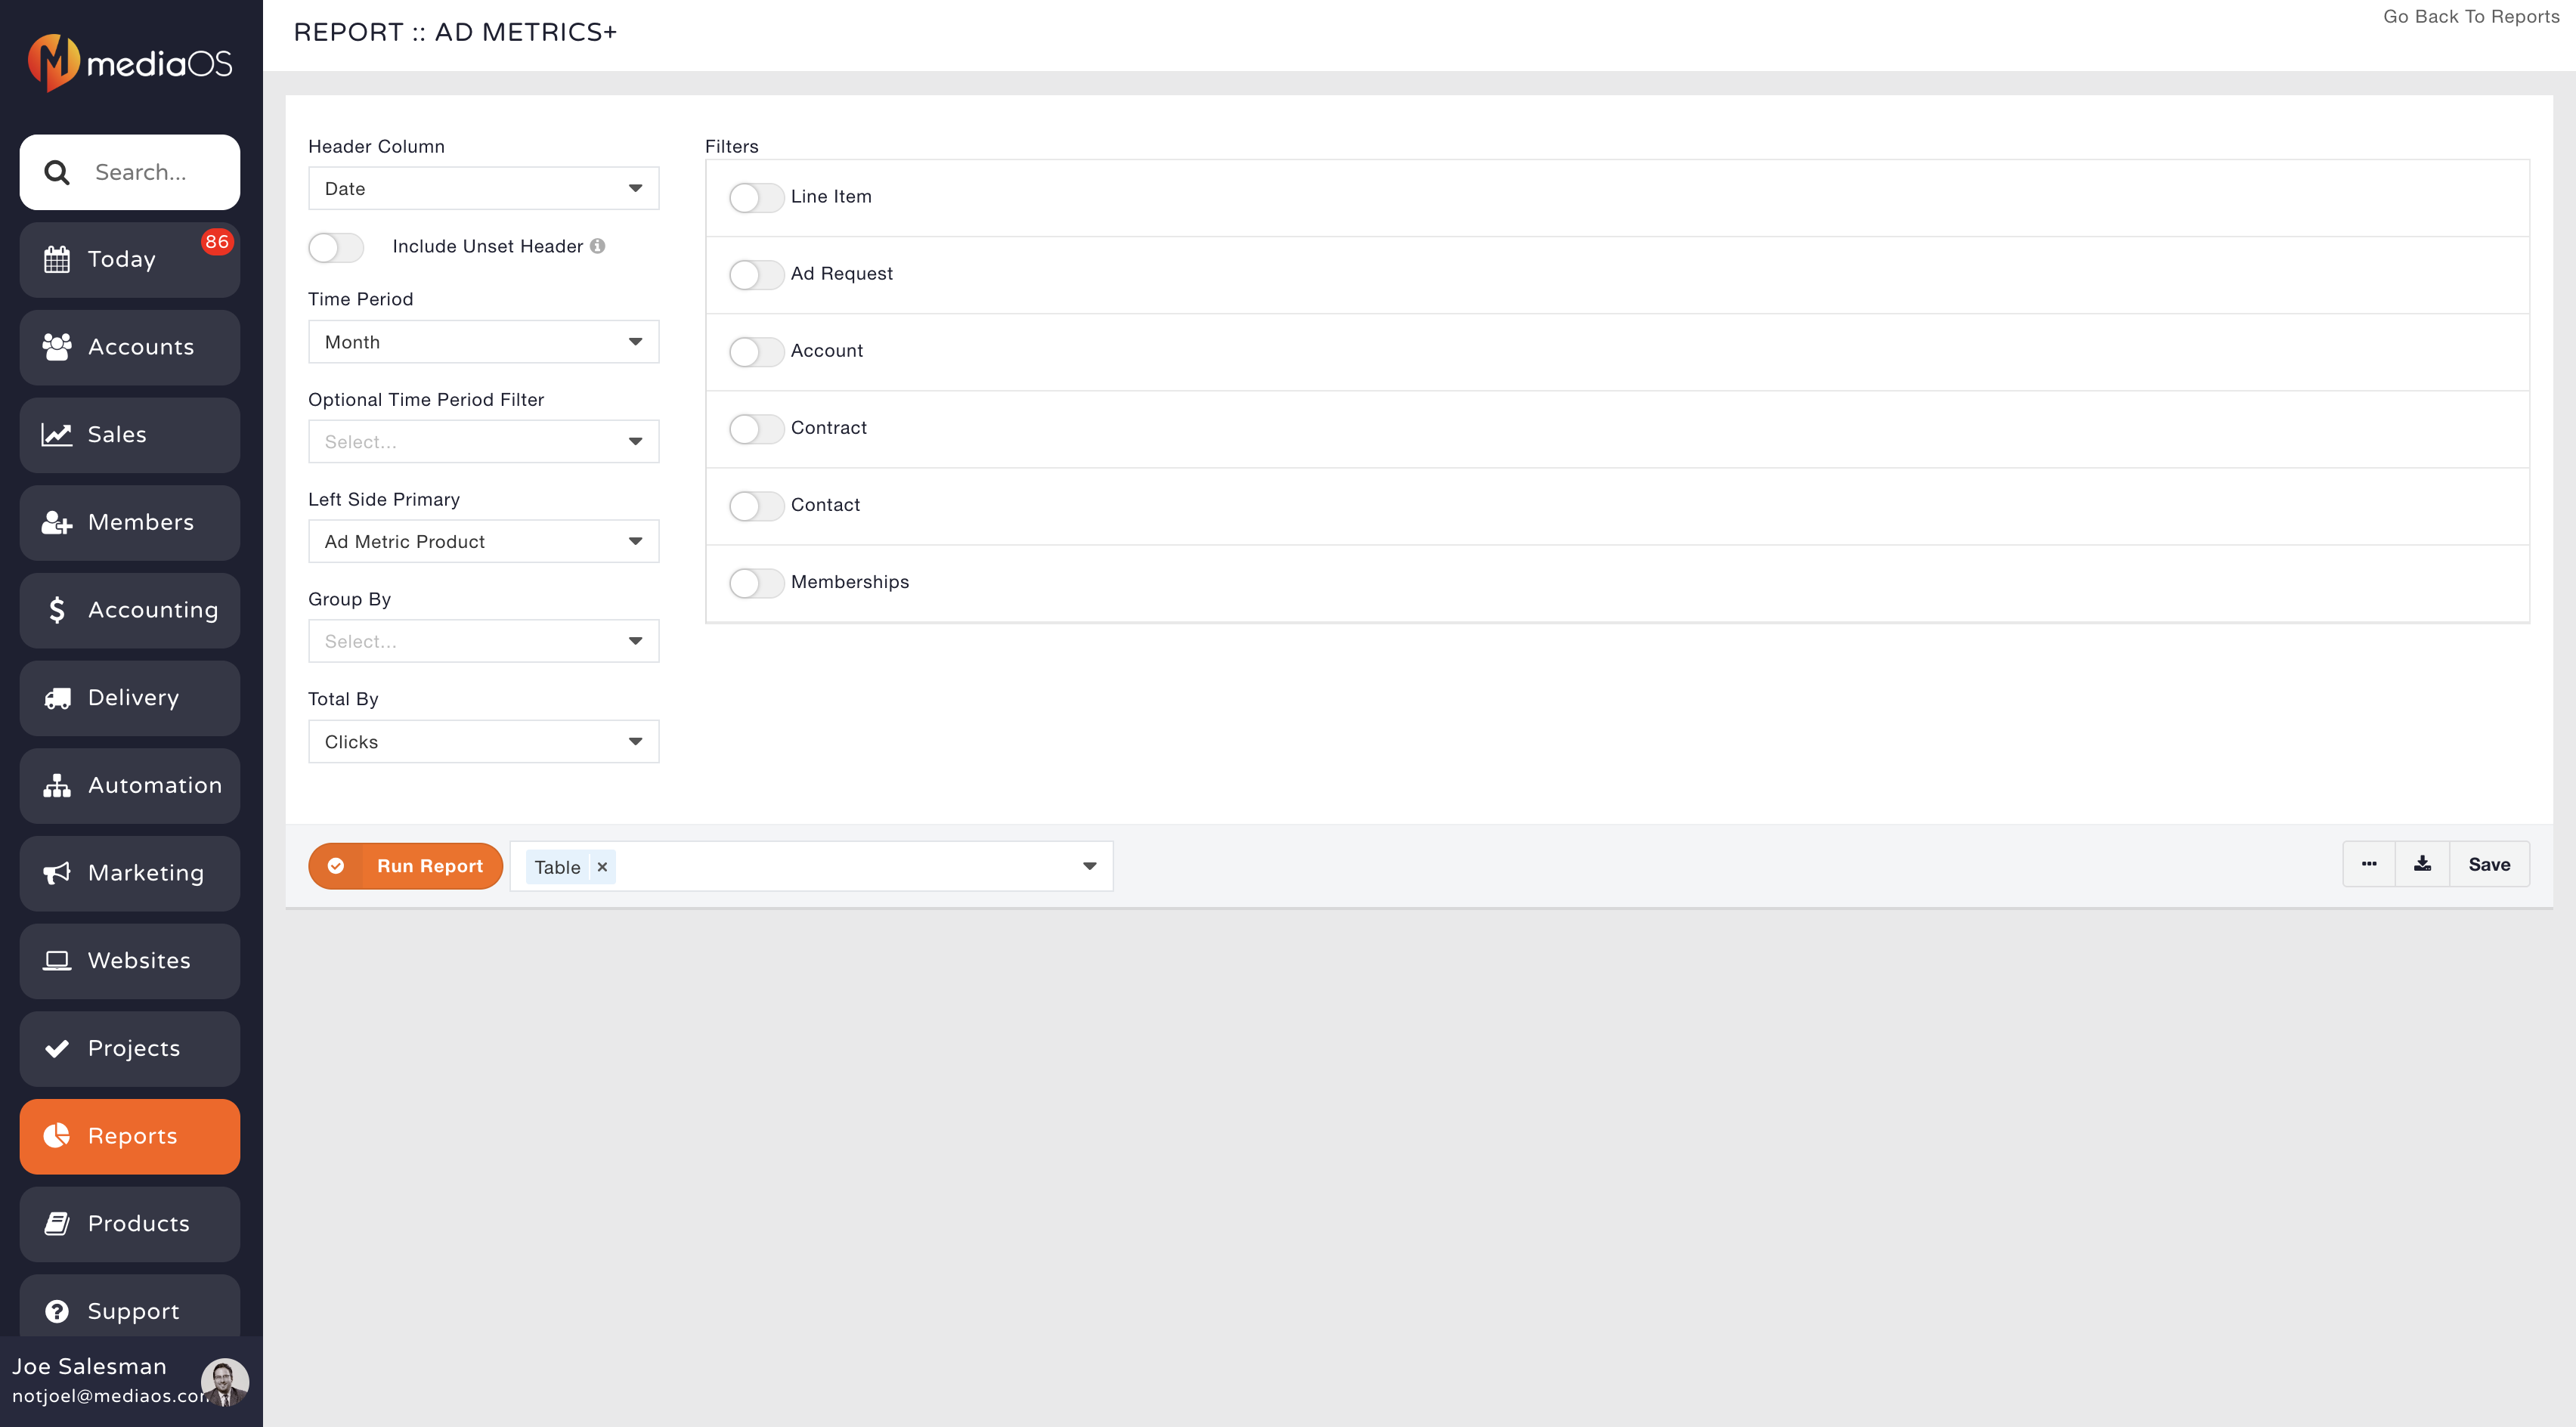
To view analytics using the first option, go to Reports > Delivery, then click the + next to Ad Metrics. From there, customize your report by selecting the metrics you want to analyze—such as clicks, impressions, or hovers—and click Run Report to generate your results.
Option 2: Account-Level Stats #
For a quick look at performance on a per-client basis, go to a specific account and click the Stats tab. This view provides real-time metrics, giving you immediate insight into how that account’s ads are performing.
Tip: These stats can be automatically pulled into invoices.
Including Ad Stats on Invoices #
Including ad stats on invoices provides clients with clear, measurable proof of performance, helping to build trust and validate their ad spend. To enable this feature, go to System Settings > General Settings, search for "Ad Server", and toggle Include Ad Server Report to ON.
Note: This will show ad stats (clicks, hovers, impressions) from the last 90 days directly on the client’s invoice.
Implementation Ideas: #
Here are a few practical ways you can use the MediaOS Ad Server to create targeted, high-impact advertising campaigns across your site. You can set up Author Sponsorships to display specific ads whenever a particular author publishes an article. With Geotargeted Campaigns, you can serve different ads to Canadian readers versus U.S. readers. Political Targeting allows you to deliver tailored political ads based on audience membership or reading habits. You can also implement Behavioral Retargeting to reach users who previously viewed a certain product or visited key sections of your site.

