

This guide covers three essential components of managing sales compensation in MediaOS: Commission Structures, Commission Payouts, and Commission Bonuses. Together, these tools help ensure your sales team is fairly and accurately rewarded for their efforts. Understanding how these elements work together is key to building a motivating, transparent, and effective compensation system.
Commission Structures #
Setting up Commission Structures correctly is essential for ensuring accurate payouts and aligning incentives across your sales organization. Whether you're configuring a common percentage-based structure or a more specialized, tiered commission plan, MediaOS provides flexible tools to support your needs.
Getting Started #
Note: The following information in this article is only available to Administrators, Sales Managers, and Accounting users.
To begin configuring commission tables in MediaOS, navigate to the Accounting section using the left-hand navigation panel. Once there, click on the Commission tab located at the top of the screen, followed by selecting the Tables tab. To create a new commission table, click the orange Add Table button.
The following examples illustrate various configuration options for setting up your commission tables. If your desired structure is not represented or you encounter difficulties during the setup process, assistance is available by contacting support at support@mediaos.com.
Flat Rate Commission Structure #
To configure a new commission table in MediaOS, begin by assigning a clear and descriptive name to the table. If you prefer not to pay commissions on items that have not yet run or been delivered, toggle the Ignore Undelivered Items option. Next, define the applicable date range by choosing either Sold Between or Line Item Date Between. Selecting Sold Between means the commission will apply to line items sold within the specified dates, whereas Line Item Date Between bases eligibility on the scheduled run dates of the line items.
After setting the date range, designate the Users who should receive commissions under this table. Then, choose the Pay Method, which determines when the user becomes eligible for commission. The Invoice (Net) method allows for commission eligibility once an item is invoiced, while the Paid Amount method (commonly referred to as "Pay on Paid") restricts eligibility to items that have been fully paid. Finally, enter the appropriate commission percentage and click Save in the bottom-right corner of the screen to apply your settings.
Example: A publisher pays a flat 10% commission rate to four sales reps on all items running in the year 2025. They do not pay commission on undelivered items and only pay commission once they have received payment. In this instance, their commission table would look like the example below.

Basic Tiered Commission Structure #
To set up a commission table in MediaOS, begin by naming your table to clearly identify its purpose or structure. If you do not wish to pay commissions on line items that have not yet run or been delivered, toggle the Ignore Undelivered Items option. Next, define the applicable date range, choosing between Sold Between—which applies the commission based on the date of sale—or Line Item Date Between, which applies based on the scheduled run dates of the line items.
After specifying the date range, select the Users who should be eligible for the commission structure. Then choose a Pay Method: either Invoice (Net), which makes users eligible for commission once items are invoiced, or Paid Amount (also known as "Pay on Paid"), which only allows commissions on fully paid line items.
Next, select the method by which you want to total your commission brackets: either Total Sales or Paid Amount. Choosing Paid Amount ensures sales reps move through commission brackets based on revenue that has actually been collected. Total Sales, on the other hand, calculates progression through brackets based on sales figures regardless of payment status—for example, a rep earning 10% on the first $50,000 of sales would advance to the next bracket once they sell beyond that amount.
After selecting your totaling method, define the commission tiers. Start by entering a value in the Sales Total To field, which represents the upper limit of sales that qualify for a specific commission rate. Then, input the corresponding base commission rate for that tier. Click the Add Row button to create additional tiers and repeat the process until all brackets have been configured. Once complete, click Save in the bottom-right corner to finalize your commission table.
Example: A publisher pays a 10% commission rate on the first $100,00 worth of items sold in the year 2025, regardless of when they are running. They pay a 12% rate on the next $100,000 worth of sales and 15% on all additional sales after that. They only pay commission once they have received payment, but are not concerned with paying commission on undelivered items. In this instance, their commission table would look like the example below.

Product Specific Commission Structures #
To configure a commission table based on specific product criteria in MediaOS, start by assigning a name to the table for easy identification. If you prefer not to pay commissions on line items that have not yet run or been delivered, toggle the Ignore Undelivered Items option.
Next, use the Filter by field to define the scope of the commission structure. You can filter by Product, Product Type, or Product Status. Selecting Product allows you to apply the commission to a specific item. Choosing Product Type enables you to include multiple products that share a common classification—ideal if, for example, you pay the same commission rate on all digital offerings. Using Product Status is helpful when multiple products, regardless of type, share the same commission structure due to a common status designation.
After selecting your filter type, choose the corresponding product, product type, or status in the field directly to the right of the Filter by menu. Then, define a date range using either Sold Between—which applies to items sold within the selected timeframe—or Line Item Date Between, which applies to items based on their scheduled run dates.
Continue by selecting the Users who should be eligible to earn the commission rate and define the Pay Method. Invoice (Net) allows for commission eligibility once the item is invoiced, while Paid Amount (also referred to as "Pay on Paid") limits eligibility to fully paid line items.
Finally, input the applicable commission percentage and click Save in the bottom-right corner of the screen to finalize your configuration.
Example: A publisher pays a flat 12% commission rate to four sales reps on digital products sold in the year 2025. They also pay an 8% commission rate to the same sales reps on their Monthly Magazine product, but only for the issues running in the year 2025. They do not pay commission on undelivered items and pay commission regardless if payment has been received. In this instance, they would set up two separate commission tables that would look like the examples below.


Tiered Commission Structures by Product #
To configure a product-specific, tiered commission table in MediaOS, begin by naming your commission table to clearly indicate its purpose. If you do not want to pay commissions on line items that have not yet run or been delivered, enable the Ignore Undelivered Items option. Next, use the Filter by field to determine which products the commission will apply to. You can filter by Product, Product Type, or Product Status. Selecting Product targets a specific item; Product Type allows for grouping multiple items that share a category (e.g., all digital products); and Product Status is useful when different product types share a common commission logic due to a shared status designation.
Once you’ve selected your filter type, choose the appropriate Product, Product Type, or Product Status in the adjacent field. Define the applicable date range using either Sold Between, which qualifies items based on their sale date, or Line Item Date Between, which qualifies items based on their scheduled run date.
Continue by assigning the Users who will earn commissions under this table. Then select a Pay Method: Invoice (Net) grants commission eligibility when an item is invoiced, while Paid Amount (or “Pay on Paid”) only does so after the line item has been paid in full.
For tiered structures, choose how you’d like to total your brackets—either by Total Sales or Paid Amount. The Paid Amount method ensures reps progress through tiers based on received payments, while Total Sales advances them based on sold amounts, regardless of payment status. For example, a rep earning 10% commission on their first $50,000 in sales would move to the next bracket upon surpassing that threshold in sold value.
Next, input a value in the Sales Total To field to define the upper limit of a commission tier, then enter the base commission rate associated with that tier. Click Add Row to add another tier, and repeat the process until all desired brackets have been entered. Finally, click Save in the bottom-right corner of the screen to complete your commission table setup.
Example: A publisher pays a 10% commission rate on the first $150,00 worth of Print Magazine Products running in the year 2025, regardless of when they were sold. They pay a 12% rate on the next $200,000 worth of Print Magazine sales running in 2025 and 15% on all additional Print Magazine sales running in 2025 after that. Sales Reps can only move up to the next commission when payments received exceed the initial bracket. They only pay commission once they have received payment, and do not pay commission on undelivered items. In this instance, their commission table would look like the example below.

Paying Commissions #
Paying out commissions within MediaOS is quick and straightforward, helping you stay on top of incentive payments with ease. Review, approve, and process commission payouts directly in the platform.
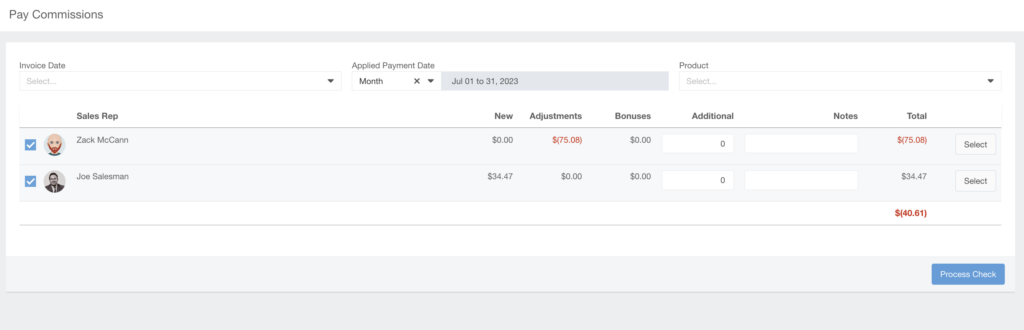
To process commission payments in MediaOS, begin by navigating to the Accounting section using the toolbar on the left-hand side of the screen. From the top bar, select Commissions, then click Paychecks in the sub-bar just below. To initiate payment, click Pay Commissions in the top-right corner. You’ll first choose whether to filter commissions by Invoice Date or Applied Payment Date. For organizations using the "Pay on Paid" method, it is recommended to remove the Invoice Date filter and rely solely on the Applied Payment Date for more accurate results.
You also have the option to narrow the data further by selecting a specific Product from the drop-down menu. The list below includes information for each sales representative:
- Sales Rep: A list of reps eligible for commission, allowing for full or selective payouts.
- New: Displays newly earned commissions.
- Adjustments: Reflects any modifications or claw backs.
- Bonuses: Shows bonuses that have been applied.
- Additional: A field to manually enter extra commission amounts.
- Notes: A customizable field for comments or feedback to be included on the paycheck.
- Total: The sum of all commission components for the rep.
You may further customize each paycheck by clicking Select on the right-hand side of a rep’s row. This opens additional options to remove or add line items.
Once you’ve reviewed and finalized all entries, click Process Check in the bottom-right corner. The processed paycheck will then appear on the sales rep’s Paychecks page, completing the commission payout process.
Note: MediaOS keeps track of all refunds, claw backs, and moving payments around and automatically applies them to the commissions paychecks. To see how these affect the paycheck, click Select on the right then scroll down to Retroactive Changes.
Commission Splits #
Commission Splits are managed at the contract level and can be set up directly within the contact’s Billing section. To get started, go to the Contact record and scroll down to the Billing section, where you’ll find a box labeled Commission Split. In this field, you can enter the details for your desired split. Keep in mind that commissions can only be split between two sales reps. The percentages you assign will be applied to what each rep has earned from the commission—for example, if you allocate 50% of the commission earned to Sales Rep B, and normally Sales Rep A would earn $100 while Sales Rep B would earn $50, the payout would be adjusted to $50 for Rep A and $25 for Rep B.
Note: Commission is based off of what sales reps would earn and the amount percentage you enter into the commission split. It is not based off the total value of the contract.
Note on Utilizing Trade in MediaOS #
Trades are carried out on the line item level. If you click Add Fees or Discounts, you are able to mark something as barter or trade and specify what you're being given. This zeros out the cash value and gives you the ability to track whether trades have been delivered. Sales reps won't earn commission on these line items because there is no cash value.
Commission Bonuses #
Applaud your Sales Reps who go above and beyond! Commission Bonuses are used outside of normal commission tables to get additional income for your representatives. Common examples of Commission Bonuses include New Customer Bonuses, Renewal Bonuses, and Number of Sales Bonuses.
Creating a Commission Bonus #
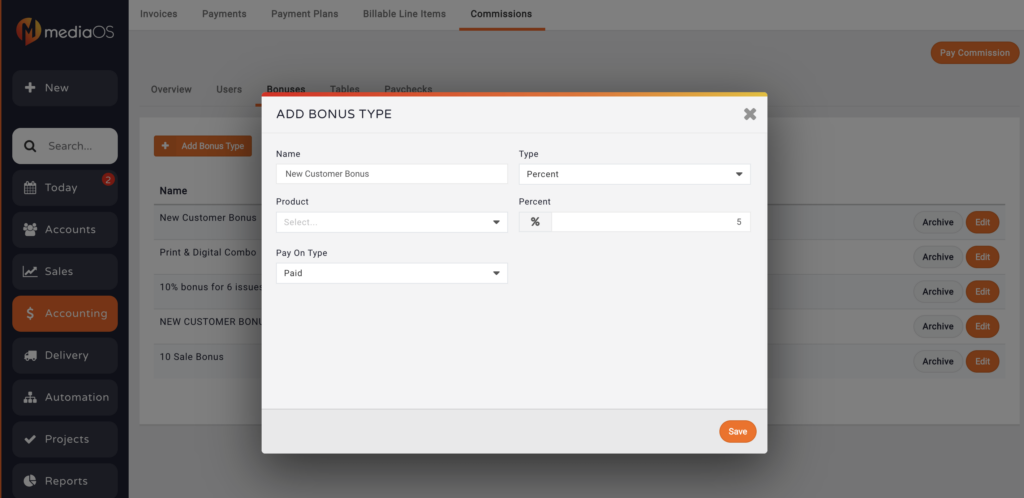
To create a new commission bonus in MediaOS, start by selecting Accounting from the main navigation menu. From the top of the screen, click on the Commissions tab, then select Bonuses from the commissions overview page. This will take you to a list of all existing bonus types in your system.
To add a new bonus, click Add Bonus Type, then complete the required fields to define the specifics of the bonus. Commission bonuses can be configured as either fixed dollar amounts or percentage-based values, and they can be applied to individual products or to an entire contract. Once all details have been entered, click Save to create and store the new bonus type. This bonus will then be available for use within your commission structure.
Applying for a Commission Bonus #
Sales representatives can apply for a commission bonus in two different ways. Either on the Contract Summary Call-Out, or by navigating to Contract Edit > Billing. Regardless of where you do it, the process is the same, select your bonus from your drop down and click Add Bonus. Your commission bonus will then be logged as pending until it is approved by Accounting or Administrator. Upon approval you will see the amount approved, a message and a notice that you received approval.
Approving Commission Bonuses #
Commission Bonus approvals can only be done by an Administrator or Accounting user and can be found in the Paychecks section of Commissions. Click here for more information on approving commission bonuses.

