The import functionality is a powerful feature that allows you to get your data from outside sources into MediaOS using our .csv import tool templates. Your data must be in a formatted .csv file that contains all required data needed to process the import. This article will discuss how to access the import tools, what format we are expecting, and the best business practices to ensure your data is imported efficiently and correctly.
To Access the Import Tools #
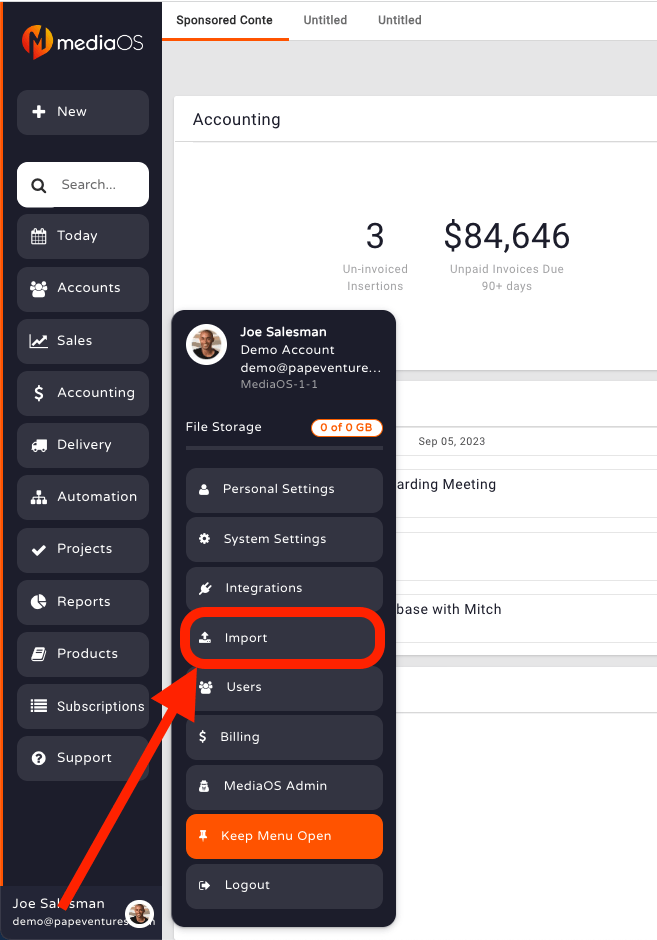
The import tools are found by selecting your Profile Avatar > Import using the left-hand navigation menu.
The Imports window displays each of the import tools. Due to the fact that many of these imports are dependent on one another, it is vitally important that your imports are conducted in the correct order. You must perform a lead or account import first. For instance, Account Tags cannot be imported until there are accounts in the system.
You can import the following data using our correlating import tool template.
- Leads (under the Accounts tab)
- Accounts
- ACH
- Unit Rates
- Account Owners
- Account Shared Owners
- Agencies
- Link Accounts to Agencies
- Contact Statuses
- Credit Cards
- Content
- Follow-ups
- Line Items
- Invoices
- Product Issues
- Lists
- Product Locations
- Notes
- Payments
- Subscriptions
- Tags
- Tasks
- Users
What is an import tool template? An import tool template is a spreadsheet that lists all the required columns for that particular import. If there is no data in a required column, then your import will fail. All required columns have an asterisk * in the column header. The import tool template also provides you with any optional columns. Optional columns can be left blank. For example, the Company Name* is a required column and can not be left blank. However, Tag 1 column is an optional field on the account/leads import tool template and can be left blank.
How to Format your .CSV File #
Your file can be made using Excel, Numbers, or any other spreadsheet creation tool. However, it must be converted to a .CSV file to import.
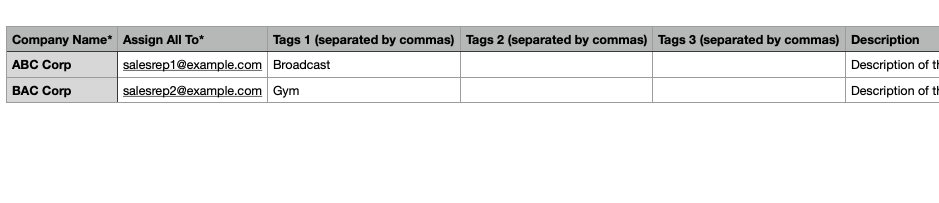
Prior to export, your data sheet will look something like this:

In the above example, you will see the column header across the top of the page, then the data for each cell filled in.
It is extremely important that each required column has a value. If there is no value in a required column, the import tool will fail. For example, with the Accounts & Leads imports, the required columns for Account Name and Sales Rep Email must not be left blank, but everything else is optional.
CODEPENDENCIES:
It is also important to note that some import fields have codependencies. For example, to import a contact for an account and/or lead, you must have a First and Last name associated with the contact. Simply mapping a contact email address and phone number without a First and Last name will not create a contact. Addresses also have codependencies. For example, you must have a street address, city, state and a zip for an entire address to import. If you don’t have all four fields, then addresses won’t be imported.
DUPLICATE ACCOUNTS
If your .CSV file contains duplicate entries that are an exact match, they will be merged into a single entry within MediaOS. If you have multiple entries that are similar but slightly different, for example, ‘Advertiser123’ and ‘Advertiser 123’, you will create duplicate accounts. So it is important to double-check you account names prior to creating the .CSV file. If you do create duplicate accounts, you can manually merge them in the system.
Note: .CSV imports are not case sensitive, so you do not need to worry about cases with your entries.
Some of our data import tools can only import a set number of records, so if you may need to run the import tool multiple times to capture all your data. Importing new data will not erase previously imported records. For example, the following imports have quantity limitations:
- Accounts & Leads – tags, notes, contacts, and contact information have limitations
- Tags – limited to 10 per import
- Contact Statuses – 1 per contact
- Agency contacts – limited to 1 per import
When importing your data, please do so in the order listed in this article.
Importing Accounts & Leads #
The first import you will need to complete is the Accounts & Leads import. This import tool is found by selecting your Profile Avatar > Imports from your left-hand navigation menu, then clicking the Accounts & Leads link.
Use the top portion of this import tool to choose your .CSV file for import. Click the Pick File button to choose your .CSV file for import or you can drag-and-drop a file from your computer directly to this window.
Leads and Accounts must be imported separately. You will use the same import tool template, but make sure one .csv file contains just leads and another separate .csv file for accounts. Enable the Import as Advertisers toggle to import all company’s as accounts (established clients) . Leave the toggle disengaged if you are importing leads.
Note: If you are importing both accounts and leads, you must make two separate import files. Leave the toggle disengaged if you are importing leads.
Note: If you are importing both accounts and leads, you must make two separate import files.
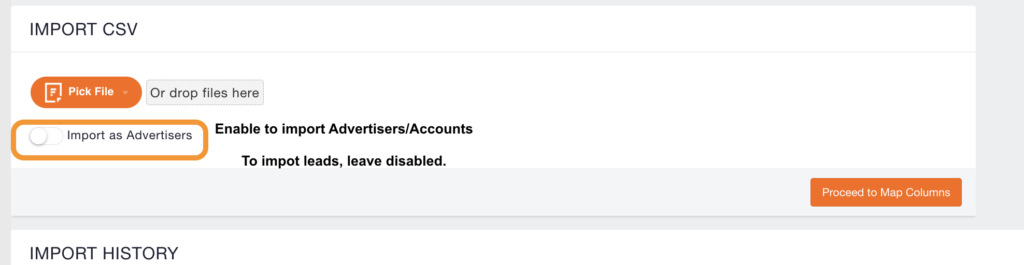
Click the Proceed to Map Columns button when you have selected your .CSV file.
When mapping Accounts or Leads, click the drop-down menu next to the field and select the column header for that data field.
Mapping the Accounts & Leads #
While there are only two required fields for Accounts & Leads, Lead Name and Assign All To, the recommended best practice is to complete as much information as you can. This will save you from manual entry down the road.
Here are some things to look out for when mapping Accounts & Leads:
- Account/Lead Name – This column must not have any blank rows. Any rows that are blank will cause the import to fail. To prevent blank rows, ensure that your spreadsheet does not have any rows, often at the bottom of the sheet, that are blank.
- Assign All To – To assign an account owner/sales rep to accounts, you must provide an email address in this required column. Also, ownership can only be assigned if a user has been created. If you want to assign all accounts to a single rep, you can also choose a MediaOS user from the drop-down menu.
- Tags – This import tool allows you to add three tags, but you can import more if you separate your tags by a comma in your data sheet. For example, your data sheet could contain a cell that looks like this:

- Primary Contact Information – You have five different options for primary contact information: Phone, Fax, Email, Skype, and Website. To add more data fields, select the number of fields you would like to add, then click the Add Data Fields button. Note: Phone numbers cannot include extensions. If you want to add an extension to a phone number, you must do that via the Account’s Page in MediaOS after the import.
- Primary Address – If you have multiple addresses, they must be listed in separate columns.
- Account/Lead Contact – You can add up to 13 contacts per account. Each contact must be separated into its own columns in the data sheet. Note: If you will be importing contacts, you must have a name mapped to the contact fields. Only mapping an email address or phone number without any name will result in a contact not being imported.
When you are finished mapping your columns, click the Start Importing Advertiser button at the bottom of the screen.
Note: Due to the taxing nature of this import, the Account & Leads tool runs at 15-minute intervals. If you click this button at 12:08, the import will run at 12:15.
Importing Line Items #
Importing Line Items is a similar process to importing accounts and leads. Select your Profile Avatar > Imports from the left-hand navigation menu, then click the Insertions link.
Use the top portion of this import tool to choose your .CSV file for import. Click the Pick File button to choose your .CSV file for import or you can drag-and-drop a file from your computer directly to this window.
Use the drop-down menu to choose which Product Type you’re importing. Common Product Types include, but are not limited to:
- Print Magazine
- Website
- Billboard
- Email Newsletter
- Newspaper
- Event
- Exhibit Space
Note: Line Items are imported by product type. You will have multiple data sheets for each product type that you are importing. For example, one for email newsletters, one for newsletters, one for website ads, etc.
Click the Proceed to Map Columns button when you have selected your datasheet and Product Type.
Mapping Line Items #
The following fields are required for mapping line items:
Note: This list may change depending on the product type you’re adding line items for.
- Account Name
- Sold By Email
- Sold Date
- Contract Number
- Product Name
- Issue Name
- Issue Date
- Ad Size Name
- Gross Rate
- Net
Here are a few things to consider when mapping line items:
- Contract Number – If you will be importing line items, payments, and contract info, the contract number you list here needs to be consistent across the board. If you do not use a contract number, all line items will be imported as separate contracts.
- Insertion Number – This field is not required, but it is highly recommended. Please ensure that your line item number is unique for each entry.
- Gross Rate – This is the total rate of return on an investment before the deduction of any fees, commissions, or expenses. This number needs to be listed as a number, not a currency.
- Net – This is what remains from the whole after certain deductions, fees, or expenses are made. This number must be listed as a number, not a currency.
- Currency fields – Most of the currency fields are only required if you are dealing with multiple currencies.
- CPM Imports – Because the system assumes all values are by the thousands, you will want to take that into account when including your impressions. For instance, if you sell 100,000 impressions, it would be listed as 100 in the data import sheet.
- Date Conventions – When importing dates, they must be listed as DD/MM/YYYY.
Importing Invoices #
Importing Invoices is a similar process to importing the other imports. Select your Profile Avatar > Imports from the left-hand navigation menu, then click the Invoices link.
Use the top portion of this import tool to choose your .CSV file for import. Click the Pick File button to choose your .CSV file for import or you can drag-and-drop a file from your computer directly to this window.
Note: Invoices are imported by line item type. You will have multiple datasheets for each line item type that you are importing. For example, one for email newsletters, one for newsletters, one for website ads, etc.
A line item types are fees or discounts. These can include finance charges, line item fees, invoice fees, write-offs, rate adjustments, and more.
Click the Proceed to Map Columns button when you have selected your datasheet.
Mapping Invoices #
Since invoices are imported by line item type, most customers use the Line Item Fee option for this import.
The following fields are required for mapping invoices:
- Create Date
- Account Name
- Comments/Notes
- Address Line 1
- Address Line 2
- Line Item Amount
Here are some things to consider when mapping your invoices:
- External Contract Number – This number must match the contract number that is listed in your Line Item import, otherwise the invoice will not be tied to its corresponding contract.
- Comments/Notes – While this field is listed as being required, you can choose to leave this blank if you do not use comments or notes.
- Line Item Amount – If you have an invoice with multiple line items, they must be listed separately in the datasheet. Ensure that your contract number is the same for each line item, and that line item will be included in that contract.
- Invoice No. – Pay special attention to this invoice number if you are planning on importing payments. Your imported payments must match the invoice number called out in this import for them to be associated with the correct invoice.
- Note: Line Item Description, Line Item Number, and Rate can be different to help differentiate between each individual line item.
Importing Payments #
Importing Payments is a similar process to importing the other imports. Select your Profile Avatar > Imports from the left-hand navigation menu, then click the Payments link.
Use the top portion of this import tool to choose your .CSV file for import. Click the Pick File button to choose your .CSV file for import or you can drag-and-drop a file from your computer directly to this window.
Payments are input as Payment IDs. If you do not use Payment IDs, contact your onboarding specialist, and we will work with you to create them.
Click the Proceed to Map Columns button when you have selected your datasheet.
Mapping Payments #
The following fields are required for mapping payments:
- Account Name
- Payment ID
- Payment Creation Date
- Payment Type
- Payment Last Four of CC or Check #
- Payment Amount
Here are a few things to consider when importing payments:
- Payment Type – This must be listed as the type noted in MediaOS. For example, if your client paid via Visa or MasterCard, it must be listed as Credit.
- Payment Last Four of CC or Check # – If you do not want these numbers added, please let your onboarding specialist know and we will add zeros in this field for you.
- You will only need to map to external invoice or contract numbers. You can ignore any internal invoice number or internal contract number.
Additional Regularly Used Import Tools #
While the previously mentioned import tools are the most important tools to ensuring your data is imported, the following import tools are also commonly used.
Agencies #
This import is found by selecting your Profile Avatar > Import, then clicking the Agencies link.
Importing agencies does not denote relationships. After you import your agencies, you will need to run the Account & Agency Relationship import. Your datasheet will include two columns, one for the account and one for the agency. Here’s an example of what the Account & Agency Relationship datasheet looks like:

Note: Only one agency contact may be imported at a time. If you have multiple contacts, simply need to run the import again and map the contact fields for the second or third contact columns in the datasheet.
Account Tags #
This import is found by selecting your Profile Avatar > Import, then clicking the Account Tags link.
- This must be done after importing your accounts.
- Your datasheet must include a row for accounts. No rows can be left blank on this column.
- There is a maximum of 10 tags you can import for this import. If you need to add more tags, you can run the import multiple times.
Contact Statuses #
This import is found by selecting your Profile Avatar > Import, then clicking the Contact Statuses link.
- The contact name must be listed (First and Last in two separate fields) for the statuses to be brought over to the correct contact.
- Your datasheet must include a row for accounts. No rows can be left blank on this column.
- Contacts can be assigned one status at a time. If you perform multiple imports, the statuses will be overwritten.