Time Based product types are generally used for digital products or for products that occur on a daily, weekly or even monthly basis. Time Based allows you to set an inventory for Ad Sizes and specify the increments in which that Ad Size is sold. Unlike Issue Based product types, you do not need to manually configure issue dates or schedules. You can simply indicate the increments an Ad Size is sold.
Creating a Time Based Product Type and Product #
- Go to Products on your left-hand navigation column.
- Click the + Product button.
- Select the + New Type button to the right of the Existing Product Type field.
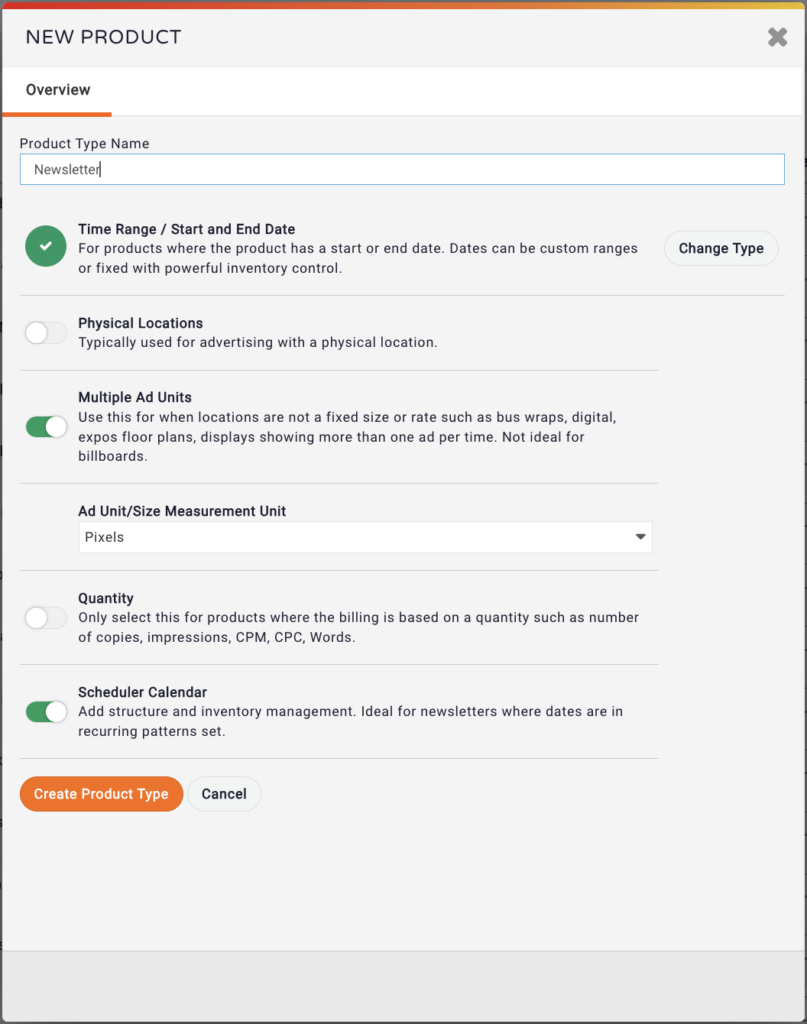
- Name the product type.
- Select Time Range / Start and End Date
- Choose any of the following options:
- Physical Location: Use this option if you need to track advertisements by their physical location. Typically used for selling bus wraps, billboards, or digital display screens.
- Multiple Ad Units: Allows for the ability to sell multiple unit sizes under a single product.
- Note: If you require inventory controls for your product, then you MUST select this option.
- Ad Unit Size/Measurement Unit: If you select multiple ad units you will select the unit of measurement used for the product whether that be pixels, inches, cm, etc.
- Quantity: Only select this for products where the billing is based on a quantity such as number of copies, impressions, CPM, CPC, Words.
- Scheduler Calendar: Add structure and inventory management. Ideal for newsletters where dates are in recurring pattern sets.
- Note: If you require inventory controls for your product you MUST select this option.
- Once you decide on the product type you’d like, click on the Create Product Type button. The example below displays the correct setup for a time based products with inventory controls, no physical locations or quantity.
- A confirmation window will appear. Read the message and type “I Understand” into the text box.
- Click Confirm.
- Name your product and Save.
Configuring Unit Sizes for a Time Based Product #
As soon as you hit the save button, the product’s details page will load. From here, you’ll be able to set up your unit sizes and rates.
- Click the + Add Unit button.
- Name the Ad Size and enter the Width and Height.
- Enter a Key Date
- The Key Date determines the first day/date that an ad displays
- If sold in Days, the Key Date is not relevant. Simply choose a date in the past so that the timeline calendar starts displaying available dates from that point on. Note: We generally suggest picking the first day of the month.
- If sold in Weeks, choose a Key Date that starts on a Monday. This way, your weekly increments start on a Monday vs an arbitrary day in the middle of the week. If you choose a Monday, all bookable weeks will start on a Monday.
- If sold in Months, choose a Key Date that determines what day you want your monthly increments to display. If you want a month to start on the first of the month, then choose a Key Date that is the first of the month. If you want your months to start on the 15th of each month, choose a Key Date that is the 15th of the month.
- If sold in Yearly increments, choose a Key Date that determines when the start of your year is. Generally, you’ll want to choose the past January 1, so that your years start on the first of the year.
- Note: Regardless if you are selling the ad unit in days, weeks, months, or years, always select a key date in the past.
- The Key Date determines the first day/date that an ad displays
- Choose the Sold In increments for your Ad Size
- Indicate which days of the week are allowed to be sold. If you are selling in Weeks, Months or Years you must check every day. If you are selling in Days, then choose the days that are allowed to be sold.
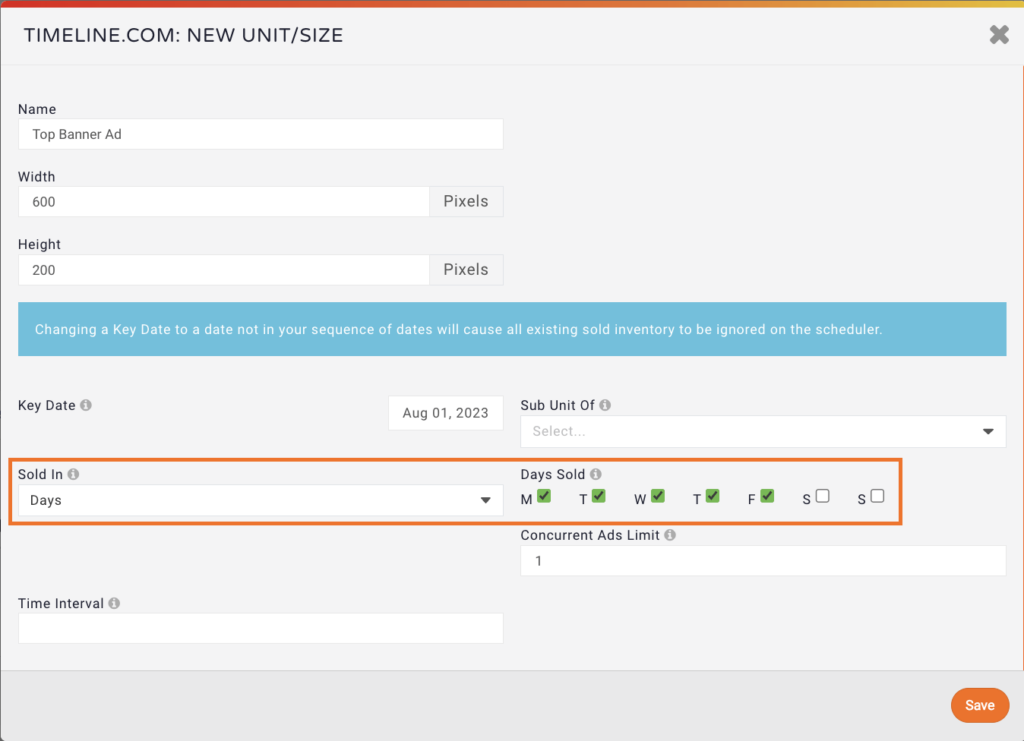
- Choose the Concurrent Ads Limit. If you have a limited inventory for this Ad Size, input how many of this Ad Size can be booked at one time. For example, if you have a position on your website that can only rotate 3 clients at a time, input your limit as 3. But if you have an unlimited inventory, put in a large quantity like, 999.
- Set the Time Interval. The Time Interval allows you to program the schedule to skip days on a recurring basis. For example, if you want to sell an ad every other day, enter 2 as the time interval. Then, the system will skip every other qualified date. If you enter 10, the system will skip 9 dates and every 10th match will appear as a sellable option.
- Note: If you do not wish to skip any eligible dates, you can ignore the Time Interval setting or simply enter 1 into the field.
- Click the save button.
- After you click save a section to enter rates associated with this ad unit will then appear at the bottom.
- Enter the Ad Rate Name.
- Note: An Ad Rate is tied to an individual Ad Size. You can create as many Ad Rates for a single Ad Size as you’d like.
- Specify the number of days, weeks, months, or years you’d like this Ad Rate to group together. This takes the Sold In increments you selected for the Ad Unit and group together the number you specify here. For example, if this Ad Size is sold in Weekly increments but you’d like to group together 4 weeks to equal a month, you would input 4 Units. Then this Ad Rate would be how much it costs to run this Ad Size for a month. You can do the same if you sell in Monthly increments, but want to group together 12 months to equal a year
- Input the Ad Rate amount. Keep in mind that if you input a larger unit than 1 in the previous step, the Ad Rate will be for how many increments you grouped together. So if you input a Unit of 4 weeks, then you need to input the Ad Rate amount as the total cost for 4 weeks (or the increment you chose).
- Click the save button.
- Repeat these steps until you have all your Ad Sizes and their corresponding Ad Rates added.