Tired of tracking commissions on spreadsheets? Then, it’s time to simplify your life with mediaOS commissions! Start saving time, minimize errors and build trust with your sales team with mediaOS commissions.
Need to Know #
First, to set up commissions, you need to be running your invoicing through mediaOS. If you’re generating invoices in Quickbooks or somewhere else, mediaOS cannot support running commissions on those invoices.
Commissions in mediaOS are generated on a per line item basis. For example, you can invoice something that has 20 different line items from 10 different products and use 20 different commissions tables. Read below to learn how to set up commissions.
Understanding the Commissions Tabs #
- Overview — This page shows you an overview of everything commissions related, including how much commissions have been earned last month and this month, how much each sales reps have earned, and when they might be jumping up to another commissions level.
- Users — See individual sales reps and their actual commissions.
- Bonuses — This allows you to set up individual bonuses that might not follow the usual schedule. You can have your sales reps apply for these and approve/decline them.
- Tables — Where you set up how your commissions are going to work.
- Paychecks — Where you’ll see a list of paychecks you’ve sent in the past, and where you can pay out your other commissions.

Setting up a Commissions Table for Products #
- Click Accounting in the toolbar on the left hand side of the screen.
- Click Commissions in the top bar.
- Click Tables in the sub-bar beneath.
- Click the blue Add Table button in the top right corner.
- Note: Commissions tables are set to run by the most specific thing first.
- Name the table in the Name section.
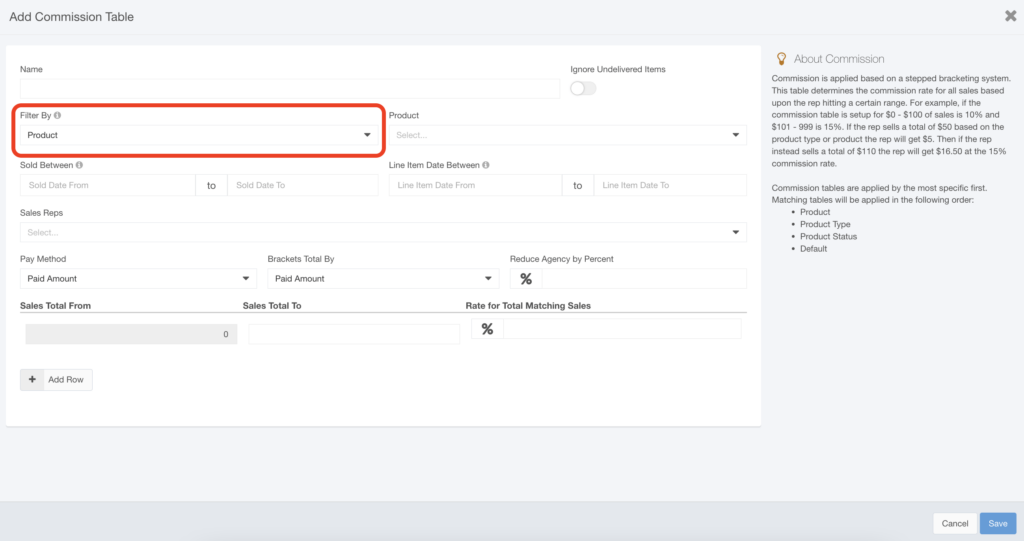
- Click on the drop-down below Filter By and select Product.
- Select the product you want to use in the left drop-down labeled Product.
- Select the dating option you want to use, either Sold Between or LIne Item Date Between. Tip: We recommend choosing just one of these to keep things simple.
- Sold Between — This will be only paid online items that have been sold between these dates.
- Line Item Date Between — This sets up commissions for when a product is running versus when it was sold.
- Choose the sales rep(s) you want this commissions table to apply to by clicking on the drop-down beneath Sales Reps and selecting the rep(s).
- Click the drop-down under Pay Method to determine if you want to pay commissions by Paid Amount or As Invoiced (Net).
- Paid Amount — This means an invoice must have a payment applied to it in order for a commission to generate (also known as Paid on Paid). In other words, your sales rep doesn’t get their commission until the client pays their invoice.
- As Invoiced (Net) — This means as soon as an invoice is created, the full commission will be paid out.
- If you work with agencies and would like to reduce commission by a certain percentage (or set up an agency fee), enter that percentage in the space available under Reduce Agency by Percent.
- If you’re setting a flat percentage, entering that percentage in the space available under Rate for Total Matching Sales.
- Optional: Set up an incentive using the Sales Total From and Sales Total To rows. Ex. If X rep sells over $150,000 (enter this amount under Sales Total To) then the commission percentage will bump up to 12%.
- Click the drop-down under Brackets Total By to determine if you want to total the commissions by
- Paid Amount or Total Sales.
- Paid Amount — Total by what has been paid.
- Total Sales — Total by the total amount of sales for this product.
- Note: These options determine how the brackets you set up in Step #13 are calculated.
- Choose whether to click the toggle on Ignore Undelivered Items. Note: This tells the system you don’t want to pay commissions on anything that has not run yet. Ex. This is for those clients who pay for the entire year up front, and you don’t want to pay commission on everything for that year all at once. Clicking the toggle switch means that anything that hasn’t run yet or has not been delivered will not pay commission on until it becomes delivered.
- Click Save in the bottom right corner to save your commissions table.

Setting up a Commissions Table for Product Type #
Note: This example is going to feature how to incentivize sales of a particular Product Type throughout a particular month.
- Go to: Accounting>Commissions>Tables
- Select Add Table in the top right corner.
- Give the table a NAME.
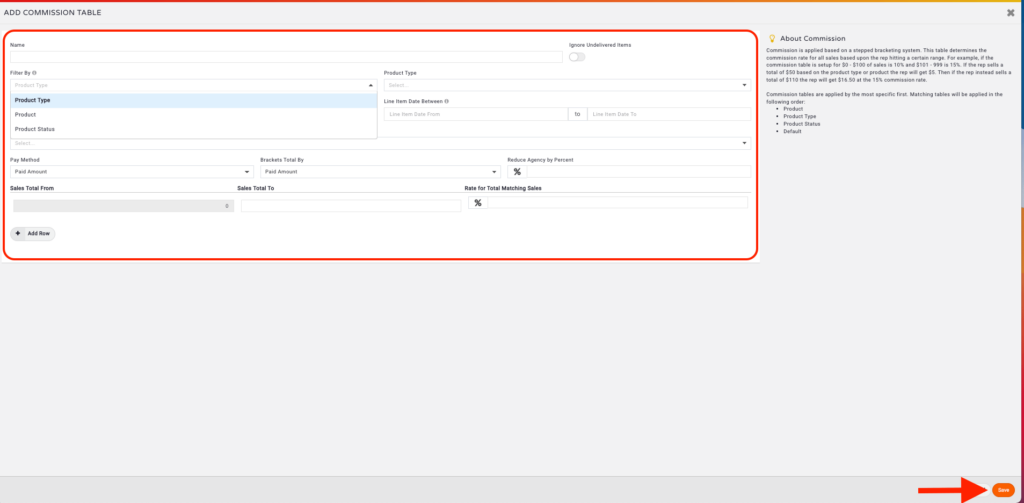
- Click on the drop-down below Filter By and select Product Type.
- Note: This example will showcase how to incentivize your sales reps in a specific month.
- Select the Product Type from the drop-down.
- Select the dating option you want to use, either Sold Between or Line Item Date Between.
- Tip: We recommend choosing just one of these to keep things simple. For this example, we’re choosing Sold Between Feb. 1, 2023 through Feb. 28, 2023.
- Choose the sales rep(s) you want this commissions table to apply to by clicking on the drop-down beneath Sales Reps and selecting the rep(s).
- Enter your percentage in the space available under Rate for Total Matching Sales. Now, you have a table that says for any Product Type you chose that’s sold in your date range, X sales rep(s) will receive a “x%”commission.
- Click Save in the bottom right corner.

Setting up a Commissions Table for Product Status #
Note: This example is going to feature how to incentivize sales of a particular Product Type throughout a particular month.
- Go to Accounting>Commissions>Tables
- On the Tables page in the Commissions section, click Add Table in the top right corner. (See previous section on Setting Up a Product Table for Navigation instructions from the home screen.)
- On the page that Name the table in the Name section.
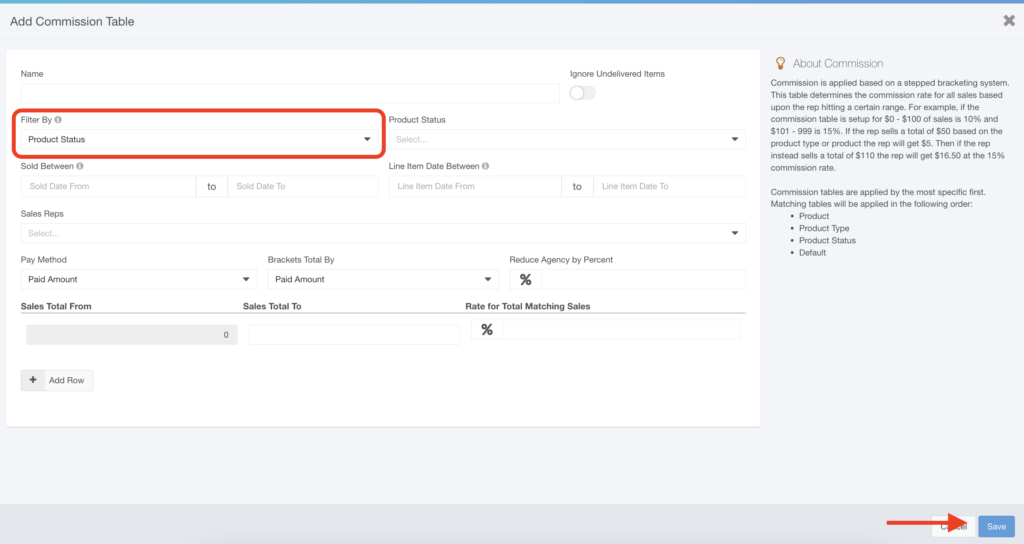
- Click on the drop-down below Filter By and select Product Status. Note: This example will showcase how to incentivize your sales reps in a specific month.
- Select the product status you want to use in the left drop-down labeled Product Status.
- Select the dating option you want to use, either Sold Between or Line Item Date Between. Tip: We recommend choosing just one of these to keep things simple.
- Choose the sales rep(s) you want this commissions table to apply to by clicking on the drop-down beneath Sales Reps and selecting the rep(s).
- Click the drop-down under Pay Method to determine if you want to pay commissions by Paid Amount or As Invoiced (Net).
- Click the drop-down under Brackets Total By to determine if you want to total the commissions by Paid Amount or Total Sales.
- Enter your percentage in the space available under Rate for Total Matching Sales.
- Click Save in the bottom right corner.

Setting up a Commissions Table for Default #
- Go to Accounting>Commissions>Tables
- On the Tables page in the Commissions section, click Add Table in the top right corner.
- On the page that Name the table in the Name section.
- Click on the drop-down below Filter By and select Default.
- Note: This creates a general catch-all commissions table.
- Select the dating option you want to use, either Sold Between or Line Item Date Between. Tip: We recommend choosing just one of these to keep things simple.
- Choose the sales rep(s) you want this commissions table to apply to by clicking on the drop-down beneath Sales Reps and selecting the rep(s).
- Click the drop-down under Pay Method to determine if you want to pay commissions by Paid Amount or As Invoiced (Net).
- Click the drop-down under Brackets Total By to determine if you want to total the commissions by Paid Amount or Total Sales.
- Enter your percentage in the space available under Rate for Total Matching Sales.
- Click Save in the bottom right corner. You now have a commissions table that will apply to anything not already determined in your Tables.


