MediaOS integrates with several third-party vendors. From processing payments to managing your email, there are a lot of great integrations at hand. Most third-party vendors require an account to be created or sign in using your existing account in order to integrate with MediaOS.
This article will go through the following most common integrations needed to get you started:
- Payment Processors
- Digital Ad Management
- Calendar
- DocuSign
- QuickBooks Online
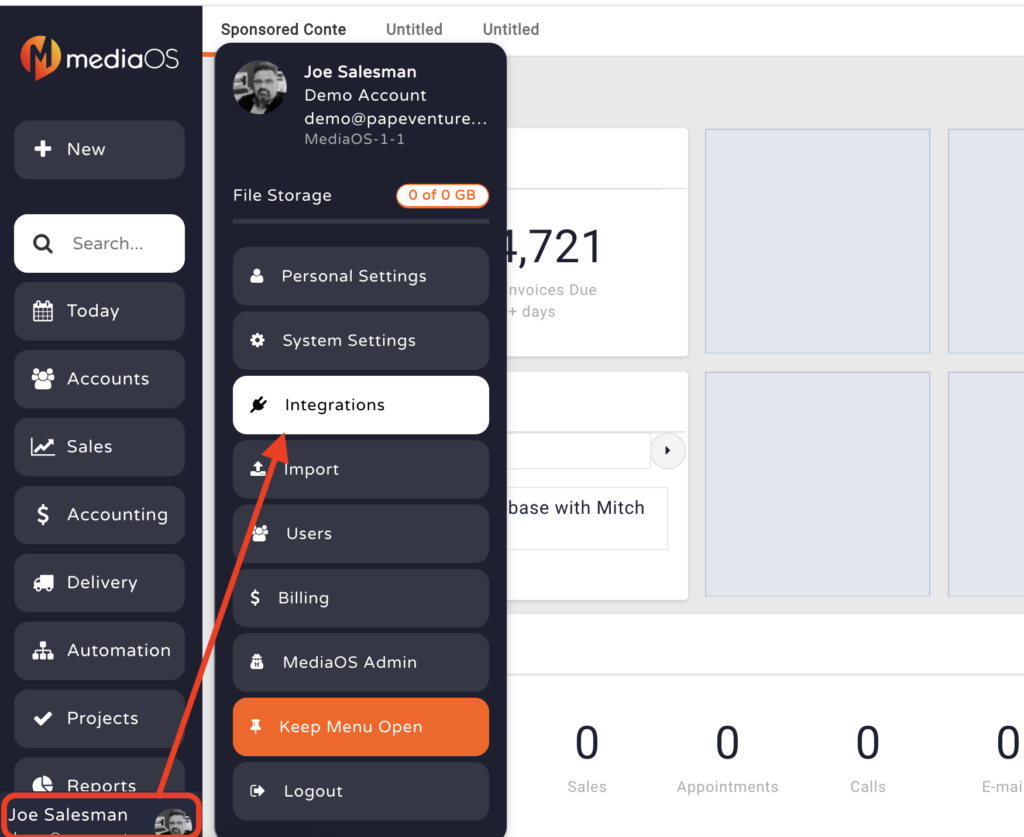
Accessing Integrations
Integrations can be found by clicking Settings > Integrations using your left-hand navigation menu.
Payment Processor Integrations
MediaOS offers two payment processors; Authorize.net and Stripe. A few things to note:
- Please note that all transactions are processed solely through the payment processor of your choice. MediaOS has no visibility of transaction errors or system issues.
- An account must be established at Authorize.net or Stripe prior to integration.
- The reason we offer both of these options is that Authorize.net will allow you to take ACH payments and credit card payments, whereas Stripe is strictly for credit cards.
- Integrating payment processors is not required in MediaOS. It simply allows you to take payments through the system.
Authorize.net Integration
Integrate Authorize.net from the Integrations window, click the Configure button next to Authorize.net. Here, you will input your API Login ID and API Transaction Key. This will complete the integration process. (Click the 'How to find Authorize.net API Keys' link for assistance in locating these keys.)
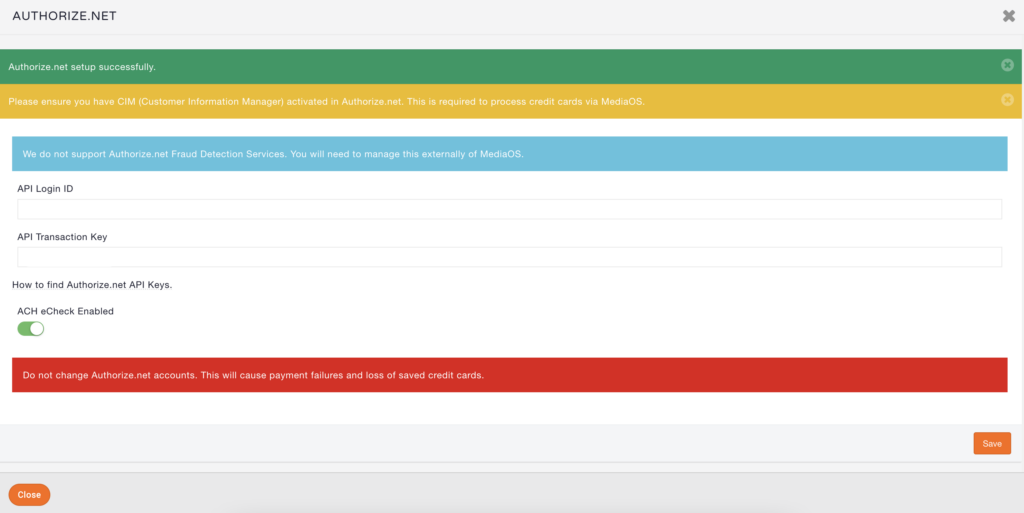
****NEVER change Authorize.net accounts. This will cause payment failures and loss of saved credit cards. MediaOS is not responsible for any issues caused by changing Authorize.net accounts.*****
We do not support Authorize.net Fraud Detection Services. You will need to manage this externally of MediaOS.
Stripe Integration
From the Integrations window, click the Configure button next to Stripe. Then, input your Publishable Key and Secret Key. (Click the 'How to find Stripe API Keys' link for assistance in locating these keys).

Digital Ad Management Integration
MediaOS offers digital ad management through your established Broadstreet Ads and Google Ad Manager account.
To Integrate BroadStreet
From the Integrations window, click the Configure button next to Broadstreet Ads. Input your Access Token. You will find and enter your Broadstreet Access Token and Save. You will need to configure your products. You can choose either CPM or Time products.

Google Ad Manager Integration
From the Integrations window, click the Configure button next to Google Ad Manager. Next click Connect and authenticate your account.
Now input your Network Code from your DFP Network. This number is found in the URL when logged into your DFP account. For example, in the URL https://www.google.com/dfp/2032576#delivery, your network code is 2032576.

Use the Designated Network Users drop-down menus to designate who the sales will be created under when MediaOS talks to Google DFP. You will need to set up your products. Please reach out to support live chat with questions.
Email Integration
Connect your existing email to MediaOS. The steps for configuring this integration are the same for all clients except for Google G Suite. Follow these instructions PRIOR to integration if you use GSuite: Google GSuite Setup.When you are ready to integrate watch this Demo Video.
Once you are ready to integrate your email, watch this email integration demo video and/or read the written instructions below:
Email Integration Instructions:
- Select your Navigation Panel select Personal Settings and then the Email Accounts tab.
- Next, click the +Email Account button.
- Enter the email address you are connecting then press OK.
- Then, follow the prompts and select "Allow" for the Nylas permissions window. For information on Nylas, visit the Nylas Website.
- After you select "Allow" your email will connect and you will see that your email is connected.
Calendar Integration
You can connect your existing calendar to MediaOS watch below demo video or follow the written instructions.
From the Today tab click the Calendar tab and then click the Connect My Calendar button. Then, follow the prompts and your calendar will be linked. Finally, using the dropdown menu, select your calendar to display in MediaOS.
DocuSign Integration
Please note that MediaOS has a FREE built in electronic signature feature. No integration is needed.
If you prefer DocuSign, you must have a DocuSign account If you don't have an account you can establish one here:DocuSign Website
This allows you to obtain a digital signature on your proposals using the DocuSign capabilities. It's important to note that MediaOS is configured to work with a single DocuSign account which is shared among all users. Users of MediaOS will not need direct access to your DocuSign account.
To integrate DocuSign, click the Configure button next to DocuSign. Next, you will input the following information.
- API Email or API User Name
- API Password
- Enable Counter Signature - If you require a counter-signature, toggle this switch on.
- Counter Signature User - You can choose the MediaOS user who is responsible for counter-signatures.
- Finally click save.

QuickBooks Online Integration
Get the best of both worlds and integrate Quickbooks Online with MediaOS so you can seamlessly manage your books using a two way sync. Accounting has never been easier!
Before you integrate with QBO, be sure your MediaOS account does NOT have any accounting data. Your payments and invoices screen should be completely blank. If you connect with accounting data in MediaOS, it will try to import information into both systems. If you aren’t sure, reach out to our team for help.
To integrate with Quickbooks Online:
- Click on your account at the bottom of the left menu.
- Go to Integrations.
- Scroll down to the QuickBooks integration.
- Click Configure.
- Enter your username and password for your QuickBooks account to finalize your integration.
Tip: Make sure you’re logging in as a master administrator in your QuickBooks account to avoid running into permissions issues.

What to Avoid when Integrating
Because this is a live, two-way integration with QuickBooks, avoid having people working on the same account at the same time in MediaOS and QuickBooks. Otherwise, QuickBooks will read that as an attempted attack and will shut that invoice down and lock down the integration for about 20 minutes.
After Integrating QuickBooks Online
Once you go through the initial connections process, it’s going to ask for some basic mapping materials.
- Click Products on the far left menu.
- Add each of your products by clicking + Product or if you already have created your products, select Manage then Edit to map your products to QBO.
- Tip: Every product needs to be mapped here and inside of QuickBooks. (See article here.) Basically, this is you telling QuickBooks that when this item comes over, this is the item we want to map it as.
Common QuickBooks Online integration Settings
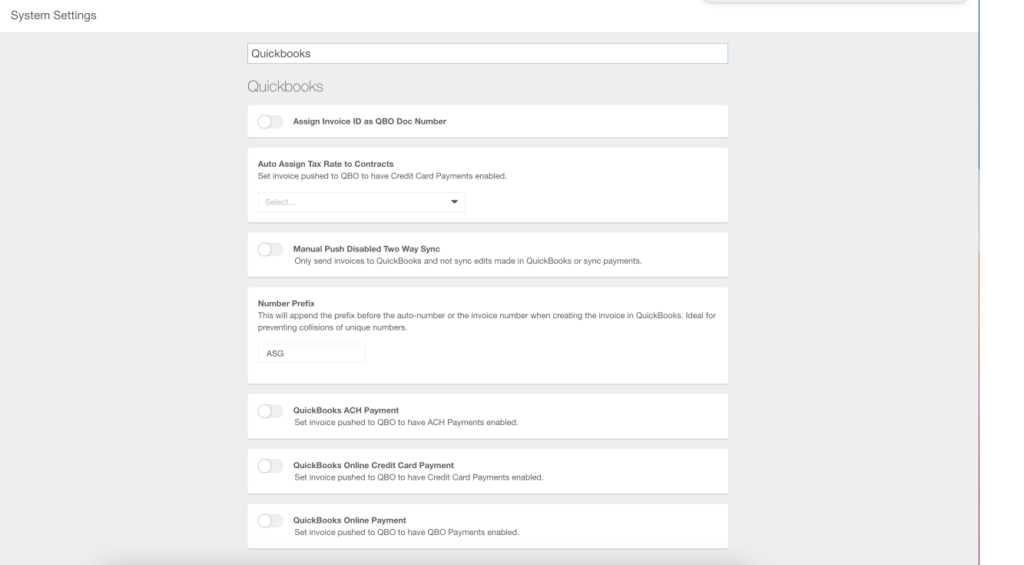
Learn about Quickbooks Online integration settings. To find these settings, follow the steps below:
- Click on your account at the bottom of the far left menu.
- Click System Settings.
- Click General settings.
- In the search bar, type “QuickBooks.”
- Assign Invoice ID as QBO (QuickBooks Online) doc number — This pulls in MediaOS invoice numbers into QuickBooks online so you’ll have the actual MediaOS invoice number in the doc number.
- Manual Push Disabled Two Way Sync — This turns off that two-way sync and makes it so that you have to manually send over invoices to QuickBooks Online. Turning this off is not recommended unless you have extenuating circumstances. If you think that is the case, please reach out to our support team so we can help you further.
- Number Prefix — This sets a prefix before the invoice number. You don’t want your MediaOS invoice numbers and your QuickBooks Online invoice numbers to entirely match, or they will read as a duplicate and the invoices won’t sync. This feature places a prefix on the invoice number when it’s created in QuickBooks. Many customers use the prefix MediaOS or 00- to distinguish these as coming from MediaOS. Example: MediaOS-136.